 |
Matronics Email Lists
Web Forum Interface to the Matronics Email Lists
|
| View previous topic :: View next topic |
| Author |
Message |
philperry9
Joined: 23 Nov 2011
Posts: 381
|
 Posted: Sat Feb 06, 2016 6:37 pm Post subject: Control Stick Slop - Bushings Posted: Sat Feb 06, 2016 6:37 pm Post subject: Control Stick Slop - Bushings |
 |
|
I've managed to run into the control stick slop that a handful of other people have reported. Â It looks like the bushing I have is undersized or the bell crank hole is over sized. Â I haven't dug far enough into to determine which it is, but I'm betting it's the welded part (IE: Bell Crank).
I've thought about building a custom bushing, but thought I'd order one more set from Vans and be extremely careful  in prepping it, to remove as much slop as possible before going any further down the path.
Looking on Vans site this evening, I can't find that bushing anywhere for purchase. Â It's labeled as BUSHING 065 x .375 x 2.313.
Have any of you successfully ordered as 2nd set from Vans? Just wondering it it could be hiding under a different stock number.
Thanks
Phil
| | - The Matronics RV10-List Email Forum - | | | Use the List Feature Navigator to browse the many List utilities available such as the Email Subscriptions page, Archive Search & Download, 7-Day Browse, Chat, FAQ, Photoshare, and much more:
http://www.matronics.com/Navigator?RV10-List |
|
|
|
| Back to top |
|
 |
rv10(at)texasrv10.com
Guest
|
| Posted: Sun Feb 07, 2016 3:15 am Post subject: Control Stick Slop - Bushings |
|
|
Thick/thin washer for the slop can help. A pain to insert but may work for your case.
Gaylon Koenning
| Quote: | On Feb 6, 2016, at 20:33, Phillip Perry <philperry9(at)gmail.com> wrote:
I've managed to run into the control stick slop that a handful of other people have reported.   It looks like the bushing I have is undersized or the bell crank hole is over sized.   I haven't dug far enough into to determine which it is, but I'm betting it's the welded part (IE: Bell Crank).


I've thought about building a custom bushing, but thought I'd order one more set from Vans and be extremely careful  in prepping it, to remove as much slop as possible before going any further down the path.

Looking on Vans site this evening, I can't find that bushing anywhere for purchase.   It's labeled as BUSHING 065 x .375 x 2.313.

Have any of you successfully ordered as 2nd set from Vans?  Just wondering it it could be hiding under a different stock number.

Thanks

Phil
|
| | - The Matronics RV10-List Email Forum - | | | Use the List Feature Navigator to browse the many List utilities available such as the Email Subscriptions page, Archive Search & Download, 7-Day Browse, Chat, FAQ, Photoshare, and much more:
http://www.matronics.com/Navigator?RV10-List |
|
|
|
| Back to top |
|
|
jesse(at)saintaviation.co
Guest
|
| Posted: Sun Feb 07, 2016 5:45 am Post subject: Control Stick Slop - Bushings |
|
|
Are you talking about the OD of the bushing being undersized? I have seen that before, although usually stick slop is because the bushing is too long and the stick base can slide forward/back on the bushing. In this case, just shorten the busing. If it's the bushing OD, then the only option is to get a bigger OD on the bushing or a new stick base and hope it fits tighter.
In use, you don't really notice it in flight in my experience, although any excess movement will cause wear in the long run.
Jesse Saint
Saint Aviation, Inc.
352-427-0285
jesse(at)saintaviation.com
Sent from my iPad
| Quote: | On Feb 7, 2016, at 6:12 AM, RV10(at)TEXASRV10.COM <rv10(at)texasrv10.com> wrote:
Thick/thin washer for the slop can help. A pain to insert but may work for your case.
Gaylon Koenning
> On Feb 6, 2016, at 20:33, Phillip Perry <philperry9(at)gmail.com> wrote:
>
> I've managed to run into the control stick slop that a handful of other people have reported. It looks like the bushing I have is undersized or the bell crank hole is over sized. I haven't dug far enough into to determine which it is, but I'm betting it's the welded part (IE: Bell Crank).
>
> I've thought about building a custom bushing, but thought I'd order one more set from Vans and be extremely careful in prepping it, to remove as much slop as possible before going any further down the path.
>
> Looking on Vans site this evening, I can't find that bushing anywhere for purchase. It's labeled as BUSHING 065 x .375 x 2.313.
>
> Have any of you successfully ordered as 2nd set from Vans? Just wondering it it could be hiding under a different stock number.
>
> Thanks
> Phil
|
| | - The Matronics RV10-List Email Forum - | | | Use the List Feature Navigator to browse the many List utilities available such as the Email Subscriptions page, Archive Search & Download, 7-Day Browse, Chat, FAQ, Photoshare, and much more:
http://www.matronics.com/Navigator?RV10-List |
|
|
|
| Back to top |
|
|
philperry9
Joined: 23 Nov 2011
Posts: 381
|
| Posted: Sun Feb 07, 2016 6:00 am Post subject: Control Stick Slop - Bushings |
|
|
Yeah, I think its the gap between the OD of the bushing and the ID of the control stick base Jesse. Â Â
I can take the stick and not just rock it forward and aft, but I can actually pick the stick up (vertically) and set it back down. So the slop is somewhere on the inside of the control stick base.
I'll have to either build a custom bushing for my bases with a local machine shop, or buy new parts. For simplicities sake, I'm leaning toward buying new parts and that's why I'd like to buy replacement bushings only at this point.  The cost to replacement bases is really high compared to a few bucks for a bushing.  So I'll just roll the dice with the bushing if I can find the replacement part number on Vans site.  I might have to give them a call on Monday because I can't find it anywhere on the site.
Phil
On Sun, Feb 7, 2016 at 7:41 AM, Jesse Saint <jesse(at)saintaviation.com (jesse(at)saintaviation.com)> wrote:
| Quote: | --> RV10-List message posted by: Jesse Saint <jesse(at)saintaviation.com (jesse(at)saintaviation.com)>
Are you talking about the OD of the bushing being undersized? I have seen that before, although usually stick slop is because the bushing is too long and the stick base can slide forward/back on the bushing. In this case, just shorten the busing. If it's the bushing OD, then the only option is to get a bigger OD on the bushing or a new stick base and hope it fits tighter.
In use, you don't really notice it in flight in my experience, although any excess movement will cause wear in the long run.
Jesse Saint
Saint Aviation, Inc.
[url=tel:352-427-0285]352-427-0285[/url]
jesse(at)saintaviation.com (jesse(at)saintaviation.com)
Sent from my iPad
> On Feb 7, 2016, at 6:12 AM, RV10(at)TEXASRV10.COM (RV10(at)TEXASRV10.COM) <rv10(at)texasrv10.com (rv10(at)texasrv10.com)> wrote:
>
> --> RV10-List message posted by: "RV10(at)TEXASRV10.COM (RV10(at)TEXASRV10.COM)" <rv10(at)texasrv10.com (rv10(at)texasrv10.com)>
>
> Thick/thin washer for the slop can help. A pain to insert but may work for your case.
>
> Gaylon Koenning
>
>
>> On Feb 6, 2016, at 20:33, Phillip Perry <philperry9(at)gmail.com (philperry9(at)gmail.com)> wrote:
>>
>> I've managed to run into the control stick slop that a handful of other people have reported.  It looks like the bushing I have is undersized or the bell crank hole is over sized.  I haven't dug far enough into to determine which it is, but I'm betting it's the welded part (IE: Bell Crank).
>>
>> I've thought about building a custom bushing, but thought I'd order one more set from Vans and be extremely careful in prepping it, to remove as much slop as possible before going any further down the path.
>>
>> Looking on Vans site this evening, I can't find that bushing anywhere for purchase.  It's labeled as BUSHING 065 x .375 x 2.313.
>>
>> Have any of you successfully ordered as 2nd set from Vans? Just wondering it it could be hiding under a different stock number.
>>
>> Thanks
>> Phil
>
>
>
>
>
===========
br> fts!)
r> > w.buildersbooks.com" rel="noreferrer" target="_blank">www.buildersbooks.com
rel="noreferrer" target="_blank">http://www.matronics.com/contribution
     -Matt Dralle, List Admin.
===========
-List" rel="noreferrer" target="_blank">http://www.matronics.com/Navigator?RV10-List
===========
FORUMS -
eferrer" target="_blank">http://forums.matronics.com
===========
b Site -
     -Matt Dralle, List Admin.
rel="noreferrer" target="_blank">http://www.matronics.com/contribution
===========
|
| | - The Matronics RV10-List Email Forum - | | | Use the List Feature Navigator to browse the many List utilities available such as the Email Subscriptions page, Archive Search & Download, 7-Day Browse, Chat, FAQ, Photoshare, and much more:
http://www.matronics.com/Navigator?RV10-List |
|
|
|
| Back to top |
|
|
kboatright1(at)comcast.ne
Guest
|
| Posted: Sun Feb 07, 2016 6:14 am Post subject: Control Stick Slop - Bushings |
|
|
Measure your bushing and ask Vanâs what size it is supposed to be. No sense in buying (and shipping) more bushings unless the bushing is the problem.
From: Phillip Perry (philperry9(at)gmail.com)
Sent: Sunday, February 07, 2016 8:56 AM
To: rv10-list(at)matronics.com (rv10-list(at)matronics.com)
Subject: Re: Control Stick Slop - Bushings
Yeah, I think its the gap between the OD of the bushing and the ID of the control stick base Jesse.
I can take the stick and not just rock it forward and aft, but I can actually pick the stick up (vertically) and set it back down. So the slop is somewhere on the inside of the control stick base.
I'll have to either build a custom bushing for my bases with a local machine shop, or buy new parts. For simplicities sake, I'm leaning toward buying new parts and that's why I'd like to buy replacement bushings only at this point. The cost to replacement bases is really high compared to a few bucks for a bushing. So I'll just roll the dice with the bushing if I can find the replacement part number on Vans site. I might have to give them a call on Monday because I can't find it anywhere on the site.
Phil
On Sun, Feb 7, 2016 at 7:41 AM, Jesse Saint <jesse(at)saintaviation.com (jesse(at)saintaviation.com)> wrote:
| Quote: | --> RV10-List message posted by: Jesse Saint <jesse(at)saintaviation.com (jesse(at)saintaviation.com)>
Are you talking about the OD of the bushing being undersized? I have seen that before, although usually stick slop is because the bushing is too long and the stick base can slide forward/back on the bushing. In this case, just shorten the busing. If it's the bushing OD, then the only option is to get a bigger OD on the bushing or a new stick base and hope it fits tighter.
In use, you don't really notice it in flight in my experience, although any excess movement will cause wear in the long run.
Jesse Saint
Saint Aviation, Inc.
[url=tel:352-427-0285]352-427-0285[/url]
jesse(at)saintaviation.com (jesse(at)saintaviation.com)
Sent from my iPad
| Quote: | On Feb 7, 2016, at 6:12 AM, RV10(at)TEXASRV10.COM (RV10(at)TEXASRV10.COM) <rv10(at)texasrv10.com (rv10(at)texasrv10.com)> wrote:
--> RV10-List message posted by: "RV10(at)TEXASRV10.COM (RV10(at)TEXASRV10.COM)" <rv10(at)texasrv10.com (rv10(at)texasrv10.com)>
Thick/thin washer for the slop can help. A pain to insert but may work for your case.
Gaylon Koenning
> On Feb 6, 2016, at 20:33, Phillip Perry <philperry9(at)gmail.com (philperry9(at)gmail.com)> wrote:
>
> I've managed to run into the control stick slop that a handful of other people have reported. It looks like the bushing I have is undersized or the bell crank hole is over sized. I haven't dug far enough into to determine which it is, but I'm betting it's the welded part (IE: Bell Crank).
>
> I've thought about building a custom bushing, but thought I'd order one more set from Vans and be extremely careful in prepping it, to remove as much slop as possible before going any further down the path.
>
> Looking on Vans site this evening, I can't find that bushing anywhere for purchase. It's labeled as BUSHING 065 x .375 x 2.313.
>
> Have any of you successfully ordered as 2nd set from Vans? Just wondering it it could be hiding under a different stock number.
>
> Thanks
> Phil
|
===========
br> fts!)
r> > w.buildersbooks.com" rel="noreferrer" target="_blank">www.buildersbooks.com
rel="noreferrer" target="_blank">http://www.matronics.com/contribution
-Matt Dralle, List Admin.
===========
-List" rel="noreferrer" target="_blank">http://www.matronics.com/Navigator?RV10-List
===========
FORUMS -
eferrer" target="_blank">http://forums.matronics.com
===========
b Site -
-Matt Dralle, List Admin.
rel="noreferrer" target="_blank">http://www.matronics.com/contribution
===========
|
| | - The Matronics RV10-List Email Forum - | | | Use the List Feature Navigator to browse the many List utilities available such as the Email Subscriptions page, Archive Search & Download, 7-Day Browse, Chat, FAQ, Photoshare, and much more:
http://www.matronics.com/Navigator?RV10-List |
|
|
|
| Back to top |
|
|
Lew Gallagher
Joined: 04 Jan 2008
Posts: 402
Location: Greenville , SC
|
| Posted: Sun Feb 07, 2016 6:33 am Post subject: Control Stick Slop - Bushings |
|
|
Hey Phil,
Awhile back I needed a replacement bushing for a tool that was 40 years old and of course no longer available. I found that local machine shops have access to every imaginable id/od bushings, steel, brass, oil impregnated ... you name it. I got exactly what I needed for $2, tool works like new. IF that is your problem, get out your calipers, contact your local machine shops.
Later, â Lew
| | - The Matronics RV10-List Email Forum - | | | Use the List Feature Navigator to browse the many List utilities available such as the Email Subscriptions page, Archive Search & Download, 7-Day Browse, Chat, FAQ, Photoshare, and much more:
http://www.matronics.com/Navigator?RV10-List |
|
_________________
non-pilot
crazy about building
NOW OFICIALLY BUILDER #40549
Fly off completed ! |
|
| Back to top |
|
|
Kellym
Joined: 10 Jan 2006
Posts: 1700
Location: Sun Lakes AZ
|
| Posted: Sun Feb 07, 2016 6:33 am Post subject: Control Stick Slop - Bushings |
|
|
The dimensions are right in the plans, as the part number.
Bushing 065 x .375 x 2.313
Should be able to disconnect everything from the stick base, so that it
is only pivoting on the bushing, and then examine where the slop is. The
plans note that you may need to ream the bushing for AN-4 bolt. Best to
start with an undersize reamer. Note the tolerance for an AN-4 is as
small as 0.246. Perhaps a different, larger tolerance bolt might be what
is need. Range is .246 to .249.
Perhaps you could have done too much deburring on the bushing or ID of
stick base??
Steps 1 and 2 on page 39-8 are the key.
I know that when something doesn't seem right to me, better than 50%
chance I am misreading the plans or not seeing/understanding something.
On 2/7/2016 7:11 AM, kboatright1(at)comcast.net wrote:
| Quote: | Measure your bushing and ask Vanâs what size it is supposed to be. No
sense in buying (and shipping) more bushings unless the bushing is the
problem.
*From:* Phillip Perry <mailto:philperry9(at)gmail.com>
*Sent:* Sunday, February 07, 2016 8:56 AM
*To:* rv10-list(at)matronics.com <mailto:rv10-list(at)matronics.com>
*Subject:* Re: Control Stick Slop - Bushings
Yeah, I think its the gap between the OD of the bushing and the ID of
the control stick base Jesse.
I can take the stick and not just rock it forward and aft, but I can
actually pick the stick up (vertically) and set it back down. So the
slop is somewhere on the inside of the control stick base.
I'll have to either build a custom bushing for my bases with a local
machine shop, or buy new parts. For simplicities sake, I'm leaning
toward buying new parts and that's why I'd like to buy replacement
bushings only at this point. The cost to replacement bases is really
high compared to a few bucks for a bushing. So I'll just roll the dice
with the bushing if I can find the replacement part number on Vans
site. I might have to give them a call on Monday because I can't find
it anywhere on the site.
Phil
On Sun, Feb 7, 2016 at 7:41 AM, Jesse Saint <jesse(at)saintaviation.com
<mailto:jesse(at)saintaviation.com>> wrote:
<jesse(at)saintaviation.com <mailto:jesse(at)saintaviation.com>>
Are you talking about the OD of the bushing being undersized? I have
seen that before, although usually stick slop is because the bushing
is too long and the stick base can slide forward/back on the
bushing. In this case, just shorten the busing. If it's the bushing
OD, then the only option is to get a bigger OD on the bushing or a
new stick base and hope it fits tighter.
In use, you don't really notice it in flight in my experience,
although any excess movement will cause wear in the long run.
Jesse Saint
Saint Aviation, Inc.
352-427-0285 <tel:352-427-0285>
jesse(at)saintaviation.com <mailto:jesse(at)saintaviation.com>
Sent from my iPad
> On Feb 7, 2016, at 6:12 AM, RV10(at)TEXASRV10.COM
<mailto:RV10(at)TEXASRV10.COM> <rv10(at)texasrv10.com
<mailto:rv10(at)texasrv10.com>> wrote:
>
>
<mailto:RV10(at)TEXASRV10.COM>" <rv10(at)texasrv10.com
<mailto:rv10(at)texasrv10.com>>
>
> Thick/thin washer for the slop can help. A pain to insert but may
work for your case.
>
> Gaylon Koenning
>
>
>> On Feb 6, 2016, at 20:33, Phillip Perry <philperry9(at)gmail.com
<mailto:philperry9(at)gmail.com>> wrote:
>>
>> I've managed to run into the control stick slop that a handful
of other people have reported. It looks like the bushing I have is
undersized or the bell crank hole is over sized. I haven't dug far
enough into to determine which it is, but I'm betting it's the
welded part (IE: Bell Crank).
>>
>> I've thought about building a custom bushing, but thought I'd
order one more set from Vans and be extremely careful in prepping
it, to remove as much slop as possible before going any further down
the path.
>>
>> Looking on Vans site this evening, I can't find that bushing
anywhere for purchase. It's labeled as BUSHING 065 x .375 x 2.313.
>>
>> Have any of you successfully ordered as 2nd set from Vans? Just
wondering it it could be hiding under a different stock number.
>>
>> Thanks
>> Phil
>
>
>
>
>
===========
br> fts!)
r> > w.buildersbooks.com" rel="noreferrer"
target="_blank">www.buildersbooks.com
rel="noreferrer" target="_blank">http://www.matronics.com/contribution
-Matt Dralle, List Admin.
===========
-List" rel="noreferrer"
target="_blank">http://www.matronics.com/Navigator?RV10-List
===========
FORUMS -
eferrer" target="_blank">http://forums.matronics.com
===========
b Site -
-Matt Dralle, List Admin.
rel="noreferrer" target="_blank">http://www.matronics.com/contribution
===========
|
| | - The Matronics RV10-List Email Forum - | | | Use the List Feature Navigator to browse the many List utilities available such as the Email Subscriptions page, Archive Search & Download, 7-Day Browse, Chat, FAQ, Photoshare, and much more:
http://www.matronics.com/Navigator?RV10-List |
|
_________________
Kelly McMullen
A&P/IA, EAA Tech Counselor # 5286
KCHD |
|
| Back to top |
|
|
Strasnuts
Joined: 10 Feb 2009
Posts: 502
Location: Salt Lake City, UT
|
| Posted: Sun Feb 07, 2016 8:18 am Post subject: Re: Control Stick Slop - Bushings |
|
|
I found the slop in mine too. I threw away the original bushings and made some out of Delrin. They are silky smooth now with no play.
| | - The Matronics RV10-List Email Forum - | | | Use the List Feature Navigator to browse the many List utilities available such as the Email Subscriptions page, Archive Search & Download, 7-Day Browse, Chat, FAQ, Photoshare, and much more:
http://www.matronics.com/Navigator?RV10-List |
|
_________________
40936
RV-10 SB N801VR Flying
780 Hours
SuperSTOL 60 hours |
|
| Back to top |
|
|
philperry9
Joined: 23 Nov 2011
Posts: 381
|
| Posted: Sun Feb 07, 2016 9:00 am Post subject: Control Stick Slop - Bushings |
|
|
Yeah, I knew you had switched them over. I think they were still brass when we flew in Salt Lake because I remember you mentioning it.  Yours were pretty similar to how mine are.
Did you machine them with the lathe? I'm wondering what the chances are of me managing to machine some on a drill press.  I might be able to find someone with a lathe here at KPWG, but curious to hear how you built them.
Phil
On Sun, Feb 7, 2016 at 10:18 AM, Strasnuts <sean(at)planearound.com (sean(at)planearound.com)> wrote:
| Quote: | --> RV10-List message posted by: "Strasnuts" <sean(at)planearound.com (sean(at)planearound.com)>
I found the slop in mine too. I threw away the original bushings and made some out of Delrin. They are silky smooth now with no play.
--------
40936
RV-10 SB N801VR Flying
530 hours
Read this topic online here:
http://forums.matronics.com/viewtopic.php?p=452663#452663
===========
br> fts!)
r> > w.buildersbooks.com" rel="noreferrer" target="_blank">www.buildersbooks.com
rel="noreferrer" target="_blank">http://www.matronics.com/contribution
     -Matt Dralle, List Admin.
===========
-List" rel="noreferrer" target="_blank">http://www.matronics.com/Navigator?RV10-List
===========
FORUMS -
eferrer" target="_blank">http://forums.matronics.com
===========
b Site -
     -Matt Dralle, List Admin.
rel="noreferrer" target="_blank">http://www.matronics.com/contribution
===========
|
| | - The Matronics RV10-List Email Forum - | | | Use the List Feature Navigator to browse the many List utilities available such as the Email Subscriptions page, Archive Search & Download, 7-Day Browse, Chat, FAQ, Photoshare, and much more:
http://www.matronics.com/Navigator?RV10-List |
|
|
|
| Back to top |
|
|
Strasnuts
Joined: 10 Feb 2009
Posts: 502
Location: Salt Lake City, UT
|
| Posted: Mon Feb 08, 2016 1:09 pm Post subject: Re: Control Stick Slop - Bushings |
|
|
Phil,


I made mine on a lathe.  I reamed my tubing first since Vans' welds make the tubing out of round.  I have adjustable reamers so I reamed just enough to make it round.  I measured the ID and made the Delrin bushing slide in.  The bushing is barely longer and when tightened down it would swell and fill any slop.  The Delrin works  great.  The more you tighten the bolt the tighter the bushing fit.  There was a good spot where there was no slop and the friction was smooth and easy.  If I tighten it more the friction would be too much.
| | - The Matronics RV10-List Email Forum - | | | Use the List Feature Navigator to browse the many List utilities available such as the Email Subscriptions page, Archive Search & Download, 7-Day Browse, Chat, FAQ, Photoshare, and much more:
http://www.matronics.com/Navigator?RV10-List |
|
_________________
40936
RV-10 SB N801VR Flying
780 Hours
SuperSTOL 60 hours |
|
| Back to top |
|
|
rvdave
Joined: 24 Jan 2009
Posts: 191
|
| Posted: Tue Feb 09, 2016 9:04 pm Post subject: Re: Control Stick Slop - Bushings |
|
|
Any chance of making any more of the delrin bushings?
| | - The Matronics RV10-List Email Forum - | | | Use the List Feature Navigator to browse the many List utilities available such as the Email Subscriptions page, Archive Search & Download, 7-Day Browse, Chat, FAQ, Photoshare, and much more:
http://www.matronics.com/Navigator?RV10-List |
|
_________________
Dave Ford
Cadillac, MI |
|
| Back to top |
|
|
Strasnuts
Joined: 10 Feb 2009
Posts: 502
Location: Salt Lake City, UT
|
| Posted: Sat Feb 13, 2016 11:36 am Post subject: Re: Control Stick Slop - Bushings |
|
|
Dave, I am reluctant to make these for control surfaces for other builders. I think each one would have to be specifically made for each aircraft after reaming the hole.
| | - The Matronics RV10-List Email Forum - | | | Use the List Feature Navigator to browse the many List utilities available such as the Email Subscriptions page, Archive Search & Download, 7-Day Browse, Chat, FAQ, Photoshare, and much more:
http://www.matronics.com/Navigator?RV10-List |
|
_________________
40936
RV-10 SB N801VR Flying
780 Hours
SuperSTOL 60 hours |
|
| Back to top |
|
|
rvdave
Joined: 24 Jan 2009
Posts: 191
|
| Posted: Sat Feb 13, 2016 3:29 pm Post subject: Re: Control Stick Slop - Bushings |
|
|
I thought about that and wondered about the possibility of sanding them down a little bit if oversized since the delrin does compress a little.
| | - The Matronics RV10-List Email Forum - | | | Use the List Feature Navigator to browse the many List utilities available such as the Email Subscriptions page, Archive Search & Download, 7-Day Browse, Chat, FAQ, Photoshare, and much more:
http://www.matronics.com/Navigator?RV10-List |
|
_________________
Dave Ford
Cadillac, MI |
|
| Back to top |
|
|
philperry9
Joined: 23 Nov 2011
Posts: 381
|
| Posted: Sat Feb 13, 2016 6:12 pm Post subject: Control Stick Slop - Bushings |
|
|
I have some delrin coming and I'm planning on making them for my sloppiness.
I'm planning on reaming the bell crank to 3/8 and then seeing how well a 3/8 delrin rod fits. If it's still too loose, I have a 7/16 rod coming in the mail too. I'll be able turn it down to fit or possibly it would fit without any working (though I doubt it).
Once I find the rod that fits best, then I'll ream the center on a friends lathe. I have a 3/16" reamer that will work, but I plan on using another reamer that's 11/64 (1/64 under sized) to see how it fits first. Then if it's too tight I'll open it up to the full 3/16 with the other reamer.
I'll probably have a report on how well it works in the next 2 weeks or possibly late next week.
Phil
Sent from my iPhone
| Quote: | On Feb 13, 2016, at 5:29 PM, rvdave <rv610dave(at)gmail.com> wrote:
I thought about that and wondered about the possibility of sanding them down a little bit if oversized since the delrin does compress a little.
--------
Dave Ford
RV6 for sale
RV10 building
Cadillac, MI
Read this topic online here:
http://forums.matronics.com/viewtopic.php?p=452802#452802
|
| | - The Matronics RV10-List Email Forum - | | | Use the List Feature Navigator to browse the many List utilities available such as the Email Subscriptions page, Archive Search & Download, 7-Day Browse, Chat, FAQ, Photoshare, and much more:
http://www.matronics.com/Navigator?RV10-List |
|
|
|
| Back to top |
|
|
philperry9
Joined: 23 Nov 2011
Posts: 381
|
| Posted: Sat Feb 13, 2016 6:25 pm Post subject: Control Stick Slop - Bushings |
|
|
Sorry typo.
15/64. Not 11/64...
Sent from my iPhone
| Quote: | On Feb 13, 2016, at 8:08 PM, Phillip Perry <philperry9(at)gmail.com> wrote:
I have some delrin coming and I'm planning on making them for my sloppiness.
I'm planning on reaming the bell crank to 3/8 and then seeing how well a 3/8 delrin rod fits. If it's still too loose, I have a 7/16 rod coming in the mail too. I'll be able turn it down to fit or possibly it would fit without any working (though I doubt it).
Once I find the rod that fits best, then I'll ream the center on a friends lathe. I have a 3/16" reamer that will work, but I plan on using another reamer that's 11/64 (1/64 under sized) to see how it fits first. Then if it's too tight I'll open it up to the full 3/16 with the other reamer.
I'll probably have a report on how well it works in the next 2 weeks or possibly late next week.
Phil
Sent from my iPhone
> On Feb 13, 2016, at 5:29 PM, rvdave <rv610dave(at)gmail.com> wrote:
>
>
>
> I thought about that and wondered about the possibility of sanding them down a little bit if oversized since the delrin does compress a little.
>
> --------
> Dave Ford
> RV6 for sale
> RV10 building
> Cadillac, MI
>
>
>
>
> Read this topic online here:
>
> http://forums.matronics.com/viewtopic.php?p=452802#452802
>
>
>
>
>
>
>
>
>
>
|
| | - The Matronics RV10-List Email Forum - | | | Use the List Feature Navigator to browse the many List utilities available such as the Email Subscriptions page, Archive Search & Download, 7-Day Browse, Chat, FAQ, Photoshare, and much more:
http://www.matronics.com/Navigator?RV10-List |
|
|
|
| Back to top |
|
|
philperry9
Joined: 23 Nov 2011
Posts: 381
|
| Posted: Wed Feb 24, 2016 9:56 pm Post subject: Control Stick Slop - Bushings |
|
|
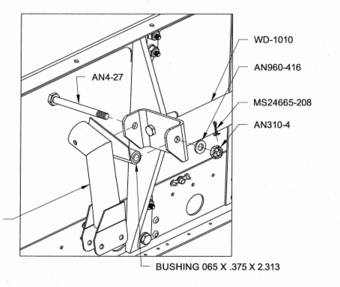
I thought I'd follow up on the control stick slop issue that I had in my system since I promised a post-bushing report. I had some major play in my control sticks and ended up following Sean's advice and replaced the brass bushings with delrin.  I attached a couple of photos of the plans to help with the explanation.
After discovering the slop, I ordered delrin rods from Aircraft Spruce. I ordered 3/8" hoping they'd be a drop-in replacement for a tight fit without any machining and 7/16" in case I had to machine them down to something closer to proper size for a good fit in the control stick base. Each stick was about $3 for a 3 ft stick, so there was no harm in ordering both.
I pulled the sticks, stick bases, and control column out of the plane and put it on the bench. On disassembly, I found that there was play between the brass bushing and the welded part of the stick bases.  I tried the 3/8" rod to see how well it fit and it dropped straight through unrestricted. The inside of the welded stick bases were way more than the spec'd 3/8". That was one part of the problem. The other part of the problem was the slop on the inside of the bushing between the bushing and the 1/4" bolt. That slop was worse than the welded part. Additionally I found one more location for slop and that was the ability to slide the stick forward and aft on the 1/4" bolt between the stick bases and the control column that the stick bases mount to.
The first order of business was to get new bushings machined out. Â Since the stick bases were more than 3/8" I used the 7/16" delrin rod and turned it down on a lathe that another guy on the airport had. Â It was turned down until it was a thumb-press fit into the stick bases.
The next step was to drill and ream the hole for the 1/4" bolt down the center.  I initially tried to ream it to 15/64 (1/64" undersized for the 1/4" bolt) to get a snug fit in the event that the bolt was on the skinny side of the tolerance. That didn't work out and I ultimately had to open it to a full 1/4" to get the bolt to slide through.
Back to the work bench where I installed the new bushings. The fit was free of any play between that bases and the bushing and between the bushing and the bolt. Â
The final task was to eliminate the sliding motion of the sticks forward and aft on the 1/4" bolt between the stick bases and the control column. Â This was a pretty simple task of inserting AN960-416 and 416L washers to shim as much of the gaps away as possible. Â Obviously you can't get all of the gap out, so you have to take care of the last little bit by tightening the nut and pulling the control column in tighter on the stick bases.
I tuned this part of the system like you would a wheel bearing. I rotated the sticks left and right while tightening the nut one flat at a time. Once I began to feel tension on the sticks, I stopped and backed off one flat where I then dropped in the cotter key in to lock it into position.
The system linkages are tight (meaning no play) and very smooth (minus the drag of the TruTrak servos). You can work the left and right sticks in opposition directions, like driving a bull dozer, and you won't find any play.  You can go all the way out to the control surface and hold it tight while wiggling the stick and not find any play between the control surface and stick. I'm very happy with the outcome.
This wasn't a terrible change to make and if you have the seats out and access to a lathe, you could probably do it in less than a day. Â You certainly could do it on a drill press with some forethought. creative jigs, patience, and a few sacrificed pieces of delrin while you traverse the learning curve, but the lathe is certainly the fastest and easiest.
I'd do it again... Â Glad it turned out the way it did.
Phil
[img]cid:ii_15316f4daba31948[/img]
[img]cid:ii_15316f5712a8780a[/img]
On Sat, Feb 13, 2016 at 8:08 PM, Phillip Perry <philperry9(at)gmail.com (philperry9(at)gmail.com)> wrote:
| Quote: | I have some delrin coming and I'm planning on making them for my sloppiness.
I'm planning on reaming the bell crank to 3/8 and then seeing how well a 3/8 delrin rod fits.  If it's still too loose, I have a 7/16 rod coming in the mail too. I'll be able turn it down to fit or possibly it would fit without any working (though I doubt it).
Once I find the rod that fits best, then I'll ream the center on a friends lathe. I have a 3/16" reamer that will work, but I plan on using another reamer that's 11/64 (1/64 under sized) to see how it fits first.  Then if it's too tight I'll open it up to the full 3/16 with the other reamer.
I'll probably have a report on how well it works in the next 2 weeks or possibly late next week.
Phil
Sent from my iPhone
> On Feb 13, 2016, at 5:29 PM, rvdave <rv610dave(at)gmail.com (rv610dave(at)gmail.com)> wrote:
>
> --> RV10-List message posted by: "rvdave" <rv610dave(at)gmail.com (rv610dave(at)gmail.com)>
>
> I thought about that and wondered about the possibility of sanding them down a little bit if oversized since the delrin does compress a little.
>
> --------
> Dave Ford
> RV6 for sale
> RV10 building
> Cadillac, MI
>
>
>
>
> Read this topic online here:
>
> http://forums.matronics.com/viewtopic.php?p=452802#452802
>
>
>
>
>
>
>
=============
h --
EE Gifts!)
on
r> ed
://www.buildersbooks.com" rel="noreferrer" target="_blank">www.buildersbooks.com
ion" rel="noreferrer" target="_blank">http://www.matronics.com/contribution
      -Matt Dralle, List Admin.
=============
br> ?RV10-List" rel="noreferrer" target="_blank">http://www.matronics.com/Navigator?RV10-List
=============
S WEB FORUMS -
="noreferrer" target="_blank">http://forums.matronics.com
=============
on Web Site -
      -Matt Dralle, List Admin.
ion" rel="noreferrer" target="_blank">http://www.matronics.com/contribution
=============
>
>
>
|
| | - The Matronics RV10-List Email Forum - | | | Use the List Feature Navigator to browse the many List utilities available such as the Email Subscriptions page, Archive Search & Download, 7-Day Browse, Chat, FAQ, Photoshare, and much more:
http://www.matronics.com/Navigator?RV10-List |
|
| Description: |
|
| Filesize: |
42.48 KB |
| Viewed: |
15418 Time(s) |

|
| Description: |
|
| Filesize: |
51.61 KB |
| Viewed: |
15418 Time(s) |
|
|
|
| Back to top |
|
|
Lew Gallagher
Joined: 04 Jan 2008
Posts: 402
Location: Greenville , SC
|
| Posted: Thu Feb 25, 2016 4:54 am Post subject: Control Stick Slop - Bushings |
|
|
Well done, Phil! Donât ya just love it when you find the correct diagnosis, come up with a solution (with a little help from your friends), and it works. On to the next challenge! I enjoy these threads that lead to happy endings.
Later, â Lew
do not archive
| | - The Matronics RV10-List Email Forum - | | | Use the List Feature Navigator to browse the many List utilities available such as the Email Subscriptions page, Archive Search & Download, 7-Day Browse, Chat, FAQ, Photoshare, and much more:
http://www.matronics.com/Navigator?RV10-List |
|
_________________
non-pilot
crazy about building
NOW OFICIALLY BUILDER #40549
Fly off completed ! |
|
| Back to top |
|
|
flysrv10(at)gmail.com
Guest
|
| Posted: Thu Feb 25, 2016 5:11 am Post subject: Control Stick Slop - Bushings |
|
|
+1.
Rob Kermanj
| Quote: | On Feb 25, 2016, at 7:53 AM, lewgall(at)charter.net (lewgall(at)charter.net) wrote:
Well done, Phil! Donât ya just love it when you find the correct diagnosis, come up with a solution (with a little help from your friends), and it works. On to the next challenge! I enjoy these threads that lead to happy endings.
Later, â Lew
do not archive
|
| | - The Matronics RV10-List Email Forum - | | | Use the List Feature Navigator to browse the many List utilities available such as the Email Subscriptions page, Archive Search & Download, 7-Day Browse, Chat, FAQ, Photoshare, and much more:
http://www.matronics.com/Navigator?RV10-List |
|
|
|
| Back to top |
|
|
carl.froehlich(at)verizon
Guest
|
| Posted: Thu Feb 25, 2016 7:14 am Post subject: Control Stick Slop - Bushings |
|
|
âI tuned this part of the system like you would a wheel bearing. I rotated the sticks left and right while tightening the nut one flat at a time. Once I began to feel tension on the sticks, I stopped and backed off one flat where I then dropped in the cotter key in to lock it into position.â
Perhaps Iâm reading this wrong. I thought the objective was for the bolt to capture the bushing so that there is no relative motion between the bolt and the bushing. All relative motion should be between the outside of the bushing and the weldment (in this case the Control Stick Base Pivot Tube).
I also believe adding a light grease for the bushing to weldment provides for reduced corrosion between the dissimilar metals â obviously not an issue when using delrin but perhaps would help keep dirt out of the bearing surface.
Carl
From: owner-rv10-list-server(at)matronics.com [mailto:owner-rv10-list-server(at)matronics.com] On Behalf Of Phillip Perry
Sent: Thursday, February 25, 2016 12:53 AM
To: rv10-list(at)matronics.com
Subject: Re: Re: Control Stick Slop - Bushings
I thought I'd follow up on the control stick slop issue that I had in my system since I promised a post-bushing report. I had some major play in my control sticks and ended up following Sean's advice and replaced the brass bushings with delrin. I attached a couple of photos of the plans to help with the explanation.
After discovering the slop, I ordered delrin rods from Aircraft Spruce. I ordered 3/8" hoping they'd be a drop-in replacement for a tight fit without any machining and 7/16" in case I had to machine them down to something closer to proper size for a good fit in the control stick base. Each stick was about $3 for a 3 ft stick, so there was no harm in ordering both.
I pulled the sticks, stick bases, and control column out of the plane and put it on the bench. On disassembly, I found that there was play between the brass bushing and the welded part of the stick bases. I tried the 3/8" rod to see how well it fit and it dropped straight through unrestricted. The inside of the welded stick bases were way more than the spec'd 3/8". That was one part of the problem. The other part of the problem was the slop on the inside of the bushing between the bushing and the 1/4" bolt. That slop was worse than the welded part. Additionally I found one more location for slop and that was the ability to slide the stick forward and aft on the 1/4" bolt between the stick bases and the control column that the stick bases mount to.
The first order of business was to get new bushings machined out. Since the stick bases were more than 3/8" I used the 7/16" delrin rod and turned it down on a lathe that another guy on the airport had. It was turned down until it was a thumb-press fit into the stick bases.
The next step was to drill and ream the hole for the 1/4" bolt down the center. I initially tried to ream it to 15/64 (1/64" undersized for the 1/4" bolt) to get a snug fit in the event that the bolt was on the skinny side of the tolerance. That didn't work out and I ultimately had to open it to a full 1/4" to get the bolt to slide through.
Back to the work bench where I installed the new bushings. The fit was free of any play between that bases and the bushing and between the bushing and the bolt.
The final task was to eliminate the sliding motion of the sticks forward and aft on the 1/4" bolt between the stick bases and the control column. This was a pretty simple task of inserting AN960-416 and 416L washers to shim as much of the gaps away as possible. Obviously you can't get all of the gap out, so you have to take care of the last little bit by tightening the nut and pulling the control column in tighter on the stick bases.
I tuned this part of the system like you would a wheel bearing. I rotated the sticks left and right while tightening the nut one flat at a time. Once I began to feel tension on the sticks, I stopped and backed off one flat where I then dropped in the cotter key in to lock it into position.
The system linkages are tight (meaning no play) and very smooth (minus the drag of the TruTrak servos). You can work the left and right sticks in opposition directions, like driving a bull dozer, and you won't find any play. You can go all the way out to the control surface and hold it tight while wiggling the stick and not find any play between the control surface and stick. I'm very happy with the outcome.
This wasn't a terrible change to make and if you have the seats out and access to a lathe, you could probably do it in less than a day. You certainly could do it on a drill press with some forethought. creative jigs, patience, and a few sacrificed pieces of delrin while you traverse the learning curve, but the lathe is certainly the fastest and easiest.
I'd do it again... Glad it turned out the way it did.
Phil
[img]cid:image001.png(at)01D16FB4.18996EC0[/img]
[img]cid:image002.png(at)01D16FB4.18996EC0[/img]
On Sat, Feb 13, 2016 at 8:08 PM, Phillip Perry <philperry9(at)gmail.com (philperry9(at)gmail.com)> wrote:
I have some delrin coming and I'm planning on making them for my sloppiness.
I'm planning on reaming the bell crank to 3/8 and then seeing how well a 3/8 delrin rod fits. If it's still too loose, I have a 7/16 rod coming in the mail too. I'll be able turn it down to fit or possibly it would fit without any working (though I doubt it).
Once I find the rod that fits best, then I'll ream the center on a friends lathe. I have a 3/16" reamer that will work, but I plan on using another reamer that's 11/64 (1/64 under sized) to see how it fits first. Then if it's too tight I'll open it up to the full 3/16 with the other reamer.
I'll probably have a report on how well it works in the next 2 weeks or possibly late next week.
Phil
Sent from my iPhone
h --
EE Gifts!)
on
r> ed
://www.buildersbooks.com" rel="noreferrer" target="_blank">www.buildersbooks.com
ion" rel="noreferrer" target="_blank">http://www.matronics.com/contribution
-Matt Dralle, List Admin.
=============
br> ?RV10-List" rel="noreferrer" target="_blank">http://www.matronics.com/Navigator?RV10-List
=============
S WEB FORUMS -
="noreferrer" target="_blank">http://forums.matronics.com
=============
on Web Site -
-Matt Dralle, List Admin.
ion" rel="noreferrer" target="_blank">http://www.matronics.com/contribution
=============
| | - The Matronics RV10-List Email Forum - | | | Use the List Feature Navigator to browse the many List utilities available such as the Email Subscriptions page, Archive Search & Download, 7-Day Browse, Chat, FAQ, Photoshare, and much more:
http://www.matronics.com/Navigator?RV10-List |
|
| Description: |
|
| Filesize: |
42.48 KB |
| Viewed: |
15415 Time(s) |

|
| Description: |
|
| Filesize: |
51.61 KB |
| Viewed: |
15415 Time(s) |

|
|
|
| Back to top |
|
|
philperry9
Joined: 23 Nov 2011
Posts: 381
|
| Posted: Thu Feb 25, 2016 7:46 am Post subject: Control Stick Slop - Bushings |
|
|
You want the pivot point on the bolt and not the steel welded part. That welded part isn't perfectly round (oblong) from the heat and it's also rough, abrasive, and susceptible to rust - contributing for abrasion and wear.
If you keep the motion on the bolt, you have a perfectly round and smooth pivot point. The nut is pinned so there's no chance of running the nut off.
Phil
Sent from my iPhone
On Feb 25, 2016, at 9:10 AM, Carl Froehlich <carl.froehlich(at)verizon.net (carl.froehlich(at)verizon.net)> wrote:
| Quote: | v\:* {behavior:url(#default#VML);} o\:* {behavior:url(#default#VML);} w\:* {behavior:url(#default#VML);} .shape {behavior:url(#default#VML);} <![endif]--> <![endif]--> <![endif]-->
âI tuned this part of the system like you would a wheel bearing. I rotated the sticks left and right while tightening the nut one flat at a time. Once I began to feel tension on the sticks, I stopped and backed off one flat where I then dropped in the cotter key in to lock it into position.â
Perhaps Iâm reading this wrong. I thought the objective was for the bolt to capture the bushing so that there is no relative motion between the bolt and the bushing. All relative motion should be between the outside of the bushing and the weldment (in this case the Control Stick Base Pivot Tube).
I also believe adding a light grease for the bushing to weldment provides for reduced corrosion between the dissimilar metals â obviously not an issue when using delrin but perhaps would help keep dirt out of the bearing surface.
Carl
From: owner-rv10-list-server(at)matronics.com (owner-rv10-list-server(at)matronics.com) [mailto:owner-rv10-list-server(at)matronics.com (owner-rv10-list-server(at)matronics.com)] On Behalf Of Phillip Perry
Sent: Thursday, February 25, 2016 12:53 AM
To: rv10-list(at)matronics.com (rv10-list(at)matronics.com)
Subject: Re: RV10-List: Re: Control Stick Slop - Bushings
I thought I'd follow up on the control stick slop issue that I had in my system since I promised a post-bushing report. I had some major play in my control sticks and ended up following Sean's advice and replaced the brass bushings with delrin. I attached a couple of photos of the plans to help with the explanation.
After discovering the slop, I ordered delrin rods from Aircraft Spruce. I ordered 3/8" hoping they'd be a drop-in replacement for a tight fit without any machining and 7/16" in case I had to machine them down to something closer to proper size for a good fit in the control stick base. Each stick was about $3 for a 3 ft stick, so there was no harm in ordering both.
I pulled the sticks, stick bases, and control column out of the plane and put it on the bench. On disassembly, I found that there was play between the brass bushing and the welded part of the stick bases. I tried the 3/8" rod to see how well it fit and it dropped straight through unrestricted. The inside of the welded stick bases were way more than the spec'd 3/8". That was one part of the problem. The other part of the problem was the slop on the inside of the bushing between the bushing and the 1/4" bolt. That slop was worse than the welded part. Additionally I found one more location for slop and that was the ability to slide the stick forward and aft on the 1/4" bolt between the stick bases and the control column that the stick bases mount to.
The first order of business was to get new bushings machined out. Since the stick bases were more than 3/8" I used the 7/16" delrin rod and turned it down on a lathe that another guy on the airport had. It was turned down until it was a thumb-press fit into the stick bases.
The next step was to drill and ream the hole for the 1/4" bolt down the center. I initially tried to ream it to 15/64 (1/64" undersized for the 1/4" bolt) to get a snug fit in the event that the bolt was on the skinny side of the tolerance. That didn't work out and I ultimately had to open it to a full 1/4" to get the bolt to slide through.
Back to the work bench where I installed the new bushings. The fit was free of any play between that bases and the bushing and between the bushing and the bolt.
The final task was to eliminate the sliding motion of the sticks forward and aft on the 1/4" bolt between the stick bases and the control column. This was a pretty simple task of inserting AN960-416 and 416L washers to shim as much of the gaps away as possible. Obviously you can't get all of the gap out, so you have to take care of the last little bit by tightening the nut and pulling the control column in tighter on the stick bases.
I tuned this part of the system like you would a wheel bearing. I rotated the sticks left and right while tightening the nut one flat at a time. Once I began to feel tension on the sticks, I stopped and backed off one flat where I then dropped in the cotter key in to lock it into position.
The system linkages are tight (meaning no play) and very smooth (minus the drag of the TruTrak servos). You can work the left and right sticks in opposition directions, like driving a bull dozer, and you won't find any play. You can go all the way out to the control surface and hold it tight while wiggling the stick and not find any play between the control surface and stick. I'm very happy with the outcome.
This wasn't a terrible change to make and if you have the seats out and access to a lathe, you could probably do it in less than a day. You certainly could do it on a drill press with some forethought. creative jigs, patience, and a few sacrificed pieces of delrin while you traverse the learning curve, but the lathe is certainly the fastest and easiest.
I'd do it again... Glad it turned out the way it did.
Phil
<image001.png>
<image002.png>
On Sat, Feb 13, 2016 at 8:08 PM, Phillip Perry <philperry9(at)gmail.com (philperry9(at)gmail.com)> wrote:
I have some delrin coming and I'm planning on making them for my sloppiness.
I'm planning on reaming the bell crank to 3/8 and then seeing how well a 3/8 delrin rod fits. If it's still too loose, I have a 7/16 rod coming in the mail too. I'll be able turn it down to fit or possibly it would fit without any working (though I doubt it).
Once I find the rod that fits best, then I'll ream the center on a friends lathe. I have a 3/16" reamer that will work, but I plan on using another reamer that's 11/64 (1/64 under sized) to see how it fits first. Then if it's too tight I'll open it up to the full 3/16 with the other reamer.
I'll probably have a report on how well it works in the next 2 weeks or possibly late next week.
Phil
Sent from my iPhone
h --
EE Gifts!)
on
r> ed
://www.buildersbooks.com" rel="noreferrer" target="_blank">www.buildersbooks.com
ion" rel="noreferrer" target="_blank">http://www.matronics.com/contribution
-Matt Dralle, List Admin.
=============
br> ?RV10-List" rel="noreferrer" target="_blank">http://www.matronics.com/Navigator?RV10-List
=============
S WEB FORUMS -
="noreferrer" target="_blank">http://forums.matronics.com
=============
on Web Site -
-Matt Dralle, List Admin.
ion" rel="noreferrer" target="_blank">http://www.matronics.com/contribution
=============
|
| | - The Matronics RV10-List Email Forum - | | | Use the List Feature Navigator to browse the many List utilities available such as the Email Subscriptions page, Archive Search & Download, 7-Day Browse, Chat, FAQ, Photoshare, and much more:
http://www.matronics.com/Navigator?RV10-List |
|
|
|
| Back to top |
|
|
|
|
You cannot post new topics in this forum
You cannot reply to topics in this forum
You cannot edit your posts in this forum
You cannot delete your posts in this forum
You cannot vote in polls in this forum
You cannot attach files in this forum
You can download files in this forum
|
Powered by phpBB © 2001, 2005 phpBB Group
|

