 |
Matronics Email Lists
Web Forum Interface to the Matronics Email Lists
|
| View previous topic :: View next topic |
| Author |
Message |
Robert Reed
Joined: 22 Oct 2009
Posts: 331
Location: Dallas/Ft.Worth
|
 Posted: Wed Jul 31, 2013 8:53 pm Post subject: How long does it take to build an throttle body airbox? Posted: Wed Jul 31, 2013 8:53 pm Post subject: How long does it take to build an throttle body airbox? |
 |
|
Answer: FOREVER and then some.
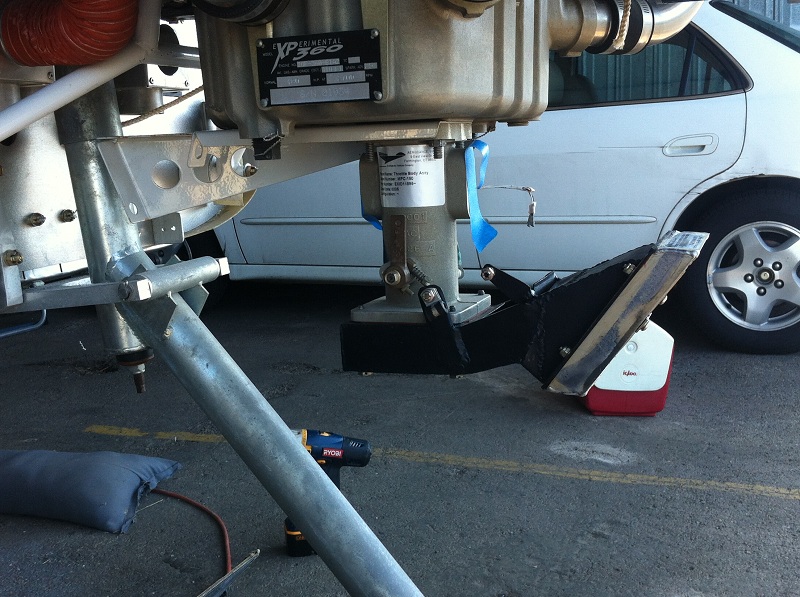
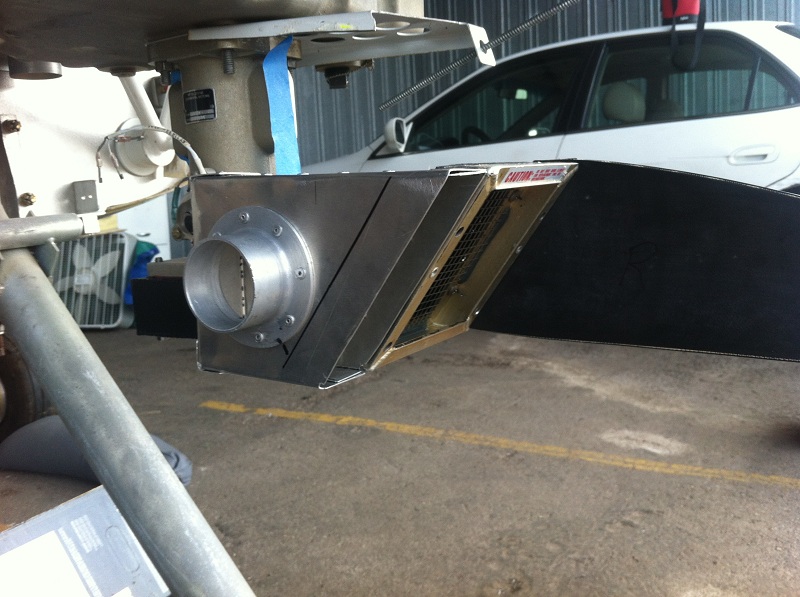
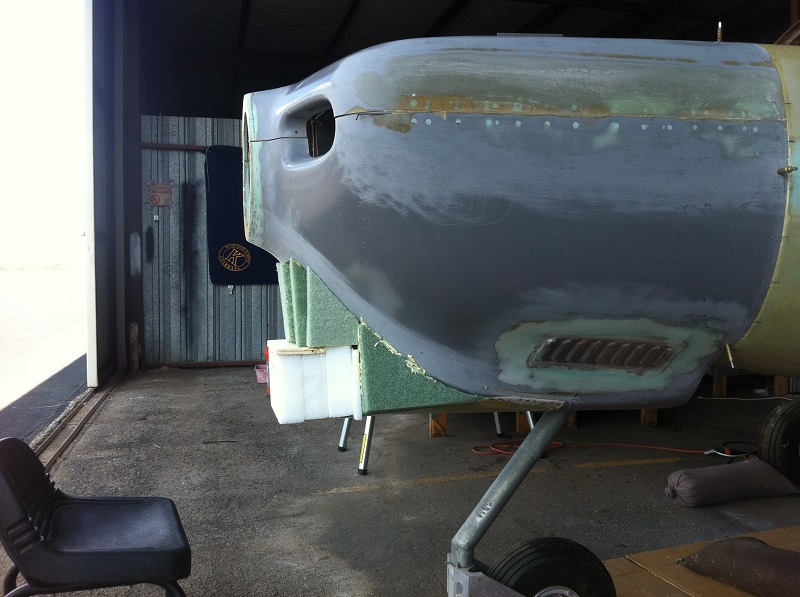
I never noticed that the throttle body on my aircraft was NOT Centered under the engine and was a full two inches taller than a normal throttle body. As a result the NACA inlet that I carefully centered in the cowling was NOT going to work. I found an air box on EBAY for the Lycoming 360 engine with alternate air and filter which was as close as I was going to find without a total custom fabrication. I paid a grand total of $45 dollars including shipping. Not a bad price.
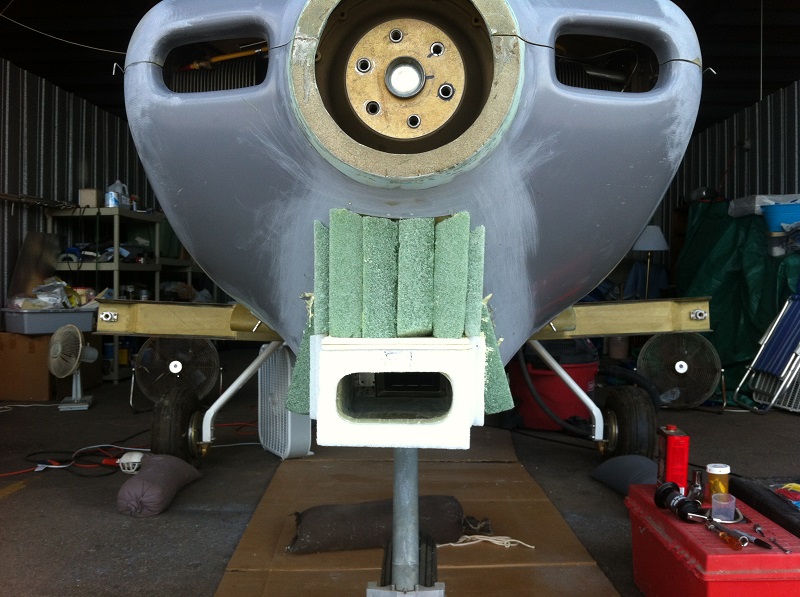
The problem was that it stuck down way too low and was too far to the pilot side to fit with the NACA inlet. The top of the filter unit was to high as well. I had looked at numerous other options and all of them was going to require a redesign of the cowling so the fun begins. First I cut out a full section of the lower cowling for a removable panel. The throttle body/air box was offset a full 1 1/2 inches. First thought was to just reshape int inlet area and connect to the air box. I knew that I was going to have to fabricate some sort of baffle to connect to the cowling air scoop so I started trying to fabricate an attachment.
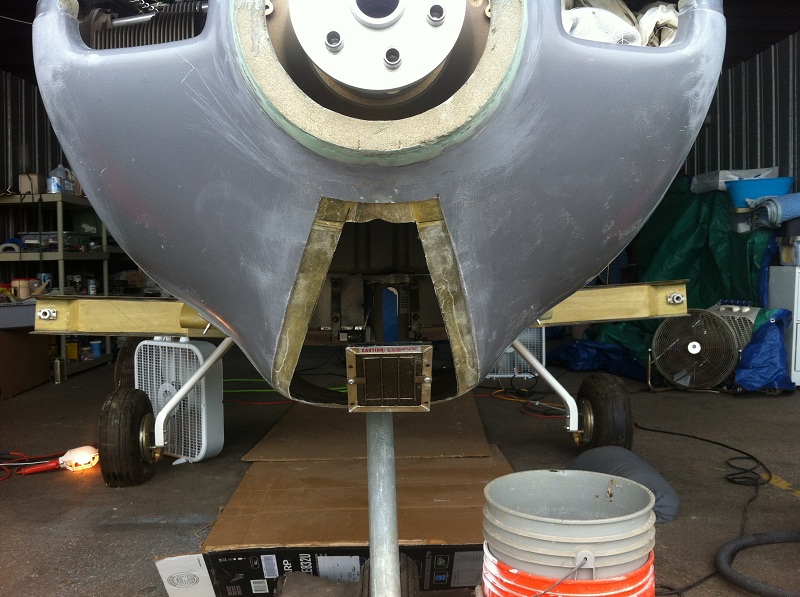
I have also been trying to find a good place for the air inlet for a hose connection to the heat muff for cabin heat. Then came the little light bulb of an idea. Why not use that extra 1 1/2 inches to fabricate a simple little box for the air outlet? Simple is obviously a relative term and after 2 1/2 days of 100 degree heat I have just about finished that simple little box. The baffle opening to the air box will be shaped to slide in the air scoop outlet and form a seal without having to use a screw connection. I will complete the air box inlet and the shape the air scoop to fit snug.
What made the "simple" little box take so long? First was trying to fabricate it around the existing air box and filter with a baffle seal that could be removed for access to the filter. It needed to attach to the existing attachment for the filter and keep the seal. Finally, the whole thing was built with just flat stock and off the shelf aluminum stock using hand tools without a metal brake.
NO PROBLEMâ¦.Right?
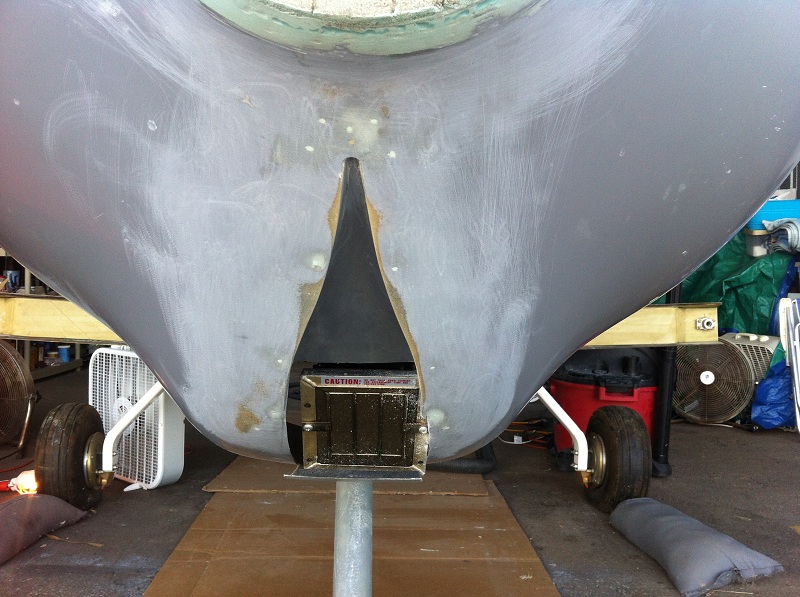
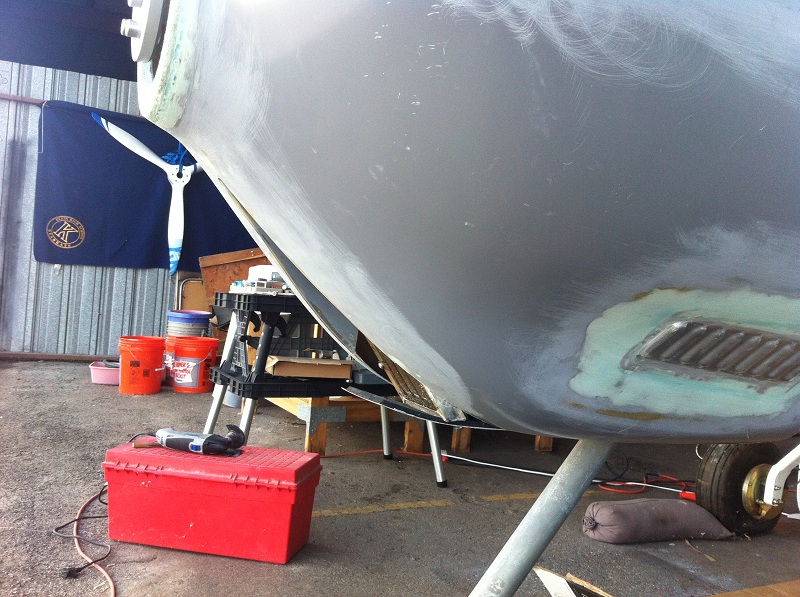
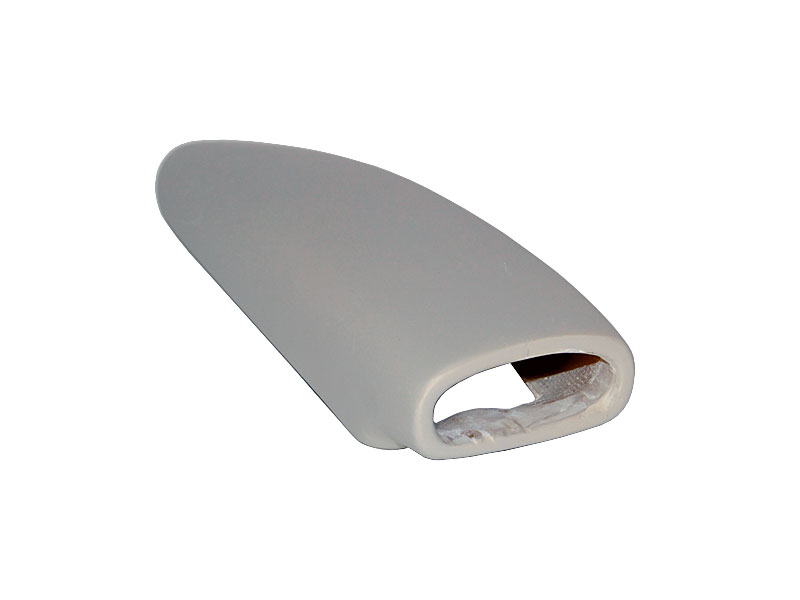
The attached photos show the purchased air box attached to the throttle body. The second photo shows the butchering of the inlet to get the lower cowling on. The next photo shows the lower panel removed with the cowling installed. You can easily see the offset and how low the filter sets. The last two photos show the cabin heat source box attachment and the last photo shows the baffle material in place and ready to be cut, riveted and trimmed. The challenge was keeping everything tight for a good seal while making it removable for access to the filter. Looks like itâs going to work but still have a couple of more days work to fit the cowling and fabricate the air scoop.
I will put up more photos of the completion. If I ever get it complete!!!!
Bob Reed
| | - The Matronics KIS-List Email Forum - | | | Use the List Feature Navigator to browse the many List utilities available such as the Email Subscriptions page, Archive Search & Download, 7-Day Browse, Chat, FAQ, Photoshare, and much more:
http://www.matronics.com/Navigator?KIS-List |
|
| Description: |
|
| Filesize: |
204.61 KB |
| Viewed: |
11564 Time(s) |
|
| Description: |
|
| Filesize: |
186.73 KB |
| Viewed: |
11564 Time(s) |
|
| Description: |
|
| Filesize: |
207.55 KB |
| Viewed: |
11564 Time(s) |
|
| Description: |
|
| Filesize: |
184.49 KB |
| Viewed: |
11564 Time(s) |
|
| Description: |
|
| Filesize: |
156.86 KB |
| Viewed: |
11564 Time(s) |
|
| Description: |
|
| Filesize: |
190.51 KB |
| Viewed: |
11564 Time(s) |
|
|
|
| Back to top |
|
 |
Robert Reed
Joined: 22 Oct 2009
Posts: 331
Location: Dallas/Ft.Worth
|
| Posted: Thu Aug 01, 2013 7:30 pm Post subject: How long does it take to build an throttle body airbox? |
|
|
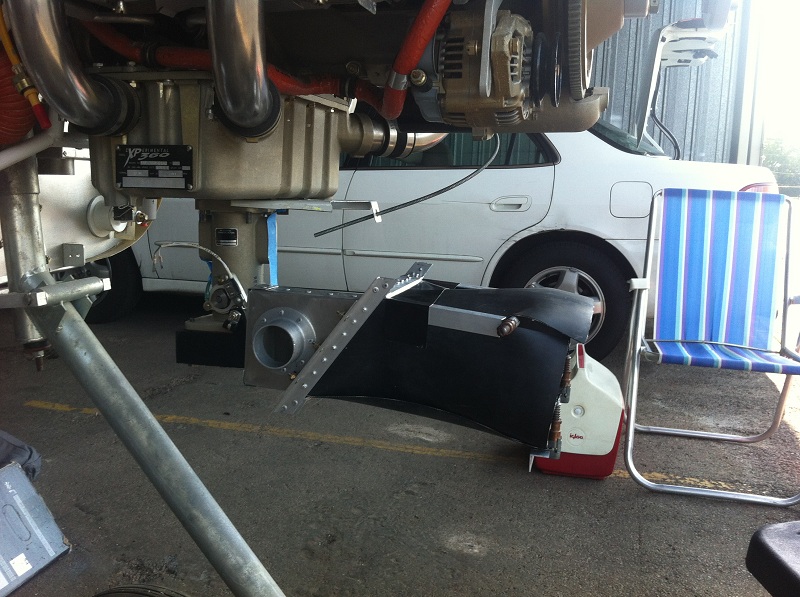
Well, the air inlet box is finally finished and I can move on to the air scoop and cowling modifications.  What a day, the recorded temperature at the airport was 102 with a feels like of 108 degrees.  I would beg to argue, it felt more like 120 degrees to me.  The forcast for tomorrow is 104 with a feels like of 110 to 112 degrees..  See the photos for the final air box.  It is setup to wedge the air scoop inlet into the air box opening and produce a seal.  The baffle section is connected only by the baffle material and the baffle section if easily removed for access to the filter.


Now for the really good news of today.  In 2001 / 2002 things were moving along real well on the plane and with my job so I bought the Superior IOF360  engine with the anticipation that I would be able to finish the plane within a resonable time.  Got the engine and then everything seemed to fall apart.  Lost my primary client and was basically out of work for almost two years.  Ended up taking a job in Dallas and had to move.  The plane was put on hold and the engine put into storage for years.  Finally moved the plane and engine to hangar in Lancaster Tx where I was able to get it mounted but little else.  Years of setting in storage and in the hangar without having been started.  I had found out a year after I bought the engine that Mattituck had NOT properly pickled the engine.


I was fully expecting to have to tear the engine down for a complete overhaul before starting it.  This week I contacted a AP at Texas Air Salvage who was recommended to me by several people.  He came out to the hangar this  afternoon and brought his borescope.  We did an extensive examination of the cylinders and every internal component we could get access to.  The GOOD NEWS....NO RUST and no problems of any kind were visible.  He did an inspection of the external components and found no issues beyond some rubber hoses showing minor cracking.  Other than that he said the engine looked great and he would help me get it ready for first start.  Oh, I almost forgot, he is also the FAA DAR that will perform the condition inspection on my aircraft when complete.  Since he will be helping me finish the final critical elements I don't expect to have any problems with the inspection.


Maybe my luck has changed....Oh and his name is LUCKY.


Bob Reed
| | - The Matronics KIS-List Email Forum - | | | Use the List Feature Navigator to browse the many List utilities available such as the Email Subscriptions page, Archive Search & Download, 7-Day Browse, Chat, FAQ, Photoshare, and much more:
http://www.matronics.com/Navigator?KIS-List |
|
| Description: |
|
| Filesize: |
207.34 KB |
| Viewed: |
11557 Time(s) |
|
| Description: |
|
| Filesize: |
212.23 KB |
| Viewed: |
11557 Time(s) |

|
|
|
| Back to top |
|
|
galinhdz(at)gmail.com
Guest
|
| Posted: Fri Aug 02, 2013 4:39 am Post subject: How long does it take to build an throttle body airbox? |
|
|
Sounds like you are getting some good progress on the build. Hopefully we will see it in the air sooner than later.


On Thursday, August 1, 2013, Robert Reed  wrote:

[quote] Well, the air inlet box is finally finished and I can move on to the air scoop and cowling modifications.  What a day, the recorded temperature at the airport was 102 with a feels like of 108 degrees.  I would beg to argue, it felt more like 120 degrees to me.  The forcast for tomorrow is 104 with a feels like of 110 to 112 degrees..  See the photos for the final air box.  It is setup to wedge the air scoop inlet into the air box opening and produce a seal.  The baffle section is connected only by the baffle material and the baffle section if easily removed for access to the filter.


Now for the really good news of today.  In 2001 / 2002 things were moving along real well on the plane and with my job so I bought the Superior IOF360  engine with the anticipation that I would be able to finish the plane within a resonable time.  Got the engine and then everything seemed to fall apart.  Lost my primary client and was basically out of work for almost two years.  Ended up taking a job in Dallas and had to move.  The plane was put on hold and the engine put into storage for years.  Finally moved the plane and engine to hangar in Lancaster Tx where I was able to get it mounted but little else.  Years of setting in storage and in the hangar without having been started.  I had found out a year after I bought the engine that Mattituck had NOT properly pickled the engine.


I was fully expecting to have to tear the engine down for a complete overhaul before starting it.  This week I contacted a AP at Texas Air Salvage who was recommended to me by several people.  He came out to the hangar this  afternoon and brought his borescope.  We did an extensive examination of the cylinders and every internal component we could get access to.  The GOOD NEWS....NO RUST and no problems of any kind were visible.  He did an inspection of the external components and found no issues beyond some rubber hoses showing minor cracking.  Other than that he said the engine looked great and he would help me get it ready for first start.  Oh, I almost forgot, he is also the FAA DAR that will perform the condition inspection on my aircraft when complete.  Since he will be helping me finish the final critical elements I don't expect to have any problems with the inspection.


Maybe my luck has changed...Oh and his name is LUCKY.


Bob Reed

[b]
| | - The Matronics KIS-List Email Forum - | | | Use the List Feature Navigator to browse the many List utilities available such as the Email Subscriptions page, Archive Search & Download, 7-Day Browse, Chat, FAQ, Photoshare, and much more:
http://www.matronics.com/Navigator?KIS-List |
|
|
|
| Back to top |
|
|
Robert Reed
Joined: 22 Oct 2009
Posts: 331
Location: Dallas/Ft.Worth
|
| Posted: Mon Aug 05, 2013 12:02 pm Post subject: How long does it take to build an throttle body airbox? |
|
|
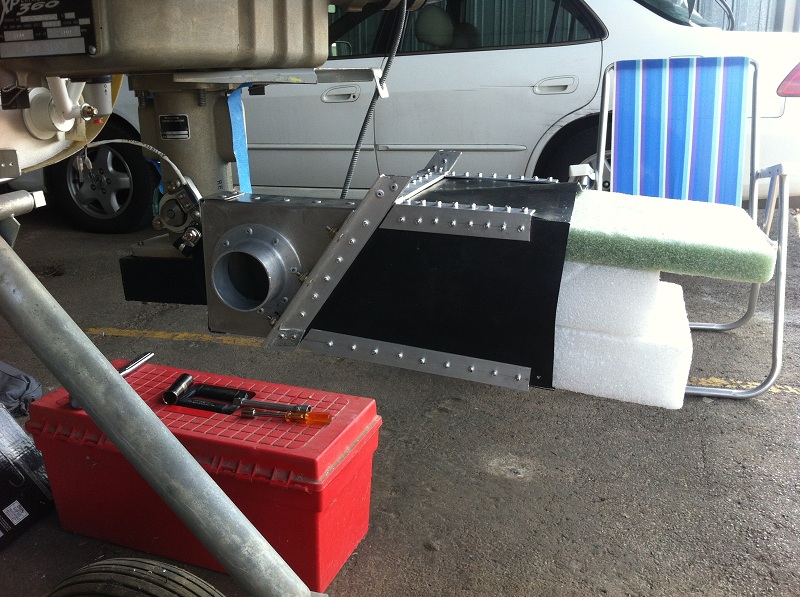
If you consider any progress to be GOOD progress then yes sir I am making good progress.  Nine straight days of working on the plane and I did make progress but it sure seemed to be very slow.  I felt like I was moving in slow motion in the heat and everything took longer than it should have.  Overall progress for the week was disappointing.  I finished the air box modifications and the air inlet but was only able to glue up a very ugly foam plug for the cowling air scoop.  Had to mix white and green foam blocks over the air inlet to form a rough shape for the cowling scoop.  I will start shaping the scoop this coming weekend.  I will get the rough shape in and then fill with micro epoxy mix to finalize the mold.  The plan is to glass over that and then remove the foam core  from the inside.  Should take at least two more weeks considering glass setup time.  With any luck I should have the cowling finished and ready for painting by the end of August.


Bob


   From: Galin Hernandez <galinhdz(at)gmail.com>

 To:  "kis-list(at)matronics.com" <kis-list(at)matronics.com>

 Sent: Friday, August 2, 2013 7:39 AM

 Subject: Re: How long does it take to build an throttle body airbox?


 Sounds like you are getting some good progress on the build. Hopefully we will see it in the air sooner than later.


On Thursday, August 1, 2013, Robert Reed  wrote:

[quote] Well, the air inlet box is finally finished and I can move on to the air scoop and cowling modifications.  What a day, the recorded temperature at the airport was 102 with a feels like of 108 degrees.  I would beg to argue, it felt more like 120 degrees to me.  The forcast for tomorrow is 104 with a feels like of 110 to 112 degrees..  See the photos for the final air box.  It is setup to wedge the air scoop inlet into the air box opening and produce a seal.  The baffle section is connected only by the baffle material and the baffle section if easily removed for access to the filter.


Now for the really good news of today.  In 2001 / 2002 things were moving along real well on the plane and with my job so I bought the Superior IOF360  engine with the anticipation that I would be able to finish the plane within a resonable time.  Got the engine and then everything seemed to fall apart.  Lost my primary client and was basically out of work for almost two years.  Ended up taking a job in Dallas and had to move.  The plane was put on hold and the engine put into storage for years.  Finally moved the plane and engine to hangar in Lancaster Tx where I was able to get it mounted but little else.  Years of setting in storage and in the hangar without having been started.  I had found out a year after I bought the engine that Mattituck had NOT properly pickled the engine.


I was fully expecting to have to tear the engine down for a complete overhaul before starting it.  This week I contacted a AP at Texas Air Salvage who was recommended to me by several people.  He came out to the hangar this  afternoon and brought his borescope.  We did an extensive examination of the cylinders and every internal component we could get access to.  The GOOD NEWS....NO RUST and no problems of any kind were visible.  He did an inspection of the external components and found no issues beyond some rubber hoses showing minor cracking.  Other than that he said the engine looked great and he would help me get it ready for first start.  Oh, I almost forgot, he is also the FAA DAR that will perform the condition inspection on my aircraft when complete.  Since he will be helping me finish the final critical elements I don't expect to have any problems with the inspection.


Maybe my luck has changed...Oh and his name is LUCKY.


Bob Reed

[b]
| | - The Matronics KIS-List Email Forum - | | | Use the List Feature Navigator to browse the many List utilities available such as the Email Subscriptions page, Archive Search & Download, 7-Day Browse, Chat, FAQ, Photoshare, and much more:
http://www.matronics.com/Navigator?KIS-List |
|
|
|
| Back to top |
|
|
mark_trickel
Joined: 13 Dec 2011
Posts: 101
Location: Philadelphia, PA, USA
|
| Posted: Thu Aug 08, 2013 7:26 am Post subject: Re: How long does it take to build an throttle body airbox? |
|
|
Hello Robert,
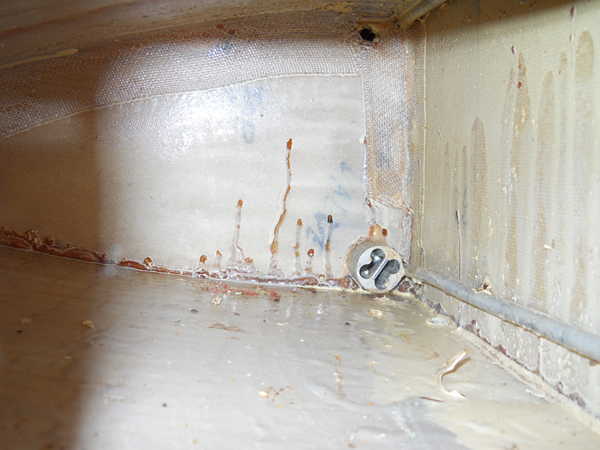
I just return from a wilderness canoe camping trip in New York's Adirondack Park to find you have overcome yet another problem. I like your idea of ducting cabin heat off the airbox intake. I also know how hard it is to work in extreme heat and humidity conditions. My dad and I rebuilt an Ercoupe and when we brought it back to the hanger to finish it off over a couple of summers the heat inside the back tar coated roof was unbearable no matter how early we arrived to work on the airplane. I hope I have as good as results as you when it comes to solving some of my dilemmas. I have attached a few pics of a couple of things I need to address:
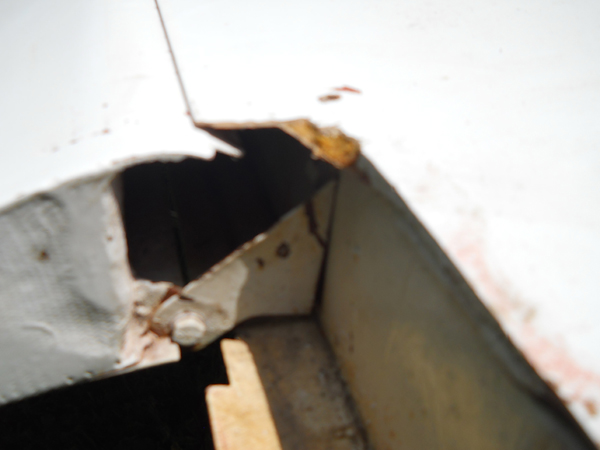
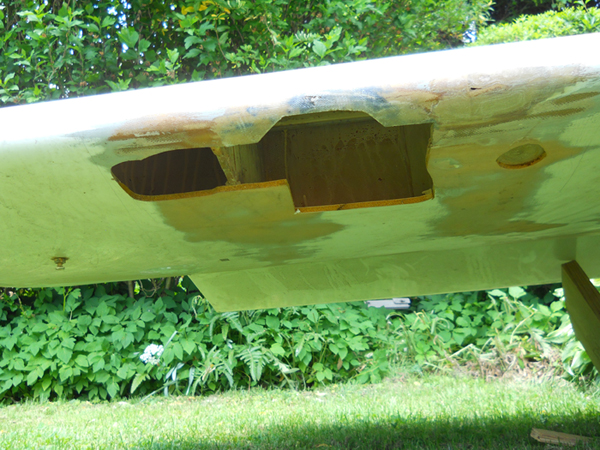
Underside of wing-the scrap on the right is from the time Ken ran over the runway light at Oshkosh. The scrap on the left from the hole in the tank is from Kens last flight when he hit a fence post, maybe a result of the tail being cut off. The way hole is cut in is a lesson on how not to prepare to patch a laminated composite structure.
Flap hinge-as the airplane rolled over the fence post it caught on the flap hinge and bent it. The wing came to rest on the post about a foot out board on the flap. That gouge has been patched.
Inside the slosh tank-Ken took a different tack on the fuel tanks, they do not have to standard flapper system to close the tank, it has some kind of metal ball in a track that seals off the tank. He also did not coat the tank with the prescribed two coats of resin he used a slosh compound. A cool idea but after 20 years it is peeling of in areas like the tank filler and bottom fuel tester drain where the resin is real smooth from gluing in these parts.
| | - The Matronics KIS-List Email Forum - | | | Use the List Feature Navigator to browse the many List utilities available such as the Email Subscriptions page, Archive Search & Download, 7-Day Browse, Chat, FAQ, Photoshare, and much more:
http://www.matronics.com/Navigator?KIS-List |
|
| Description: |
|
| Filesize: |
329.51 KB |
| Viewed: |
11509 Time(s) |
|
| Description: |
|
| Filesize: |
240.19 KB |
| Viewed: |
11509 Time(s) |
|
| Description: |
|
| Filesize: |
120.63 KB |
| Viewed: |
11509 Time(s) |
|
| Description: |
|
| Filesize: |
327.32 KB |
| Viewed: |
11509 Time(s) |
|
|
|
| Back to top |
|
|
Robert Reed
Joined: 22 Oct 2009
Posts: 331
Location: Dallas/Ft.Worth
|
| Posted: Thu Aug 08, 2013 8:16 am Post subject: How long does it take to build an throttle body airbox? |
|
|
Mark,


Looks like you had a great trip, wish I had been there, looks great.


Regarding the fuel tank....Good luck with that.  I have NO idea how to fix except sand and try to recoat with Jeffcoat or something.  The flaking looks really bad and I wonder if the second bay is as bad.  Makes me want to scope out mine before I go any further.


The flap hinge doesn't look too bad from the photo but may need replacement if binding.


The hole in the wing looks like a reverse construction process.  Layup two or three ply flat sheet of fiberglass with peel ply on one side to make good bonding  surface.  Fit the sheet to the inside of the wing hole and bond all the way around.  Fill in the middle with foam and bond to the inside skin.  Finally, glass over the outside and flair into existing skin.  The result should be just as strong as the original skin if not a bit more so.


Sounds so easy doesn't it?  The devil is always in the details though.


I am having to do much the same operation on the cowling trying to fabricate an air scoop.  It sure looks funny in the intermediate stages but I am hopeful the final result won't look quite so odd.  It would have looked a lot better if I has used the same color foam.  I will try to get back to it this weekend and start the shaping with a rasp and sandpaper.  I figure it will take a couple of weekends to shape it, fill it, shape it some more, fill it some more, and then start the  glass work.  Followed by more sanding, filling, and repeat until sick of it.  The foam I am using can easily be shaped, filled with epoxy micro mix for a bondable surface and then be dissolved with Acetone when finished.  It won't look pretty on the inside but I can live with that.  I am doing it all in place to make sure the air inlet is properly positioned for the air box attachment.


It is hard to see from the photos but the underside is a flat sheet of 4-ply fiberglass that I fabricated for some other parts that I cut to form the bottom of the scoop and cowling.  I used pop rivets and bonded  (belt and suspenders) it to the existing cowling bottom.  When it took the rounded shape it carried it forward to help flair into the existing contours.  I will post additional photos of the process and the completed cowling.  (BUT ONLY IF IT COMES OUT LOOKING  RIGHT)


Bob Reed

Making slow but steady progress.


   From: mark_trickel <marktrickel(at)gmail.com>S

 To: kis-list(at)matronics.com

 Sent: Thursday, August 8, 2013 10:26 AM

 Subject: Re: How long does it take to build an throttle body airbox?


 --> KIS-List message posted by: "mark_trickel" <marktrickel(at)gmail.com (marktrickel(at)gmail.com)>


Hello Robert,


I just return from a wilderness canoe camping trip in New York's Adirondack Park to find you have overcome yet another problem. I like your idea of ducting cabin heat off the airbox intake. I also know how hard it is to work in extreme heat and humidity conditions. My dad and I rebuilt an Ercoupe and when we brought it back to the hanger to finish it off over a couple of summers the heat inside the back tar coated roof was unbearable no matter how early we arrived to work on the airplane. I hope I have as good as results as you when it comes to solving some of my dilemmas. I have attached a few pics of a couple of things I need to address:


Underside of wing-the scrap on the right is from the time Ken ran over the runway light at Oshkosh. The scrap on the left  from the hole in the tank is from Kens last flight when he hit a fence post, maybe a result of the tail being cut off. The way hole is cut in is a lesson on how not to prepare to patch a laminated composite structure.


Flap hinge-as the airplane rolled over the fence post it caught on the flap hinge and bent it. The wing came to rest on the post about a foot out board on the flap. That gouge has been patched.


Inside the slosh tank-Ken took a different tack on the fuel tanks, they do not have to standard flapper system to close the tank, it has some kind of metal ball in a track that seals off the tank. He also did not coat the tank with the prescribed two coats of resin he used a slosh compound. A cool idea but after 20 years it is peeling of in areas like the tank filler and bottom fuel tester drain where the resin is real smooth from gluing in these parts.


Read this topic online  here:


http://forums.matronics.com/viewtopic.php?p=406238#406238


Attachments:


http://forums.matronics.com//files/bog_river_to_lows_lake_173.jpg

http://forums.matronics.com//files/km3_slosh_tank_599.jpg

http://forums.matronics.com//files/km3_flap_hinge_123.jpg

http://forums.matronics.com//files/km3_wing_392.jpg


<brnbsp;                    =
| | - The Matronics KIS-List Email Forum - | | | Use the List Feature Navigator to browse the many List utilities available such as the Email Subscriptions page, Archive Search & Download, 7-Day Browse, Chat, FAQ, Photoshare, and much more:
http://www.matronics.com/Navigator?KIS-List |
|
| Description: |
|
| Filesize: |
165.72 KB |
| Viewed: |
11507 Time(s) |
|
| Description: |
|
| Filesize: |
156.93 KB |
| Viewed: |
11507 Time(s) |
|
| Description: |
|
| Filesize: |
169.06 KB |
| Viewed: |
11507 Time(s) |
|
|
|
| Back to top |
|
|
ftyoder(at)yoderbuilt.com
Guest
|
| Posted: Thu Aug 08, 2013 10:08 am Post subject: How long does it take to build an throttle body airbox? |
|
|
Mark,


 I had to repair a fuel leak in my TR-1 and I decided to cut an  access hole in the top of the wing and then patched it just like fabricating a  access panel. This would allow you to reinforce the repair of the bottom of the  tank and even recoat with epoxy or other tank sealer. The patch on the top has  very little head pressure compared to the bottom, when the tank is  full.


 Tim


   From: owner-kis-list-server(at)matronics.com  [mailto:owner-kis-list-server(at)matronics.com] On Behalf Of Robert  Reed

Sent: Thursday, August 08, 2013 9:16 AM

To:  kis-list(at)matronics.com

Subject: Re: Re: How long does it  take to build an throttle body airbox?


  Mark,


 Looks like you had a great trip, wish I had been there, looks  great.


 Regarding the fuel tank....Good luck with that.  I have NO idea  how to fix except sand and try to recoat with Jeffcoat or something.  The  flaking looks really bad and I wonder if the second bay is as bad.  Makes  me want to scope out mine before I go any further.


 The flap hinge doesn't look too bad from the photo but may need  replacement if binding.


 The hole in the wing looks like a reverse construction process.   Layup two or three ply flat sheet of fiberglass with peel ply on one side to  make good bonding surface.  Fit the sheet to the inside of the wing hole  and bond all the way around.  Fill in the middle with foam and bond to the  inside skin.  Finally, glass over the outside and flair into existing  skin.  The result should be just as strong as the original skin if not a  bit more so.


 Sounds so easy doesn't it?  The devil is always in the details  though.


 I am having to do much the same operation on the cowling trying to  fabricate an air scoop.  It sure looks funny in the intermediate stages but  I am hopeful the final result won't look quite so odd.  It would have  looked a lot better if I has used the same color foam.  I will try to get  back to it this weekend and start the shaping with a rasp and  sandpaper.  I figure it will take a couple of weekends to shape it, fill  it, shape it some more, fill it some more, and then start the glass  work.  Followed by more sanding, filling, and repeat until sick  of it.  The foam I am using can easily be shaped, filled with epoxy  micro mix for a bondable surface and then be dissolved with Acetone when  finished.  It won't look pretty on the inside but I can live with  that.  I am doing it all in place to make sure the air inlet is properly  positioned for the air box attachment.


 It is hard to see from the photos but the underside is a flat sheet of  4-ply fiberglass that I fabricated for some other parts that I cut to form the  bottom of the scoop and cowling.  I used pop rivets and bonded  (belt  and suspenders) it to the existing cowling bottom.  When it took the  rounded shape it carried it forward to help flair into the  existing contours.  I will post additional photos of the process and  the completed cowling.  (BUT ONLY IF IT COMES OUT LOOKING RIGHT)


 Bob Reed

 Making slow but steady progress.


From: mark_trickel  <marktrickel(at)gmail.com>S

To: kis-list(at)matronics.com

Sent: Thursday, August 8, 2013 10:26  AM

Subject: Re: How  long does it take to build an throttle body airbox?


--> KIS-List message posted by: "mark_trickel"  <marktrickel(at)gmail.com (marktrickel(at)gmail.com)>


Hello  Robert,


I just return from a wilderness canoe camping trip in New York's  Adirondack Park to find you have overcome yet another problem. I like your idea  of ducting cabin heat off the airbox intake. I also know how hard it is to work  in extreme heat and humidity conditions. My dad and I rebuilt an Ercoupe and  when we brought it back to the hanger to finish it off over a couple of summers  the heat inside the back tar coated roof was unbearable no matter how early we  arrived to work on the airplane. I hope I have as good as results as you when it  comes to solving some of my dilemmas. I have attached a few pics of a couple of  things I need to address:


Underside of wing-the scrap on the right is  from the time Ken ran over the runway light at Oshkosh. The scrap on the left  from the hole in the tank is from Kens last flight when he hit a fence post,  maybe a result of the tail being cut off. The way hole is cut in is a lesson on  how not to prepare to patch a laminated composite structure.


Flap  hinge-as the airplane rolled over the fence post it caught on the flap hinge and  bent it. The wing came to rest on the post about a foot out board on the flap.  That gouge has been patched.


Inside the slosh tank-Ken took a different  tack on the fuel tanks, they do not have to standard flapper system to close the  tank, it has some kind of metal ball in a track that seals off the tank. He also  did not coat the tank with the prescribed two coats of resin he used a slosh  compound. A cool idea but after 20 years it is peeling of in areas like the tank  filler and bottom fuel tester drain where the resin is real smooth from gluing  in these parts.


Read this topic online  here:


http://forums.matronics.com/viewtopic.php?p=406238#406238


Attachments:


http://forums.matronics.com//files/bog_river_to_lows_lake_173.jpg

http://forums.matronics.com//files/km3_slosh_tank_599.jpg

http://forums.matronics.com//files/km3_flap_hinge_123.jpg

http://forums.matronics.com//files/km3_wing_392.jpg


   [quote][b]
| | - The Matronics KIS-List Email Forum - | | | Use the List Feature Navigator to browse the many List utilities available such as the Email Subscriptions page, Archive Search & Download, 7-Day Browse, Chat, FAQ, Photoshare, and much more:
http://www.matronics.com/Navigator?KIS-List |
|
|
|
| Back to top |
|
|
fredorosa(at)gmail.com
Guest
|
| Posted: Thu Aug 08, 2013 10:40 am Post subject: How long does it take to build an throttle body airbox? |
|
|
Bob,I'm sure that will be an efficient air scoop but the front of your plane is beginning to resemble a locomotive rather than a streamlined airplane.  Couldn't the scoop be curved upward and follow the the cowling shape somewhat?  Just a thought from a retired industrial designer.


Al


On Thu, Aug 8, 2013 at 12:15 PM, Robert Reed <robertr237(at)att.net (robertr237(at)att.net)> wrote:

 [quote]Mark,


 Looks like you had a great trip, wish I had been there, looks great.


Regarding the fuel tank....Good luck with that.  I have NO idea how to fix except sand and try to recoat with Jeffcoat or something.  The flaking looks really bad and I wonder if the second bay is as bad.  Makes me want to scope out mine before I go any further.


The flap hinge doesn't look too bad from the photo but may need replacement if binding.


The hole in the wing looks like a reverse construction process.  Layup two or three ply flat sheet of fiberglass with peel ply on one side to make good bonding  surface.  Fit the sheet to the inside of the wing hole and bond all the way around.  Fill in the middle with foam and bond to the inside skin.  Finally, glass over the outside and flair into existing skin.  The result should be just as strong as the original skin if not a bit more so.


Sounds so easy doesn't it?  The devil is always in the details though.


I am having to do much the same operation on the cowling trying to fabricate an air scoop.  It sure looks funny in the intermediate stages but I am hopeful the final result won't look quite so odd.  It would have looked a lot better if I has used the same color foam.  I will try to get back to it this weekend and start the shaping with a rasp and sandpaper.  I figure it will take a couple of weekends to shape it, fill it, shape it some more, fill it some more, and then start the  glass work.  Followed by more sanding, filling, and repeat until sick of it.  The foam I am using can easily be shaped, filled with epoxy micro mix for a bondable surface and then be dissolved with Acetone when finished.  It won't look pretty on the inside but I can live with that.  I am doing it all in place to make sure the air inlet is properly positioned for the air box attachment.


It is hard to see from the photos but the underside is a flat sheet of 4-ply fiberglass that I fabricated for some other parts that I cut to form the bottom of the scoop and cowling.  I used pop rivets and bonded  (belt and suspenders) it to the existing cowling bottom.  When it took the rounded shape it carried it forward to help flair into the existing contours.  I will post additional photos of the process and the completed cowling.  (BUT ONLY IF IT COMES OUT LOOKING  RIGHT)


Bob Reed

Making slow but steady progress.


   From: mark_trickel <marktrickel(at)gmail.com (marktrickel(at)gmail.com)>S

  To: kis-list(at)matronics.com (kis-list(at)matronics.com)

 Sent: Thursday, August 8, 2013 10:26 AM

  Subject: Re: How long does it take to build an throttle body airbox?


 --> KIS-List message posted by: "mark_trickel" <marktrickel(at)gmail.com (marktrickel(at)gmail.com)>


Hello Robert,


I just return from a wilderness canoe camping trip in New York's Adirondack Park to find you have overcome yet another problem. I like your idea of ducting cabin heat off the airbox intake. I also know how hard it is to work in extreme heat and humidity conditions. My dad and I rebuilt an Ercoupe and when we brought it back to the hanger to finish it off over a couple of summers the heat inside the back tar coated roof was unbearable no matter how early we arrived to work on the airplane. I hope I have as good as results as you when it comes to solving some of my dilemmas. I have attached a few pics of a couple of things I need to address:


Underside of wing-the scrap on the right is from the time Ken ran over the runway light at Oshkosh. The scrap on the left  from the hole in the tank is from Kens last flight when he hit a fence post, maybe a result of the tail being cut off. The way hole is cut in is a lesson on how not to prepare to patch a laminated composite structure.


Flap hinge-as the airplane rolled over the fence post it caught on the flap hinge and bent it. The wing came to rest on the post about a foot out board on the flap. That gouge has been patched.


Inside the slosh tank-Ken took a different tack on the fuel tanks, they do not have to standard flapper system to close the tank, it has some kind of metal ball in a track that seals off the tank. He also did not coat the tank with the prescribed two coats of resin he used a slosh compound. A cool idea but after 20 years it is peeling of in areas like the tank filler and bottom fuel tester drain where the resin is real smooth from gluing in these parts.


Read this topic online  here:


http://forums.matronics.com/viewtopic.php?p=406238#406238


Attachments:


http://forums.matronics.com//files/bog_river_to_lows_lake_173.jpg

 http://forums.matronics.com//files/km3_slosh_tank_599.jpg

http://forums.matronics.com//files/km3_flap_hinge_123.jpg

 http://forums.matronics.com//files/km3_wing_392.jpg


[b]
| | - The Matronics KIS-List Email Forum - | | | Use the List Feature Navigator to browse the many List utilities available such as the Email Subscriptions page, Archive Search & Download, 7-Day Browse, Chat, FAQ, Photoshare, and much more:
http://www.matronics.com/Navigator?KIS-List |
|
|
|
| Back to top |
|
|
Robert Reed
Joined: 22 Oct 2009
Posts: 331
Location: Dallas/Ft.Worth
|
| Posted: Thu Aug 08, 2013 12:20 pm Post subject: How long does it take to build an throttle body airbox? |
|
|
Al,
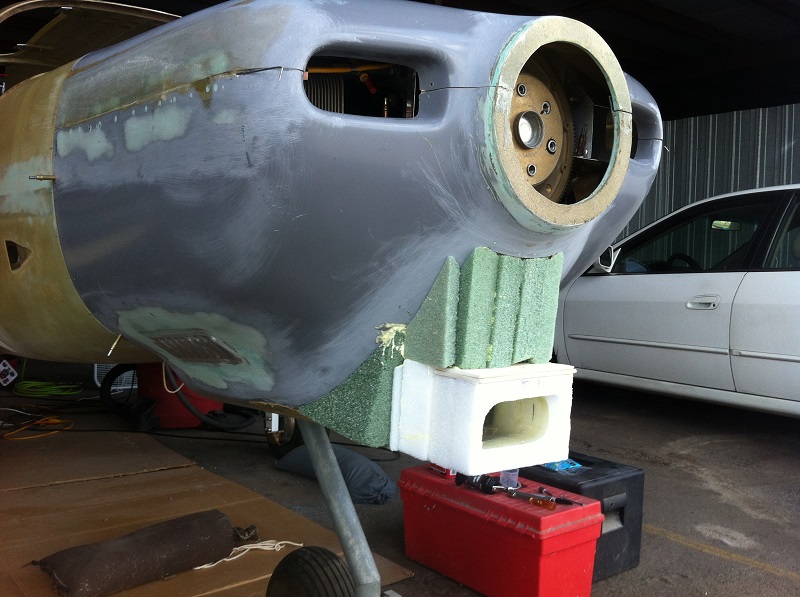
The air box ended up an inch below the bottom of the cowling before I started with the connection to the scoop. I was able to bring that up a little and keep the bottom aligned with the bottom of the cowling. The air inlet extended the connection forward even further below the original cowling shape. The current layup gives me some wiggle room to shape it and cut it back some but my main goal was to keep the smooth flow. What you see right now is a lot of extra foam that will be cut away as the shape is developed. The attached photo shows the basic shape that I am going for and that will transition into the existing cowling shape as much as possible.
Please let me finish it before you start labeling it a steam locomotive.
BOB
From: Alfred Rosa <fredorosa(at)gmail.com>
To: kisbuilders <kis-list(at)matronics.com>
Sent: Thursday, August 8, 2013 1:40 PM
Subject: Re: Re: How long does it take to build an throttle body airbox?
Bob,I'm sure that will be an efficient air scoop but the front of your plane is beginning to resemble a locomotive rather than a streamlined airplane. Couldn't the scoop be curved upward and follow the the cowling shape somewhat? Just a thought from a retired industrial designer.
Al
On Thu, Aug 8, 2013 at 12:15 PM, Robert Reed <robertr237(at)att.net (robertr237(at)att.net)> wrote:
| Quote: | Mark,
Looks like you had a great trip, wish I had been there, looks great.
Regarding the fuel tank....Good luck with that. I have NO idea how to fix except sand and try to recoat with Jeffcoat or something. The flaking looks really bad and I wonder if the second bay is as bad. Makes me want to scope out mine before I go any further.
The flap hinge doesn't look too bad from the photo but may need replacement if binding.
The hole in the wing looks like a reverse construction process. Layup two or three ply flat sheet of fiberglass with peel ply on one side to make good bonding surface. Fit the sheet to the inside of the wing hole and bond all the way around. Fill in the middle with foam and bond to the inside skin. Finally, glass over the outside and flair into existing skin. The result should be just as strong as the original skin if not a bit more so.
Sounds so easy doesn't it? The devil is always in the details though.
I am having to do much the same operation on the cowling trying to fabricate an air scoop. It sure looks funny in the intermediate stages but I am hopeful the final result won't look quite so odd. It would have looked a lot better if I has used the same color foam. I will try to get back to it this weekend and start the shaping with a rasp and sandpaper. I figure it will take a couple of weekends to shape it, fill it, shape it some more, fill it some more, and then start the glass work. Followed by more sanding, filling, and repeat until sick of it. The foam I am using can easily be shaped, filled with epoxy micro mix for a bondable surface and then be dissolved with Acetone when finished. It won't look pretty on the inside but I can live with that. I am doing it all in place to make sure the air inlet is properly positioned for the air box attachment.
It is hard to see from the photos but the underside is a flat sheet of 4-ply fiberglass that I fabricated for some other parts that I cut to form the bottom of the scoop and cowling. I used pop rivets and bonded (belt and suspenders) it to the existing cowling bottom. When it took the rounded shape it carried it forward to help flair into the existing contours. I will post additional photos of the process and the completed cowling. (BUT ONLY IF IT COMES OUT LOOKING RIGHT)
Bob Reed
Making slow but steady progress.
From: mark_trickel <marktrickel(at)gmail.com (marktrickel(at)gmail.com)>S
To: kis-list(at)matronics.com (kis-list(at)matronics.com)
Sent: Thursday, August 8, 2013 10:26 AM
Subject: Re: How long does it take to build an throttle body airbox?
--> KIS-List message posted by: "mark_trickel" <marktrickel(at)gmail.com (marktrickel(at)gmail.com)>
Hello Robert,
I just return from a wilderness canoe camping trip in New York's Adirondack Park to find you have overcome yet another problem. I like your idea of ducting cabin heat off the airbox intake. I also know how hard it is to work in extreme heat and humidity conditions. My dad and I rebuilt an Ercoupe and when we brought it back to the hanger to finish it off over a couple of summers the heat inside the back tar coated roof was unbearable no matter how early we arrived to work on the airplane. I hope I have as good as results as you when it comes to solving some of my dilemmas. I have attached a few pics of a couple of things I need to address:
Underside of wing-the scrap on the right is from the time Ken ran over the runway light at Oshkosh. The scrap on the left from the hole in the tank is from Kens last flight when he hit a fence post, maybe a result of the tail being cut off. The way hole is cut in is a lesson on how not to prepare to patch a laminated composite structure.
Flap hinge-as the airplane rolled over the fence post it caught on the flap hinge and bent it. The wing came to rest on the post about a foot out board on the flap. That gouge has been patched.
Inside the slosh tank-Ken took a different tack on the fuel tanks, they do not have to standard flapper system to close the tank, it has some kind of metal ball in a track that seals off the tank. He also did not coat the tank with the prescribed two coats of resin he used a slosh compound. A cool idea but after 20 years it is peeling of in areas like the tank filler and bottom fuel tester drain where the resin is real smooth from gluing in these parts.
Read this topic online here:
http://forums.matronics.com/viewtopic.php?p=406238#406238
Attachments:
http://forums.matronics.com//files/bog_river_to_lows_lake_173.jpg
http://forums.matronics.com//files/km3_slosh_tank_599.jpg
http://forums.matronics.com//files/km3_flap_hinge_123.jpg
http://forums.matronics.com//files/km3_wing_392.jpg
http://www.matronics.com/contri===============
|
| | - The Matronics KIS-List Email Forum - | | | Use the List Feature Navigator to browse the many List utilities available such as the Email Subscriptions page, Archive Search & Download, 7-Day Browse, Chat, FAQ, Photoshare, and much more:
http://www.matronics.com/Navigator?KIS-List |
|
| Description: |
|
| Filesize: |
17.93 KB |
| Viewed: |
11505 Time(s) |
|
|
|
| Back to top |
|
|
sstearns2(at)yahoo.com
Guest
|
| Posted: Thu Aug 08, 2013 6:56 pm Post subject: How long does it take to build an throttle body airbox? |
|
|
Hi Mark,
I have all piano hinges on my flaps and no problems. I also run about 35 degrees of flap.
If you go with the jeffco fuel sealer then Lancair has by far the best price as of a couple months ago.
Larry out in CA had the same problem with the sealer pealing off on this airplane. He used a 6 inch hole saw to access the tanks.
Scott
On Aug 8, 2013, at 10:26 AM, "mark_trickel" <marktrickel(at)gmail.com> wrote:
| Quote: |
Hello Robert,
I just return from a wilderness canoe camping trip in New York's Adirondack Park to find you have overcome yet another problem. I like your idea of ducting cabin heat off the airbox intake. I also know how hard it is to work in extreme heat and humidity conditions. My dad and I rebuilt an Ercoupe and when we brought it back to the hanger to finish it off over a couple of summers the heat inside the back tar coated roof was unbearable no matter how early we arrived to work on the airplane. I hope I have as good as results as you when it comes to solving some of my dilemmas. I have attached a few pics of a couple of things I need to address:
Underside of wing-the scrap on the right is from the time Ken ran over the runway light at Oshkosh. The scrap on the left from the hole in the tank is from Kens last flight when he hit a fence post, maybe a result of the tail being cut off. The way hole is cut in is a lesson on how not to prepare to patch a laminated composite structure.
Flap hinge-as the airplane rolled over the fence post it caught on the flap hinge and bent it. The wing came to rest on the post about a foot out board on the flap. That gouge has been patched.
Inside the slosh tank-Ken took a different tack on the fuel tanks, they do not have to standard flapper system to close the tank, it has some kind of metal ball in a track that seals off the tank. He also did not coat the tank with the prescribed two coats of resin he used a slosh compound. A cool idea but after 20 years it is peeling of in areas like the tank filler and bottom fuel tester drain where the resin is real smooth from gluing in these parts.
Read this topic online here:
http://forums.matronics.com/viewtopic.php?p=406238#406238
Attachments:
http://forums.matronics.com//files/bog_river_to_lows_lake_173.jpg
http://forums.matronics.com//files/km3_slosh_tank_599.jpg
http://forums.matronics.com//files/km3_flap_hinge_123.jpg
http://forums.matronics.com//files/km3_wing_392.jpg
|
| | - The Matronics KIS-List Email Forum - | | | Use the List Feature Navigator to browse the many List utilities available such as the Email Subscriptions page, Archive Search & Download, 7-Day Browse, Chat, FAQ, Photoshare, and much more:
http://www.matronics.com/Navigator?KIS-List |
|
|
|
| Back to top |
|
|
sstearns2(at)yahoo.com
Guest
|
| Posted: Thu Aug 08, 2013 7:03 pm Post subject: How long does it take to build an throttle body airbox? |
|
|
I used the airbox, air scoop, and baffle kit from vans on my airplane. I had to modify them in places and graft the scoop onto the existing cowl, but it was a great starting point. The baffle kit saves tons of time.
http://www.vansaircraft.com/cgi-bin/store.cgi?ident=1376017121-472-6&browse=engines
Why is the throttle body so long? mine is half that long...
Scott
On Aug 8, 2013, at 3:20 PM, Robert Reed <robertr237(at)att.net (robertr237(at)att.net)> wrote:
[quote]Al,
The air box ended up an inch below the bottom of the cowling before I started with the connection to the scoop. I was able to bring that up a little and keep the bottom aligned with the bottom of the cowling. The air inlet extended the connection forward even further below the original cowling shape. The current layup gives me some wiggle room to shape it and cut it back some but my main goal was to keep the smooth flow. What you see right now is a lot of extra foam that will be cut away as the shape is developed. The attached photo shows the basic shape that I am going for and that will transition into the existing cowling shape as much as possible.
Please let me finish it before you start labeling it a steam locomotive.
BOB
From: Alfred Rosa <fredorosa(at)gmail.com (fredorosa(at)gmail.com)>
To: kisbuilders <kis-list(at)matronics.com (kis-list(at)matronics.com)>
Sent: Thursday, August 8, 2013 1:40 PM
Subject: Re: Re: How long does it take to build an throttle body airbox?
Bob,I'm sure that will be an efficient air scoop but the front of your plane is beginning to resemble a locomotive rather than a streamlined airplane. Couldn't the scoop be curved upward and follow the the cowling shape somewhat? Just a thought from a retired industrial designer.
Al
On Thu, Aug 8, 2013 at 12:15 PM, Robert Reed <robertr237(at)att.net (robertr237(at)att.net)> wrote:
| Quote: | Mark,
Looks like you had a great trip, wish I had been there, looks great.
Regarding the fuel tank....Good luck with that. I have NO idea how to fix except sand and try to recoat with Jeffcoat or something. The flaking looks really bad and I wonder if the second bay is as bad. Makes me want to scope out mine before I go any further.
The flap hinge doesn't look too bad from the photo but may need replacement if binding.
The hole in the wing looks like a reverse construction process. Layup two or three ply flat sheet of fiberglass with peel ply on one side to make good bonding surface. Fit the sheet to the inside of the wing hole and bond all the way around. Fill in the middle with foam and bond to the inside skin. Finally, glass over the outside and flair into existing skin. The result should be just as strong as the original skin if not a bit more so.
Sounds so easy doesn't it? The devil is always in the details though.
I am having to do much the same operation on the cowling trying to fabricate an air scoop. It sure looks funny in the intermediate stages but I am hopeful the final result won't look quite so odd. It would have looked a lot better if I has used the same color foam. I will try to get back to it this weekend and start the shaping with a rasp and sandpaper. I figure it will take a couple of weekends to shape it, fill it, shape it some more, fill it some more, and then start the glass work. Followed by more sanding, filling, and repeat until sick of it. The foam I am using can easily be shaped, filled with epoxy micro mix for a bondable surface and then be dissolved with Acetone when finished. It won't look pretty on the inside but I can live with that. I am doing it all in place to make sure the air inlet is properly positioned for the air box attachment.
It is hard to see from the photos but the underside is a flat sheet of 4-ply fiberglass that I fabricated for some other parts that I cut to form the bottom of the scoop and cowling. I used pop rivets and bonded (belt and suspenders) it to the existing cowling bottom. When it took the rounded shape it carried it forward to help flair into the existing contours. I will post additional photos of the process and the completed cowling. (BUT ONLY IF IT COMES OUT LOOKING RIGHT)
Bob Reed
Making slow but steady progress.
From: mark_trickel <marktrickel(at)gmail.com (marktrickel(at)gmail.com)>S
To: kis-list(at)matronics.com (kis-list(at)matronics.com)
Sent: Thursday, August 8, 2013 10:26 AM
Subject: Re: How long does it take to build an throttle body airbox?
--> KIS-List message posted by: "mark_trickel" <marktrickel(at)gmail.com (marktrickel(at)gmail.com)>
Hello Robert,
I just return from a wilderness canoe camping trip in New York's Adirondack Park to find you have overcome yet another problem. I like your idea of ducting cabin heat off the airbox intake. I also know how hard it is to work in extreme heat and humidity conditions. My dad and I rebuilt an Ercoupe and when we brought it back to the hanger to finish it off over a couple of summers the heat inside the back tar coated roof was unbearable no matter how early we arrived to work on the airplane. I hope I have as good as results as you when it comes to solving some of my dilemmas. I have attached a few pics of a couple of things I need to address:
Underside of wing-the scrap on the right is from the time Ken ran over the runway light at Oshkosh. The scrap on the left from the hole in the tank is from Kens last flight when he hit a fence post, maybe a result of the tail being cut off. The way hole is cut in is a lesson on how not to prepare to patch a laminated composite structure.
Flap hinge-as the airplane rolled over the fence post it caught on the flap hinge and bent it. The wing came to rest on the post about a foot out board on the flap. That gouge has been patched.
Inside the slosh tank-Ken took a different tack on the fuel tanks, they do not have to standard flapper system to close the tank, it has some kind of metal ball in a track that seals off the tank. He also did not coat the tank with the prescribed two coats of resin he used a slosh compound. A cool idea but after 20 years it is peeling of in areas like the tank filler and bottom fuel tester drain where the resin is real smooth from gluing in these parts.
Read this topic online here:
http://forums.matronics.com/viewtopic.php?p=406238#406238
Attachments:
http://forums.matronics.com//files/bog_river_to_lows_lake_173.jpg
http://forums.matronics.com//files/km3_slosh_tank_599.jpg
http://forums.matronics.com//files/km3_flap_hinge_123.jpg
http://forums.matronics.com//files/km3_wing_392.jpg
http://www.matronics.com/contri===============
|
<ESMSPITF-89F-47.jpg>
[b]
| | - The Matronics KIS-List Email Forum - | | | Use the List Feature Navigator to browse the many List utilities available such as the Email Subscriptions page, Archive Search & Download, 7-Day Browse, Chat, FAQ, Photoshare, and much more:
http://www.matronics.com/Navigator?KIS-List |
|
|
|
| Back to top |
|
|
Robert Reed
Joined: 22 Oct 2009
Posts: 331
Location: Dallas/Ft.Worth
|
| Posted: Thu Aug 08, 2013 8:07 pm Post subject: How long does it take to build an throttle body airbox? |
|
|
Scott,
The throttle body is just an air control unit which in my mind should be shorter but the dual sensors for manifold pressure and temperature required for the FADEC system take up a large portion of the height. The blue tape is covering the mounts for the censors in the photo. They also protrude out several inches from the throttle body not including the wiring. I looked at the filtered air box from Vans. Another builder on the field has one and I looked at the measurements and they would have required me to also cut the bottom out of the cowling. I might have been able to use the Vans scoop but it would have required almost as much surgery on the cowling. The main difference though is going to come down to cost. When I am done the total cost for the air box, scoop, and modifications will be about $75 vs several hundred for any other option. Cost in time should be about the same overall.
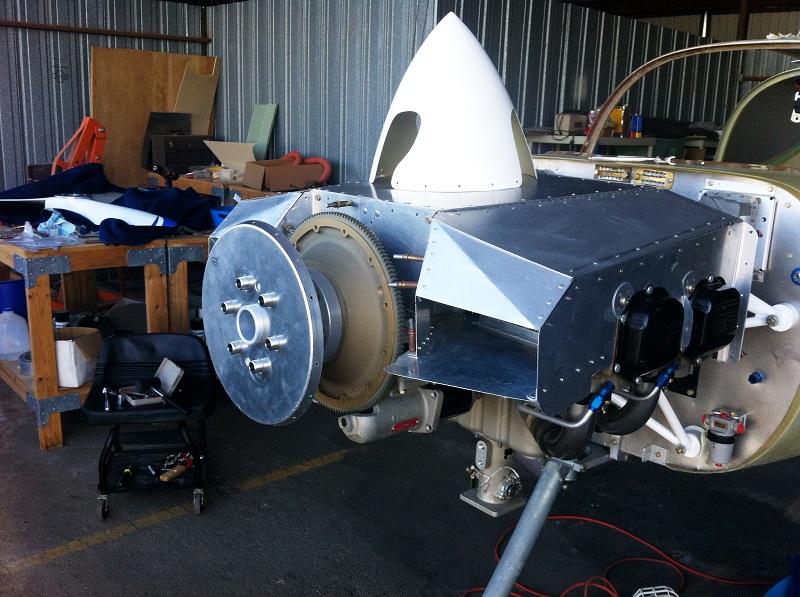
I did get the baffle kit from Vans and you are right, it was a great starting point and saved considerable time. I used it to create a pressure cowling shown in the photo. Used piano hinges to provide quick easy access. My concern living in Texas is getting maximum cooling to the engine which is why I am using a pressure cowling along with vents on the side of the cowling. I am still concerned about getting enough air through the engine with the use of 4 into 1 exhaust. I am a bit concerned the exhaust system will block the air from the rear of the cowling. I am hoping I will have enough air flow.
Bob
From: Scott Stearns <sstearns2(at)yahoo.com>
To: "kis-list(at)matronics.com" <kis-list(at)matronics.com>
Sent: Thursday, August 8, 2013 10:02 PM
Subject: Re: Re: How long does it take to build an throttle body airbox?
I used the airbox, air scoop, and baffle kit from vans on my airplane. I had to modify them in places and graft the scoop onto the existing cowl, but it was a great starting point. The baffle kit saves tons of time.
http://www.vansaircraft.com/cgi-bin/store.cgi?ident=1376017121-472-6&browse=engines
Why is the throttle body so long? mine is half that long...
Scott
On Aug 8, 2013, at 3:20 PM, Robert Reed <robertr237(at)att.net (robertr237(at)att.net)> wrote:
| Quote: | Al,
The air box ended up an inch below the bottom of the cowling before I started with the connection to the scoop. I was able to bring that up a little and keep the bottom aligned with the bottom of the cowling. The air inlet extended the connection forward even further below the original cowling shape. The current layup gives me some wiggle room to shape it and cut it back some but my main goal was to keep the smooth flow. What you see right now is a lot of extra foam that will be cut away as the shape is developed. The attached photo shows the basic shape that I am going for and that will transition into the existing cowling shape as much as possible.
Please let me finish it before you start labeling it a steam locomotive.
BOB
From: Alfred Rosa <fredorosa(at)gmail.com (fredorosa(at)gmail.com)>
To: kisbuilders <kis-list(at)matronics.com (kis-list(at)matronics.com)>
Sent: Thursday, August 8, 2013 1:40 PM
Subject: Re: KIS-List: Re: How long does it take to build an throttle body airbox?
Bob,I'm sure that will be an efficient air scoop but the front of your plane is beginning to resemble a locomotive rather than a streamlined airplane. Couldn't the scoop be curved upward and follow the the cowling shape somewhat? Just a thought from a retired industrial designer.
Al
On Thu, Aug 8, 2013 at 12:15 PM, Robert Reed <robertr237(at)att.net (robertr237(at)att.net)> wrote:
| Quote: | Mark,
Looks like you had a great trip, wish I had been there, looks great.
Regarding the fuel tank....Good luck with that. I have NO idea how to fix except sand and try to recoat with Jeffcoat or something. The flaking looks really bad and I wonder if the second bay is as bad. Makes me want to scope out mine before I go any further.
The flap hinge doesn't look too bad from the photo but may need replacement if binding.
The hole in the wing looks like a reverse construction process. Layup two or three ply flat sheet of fiberglass with peel ply on one side to make good bonding surface. Fit the sheet to the inside of the wing hole and bond all the way around. Fill in the middle with foam and bond to the inside skin. Finally, glass over the outside and flair into existing skin. The result should be just as strong as the original skin if not a bit more so.
Sounds so easy doesn't it? The devil is always in the details though.
I am having to do much the same operation on the cowling trying to fabricate an air scoop. It sure looks funny in the intermediate stages but I am hopeful the final result won't look quite so odd. It would have looked a lot better if I has used the same color foam. I will try to get back to it this weekend and start the shaping with a rasp and sandpaper. I figure it will take a couple of weekends to shape it, fill it, shape it some more, fill it some more, and then start the glass work. Followed by more sanding, filling, and repeat until sick of it. The foam I am using can easily be shaped, filled with epoxy micro mix for a bondable surface and then be dissolved with Acetone when finished. It won't look pretty on the inside but I can live with that. I am doing it all in place to make sure the air inlet is properly positioned for the air box attachment.
It is hard to see from the photos but the underside is a flat sheet of 4-ply fiberglass that I fabricated for some other parts that I cut to form the bottom of the scoop and cowling. I used pop rivets and bonded (belt and suspenders) it to the existing cowling bottom. When it took the rounded shape it carried it forward to help flair into the existing contours. I will post additional photos of the process and the completed cowling. (BUT ONLY IF IT COMES OUT LOOKING RIGHT)
Bob Reed
Making slow but steady progress.
From: mark_trickel <marktrickel(at)gmail.com (marktrickel(at)gmail.com)>S
To: kis-list(at)matronics.com (kis-list(at)matronics.com)
Sent: Thursday, August 8, 2013 10:26 AM
Subject: Re: How long does it take to build an throttle body airbox?
--> KIS-List message posted by: "mark_trickel" <marktrickel(at)gmail.com (marktrickel(at)gmail.com)>
Hello Robert,
I just return from a wilderness canoe camping trip in New York's Adirondack Park to find you have overcome yet another problem. I like your idea of ducting cabin heat off the airbox intake. I also know how hard it is to work in extreme heat and humidity conditions. My dad and I rebuilt an Ercoupe and when we brought it back to the hanger to finish it off over a couple of summers the heat inside the back tar coated roof was unbearable no matter how early we arrived to work on the airplane. I hope I have as good as results as you when it comes to solving some of my dilemmas. I have attached a few pics of a couple of things I need to address:
Underside of wing-the scrap on the right is from the time Ken ran over the runway light at Oshkosh. The scrap on the left from the hole in the tank is from Kens last flight when he hit a fence post, maybe a result of the tail being cut off. The way hole is cut in is a lesson on how not to prepare to patch a laminated composite structure.
Flap hinge-as the airplane rolled over the fence post it caught on the flap hinge and bent it. The wing came to rest on the post about a foot out board on the flap. That gouge has been patched.
Inside the slosh tank-Ken took a different tack on the fuel tanks, they do not have to standard flapper system to close the tank, it has some kind of metal ball in a track that seals off the tank. He also did not coat the tank with the prescribed two coats of resin he used a slosh compound. A cool idea but after 20 years it is peeling of in areas like the tank filler and bottom fuel tester drain where the resin is real smooth from gluing in these parts.
Read this topic online here:
http://forums.matronics.com/viewtopic.php?p=406238#406238
Attachments:
http://forums.matronics.com//files/bog_river_to_lows_lake_173.jpg
http://forums.matronics.com//files/km3_slosh_tank_599.jpg
http://forums.matronics.com//files/km3_flap_hinge_123.jpg
http://forums.matronics.com//files/km3_wing_392.jpg
http://www.matronics.com/contri===============
|
<ESMSPITF-89F-47.jpg>
http://www.matronics.c==================
|
| | - The Matronics KIS-List Email Forum - | | | Use the List Feature Navigator to browse the many List utilities available such as the Email Subscriptions page, Archive Search & Download, 7-Day Browse, Chat, FAQ, Photoshare, and much more:
http://www.matronics.com/Navigator?KIS-List |
|
| Description: |
|
| Filesize: |
156.86 KB |
| Viewed: |
11503 Time(s) |

|
| Description: |
|
| Filesize: |
208.59 KB |
| Viewed: |
11503 Time(s) |
|
|
|
| Back to top |
|
|
sstearns2(at)yahoo.com
Guest
|
| Posted: Thu Aug 08, 2013 10:08 pm Post subject: How long does it take to build an throttle body airbox? |
|
|
Hi Bob,
I forgot you had the FADEC engine. I had major cooling problems with my 360 in the TR-1. I have the 4 into 1 tuned exhaust and it does take up a big chunk of the exit area. I opened up the inlets and exit by 50% and went from a 6 row to a 10 row oil cooler. Cooling is good now but it was a long road. If your engine is set up to spray oil on the back of the pistons like mine is then I would recommend the 10 row oil cooler. It just fits on the vans baffles if you make the hole bigger.
Somewhere I saw a louvered cowl vent that was cockpit adjustable for airflow, but now I cant find it. Have you seen anything like that?
Scott
On Aug 8, 2013, at 11:06 PM, Robert Reed <robertr237(at)att.net (robertr237(at)att.net)> wrote:
[quote]Scott,
The throttle body is just an air control unit which in my mind should be shorter but the dual sensors for manifold pressure and temperature required for the FADEC system take up a large portion of the height. The blue tape is covering the mounts for the censors in the photo. They also protrude out several inches from the throttle body not including the wiring. I looked at the filtered air box from Vans. Another builder on the field has one and I looked at the measurements and they would have required me to also cut the bottom out of the cowling. I might have been able to use the Vans scoop but it would have required almost as much surgery on the cowling. The main difference though is going to come down to cost. When I am done the total cost for the air box, scoop, and modifications will be about $75 vs several hundred for any other option. Cost in time should be about the same overall.
I did get the baffle kit from Vans and you are right, it was a great starting point and saved considerable time. I used it to create a pressure cowling shown in the photo. Used piano hinges to provide quick easy access. My concern living in Texas is getting maximum cooling to the engine which is why I am using a pressure cowling along with vents on the side of the cowling. I am still concerned about getting enough air through the engine with the use of 4 into 1 exhaust. I am a bit concerned the exhaust system will block the air from the rear of the cowling. I am hoping I will have enough air flow.
Bob
From: Scott Stearns <sstearns2(at)yahoo.com (sstearns2(at)yahoo.com)>
To: "kis-list(at)matronics.com (kis-list(at)matronics.com)" <kis-list(at)matronics.com (kis-list(at)matronics.com)>
Sent: Thursday, August 8, 2013 10:02 PM
Subject: Re: Re: How long does it take to build an throttle body airbox?
I used the airbox, air scoop, and baffle kit from vans on my airplane. I had to modify them in places and graft the scoop onto the existing cowl, but it was a great starting point. The baffle kit saves tons of time.
http://www.vansaircraft.com/cgi-bin/store.cgi?ident=1376017121-472-6&browse=engines
Why is the throttle body so long? mine is half that long...
Scott
On Aug 8, 2013, at 3:20 PM, Robert Reed <robertr237(at)att.net (robertr237(at)att.net)> wrote:
| Quote: | Al,
The air box ended up an inch below the bottom of the cowling before I started with the connection to the scoop. I was able to bring that up a little and keep the bottom aligned with the bottom of the cowling. The air inlet extended the connection forward even further below the original cowling shape. The current layup gives me some wiggle room to shape it and cut it back some but my main goal was to keep the smooth flow. What you see right now is a lot of extra foam that will be cut away as the shape is developed. The attached photo shows the basic shape that I am going for and that will transition into the existing cowling shape as much as possible.
Please let me finish it before you start labeling it a steam locomotive.
BOB
From: Alfred Rosa <fredorosa(at)gmail.com (fredorosa(at)gmail.com)>
To: kisbuilders <kis-list(at)matronics.com (kis-list(at)matronics.com)>
Sent: Thursday, August 8, 2013 1:40 PM
Subject: Re: KIS-List: Re: How long does it take to build an throttle body airbox?
Bob,I'm sure that will be an efficient air scoop but the front of your plane is beginning to resemble a locomotive rather than a streamlined airplane. Couldn't the scoop be curved upward and follow the the cowling shape somewhat? Just a thought from a retired industrial designer.
Al
On Thu, Aug 8, 2013 at 12:15 PM, Robert Reed <robertr237(at)att.net (robertr237(at)att.net)> wrote:
| Quote: | Mark,
Looks like you had a great trip, wish I had been there, looks great.
Regarding the fuel tank....Good luck with that. I have NO idea how to fix except sand and try to recoat with Jeffcoat or something. The flaking looks really bad and I wonder if the second bay is as bad. Makes me want to scope out mine before I go any further.
The flap hinge doesn't look too bad from the photo but may need replacement if binding.
The hole in the wing looks like a reverse construction process. Layup two or three ply flat sheet of fiberglass with peel ply on one side to make good bonding surface. Fit the sheet to the inside of the wing hole and bond all the way around. Fill in the middle with foam and bond to the inside skin. Finally, glass over the outside and flair into existing skin. The result should be just as strong as the original skin if not a bit more so.
Sounds so easy doesn't it? The devil is always in the details though.
I am having to do much the same operation on the cowling trying to fabricate an air scoop. It sure looks funny in the intermediate stages but I am hopeful the final result won't look quite so odd. It would have looked a lot better if I has used the same color foam. I will try to get back to it this weekend and start the shaping with a rasp and sandpaper. I figure it will take a couple of weekends to shape it, fill it, shape it some more, fill it some more, and then start the glass work. Followed by more sanding, filling, and repeat until sick of it. The foam I am using can easily be shaped, filled with epoxy micro mix for a bondable surface and then be dissolved with Acetone when finished. It won't look pretty on the inside but I can live with that. I am doing it all in place to make sure the air inlet is properly positioned for the air box attachment.
It is hard to see from the photos but the underside is a flat sheet of 4-ply fiberglass that I fabricated for some other parts that I cut to form the bottom of the scoop and cowling. I used pop rivets and bonded (belt and suspenders) it to the existing cowling bottom. When it took the rounded shape it carried it forward to help flair into the existing contours. I will post additional photos of the process and the completed cowling. (BUT ONLY IF IT COMES OUT LOOKING RIGHT)
Bob Reed
Making slow but steady progress.
From: mark_trickel <marktrickel(at)gmail.com (marktrickel(at)gmail.com)>S
To: kis-list(at)matronics.com (kis-list(at)matronics.com)
Sent: Thursday, August 8, 2013 10:26 AM
Subject: Re: How long does it take to build an throttle body airbox?
--> KIS-List message posted by: "mark_trickel" <marktrickel(at)gmail.com (marktrickel(at)gmail.com)>
Hello Robert,
I just return from a wilderness canoe camping trip in New York's Adirondack Park to find you have overcome yet another problem. I like your idea of ducting cabin heat off the airbox intake. I also know how hard it is to work in extreme heat and humidity conditions. My dad and I rebuilt an Ercoupe and when we brought it back to the hanger to finish it off over a couple of summers the heat inside the back tar coated roof was unbearable no matter how early we arrived to work on the airplane. I hope I have as good as results as you when it comes to solving some of my dilemmas. I have attached a few pics of a couple of things I need to address:
Underside of wing-the scrap on the right is from the time Ken ran over the runway light at Oshkosh. The scrap on the left from the hole in the tank is from Kens last flight when he hit a fence post, maybe a result of the tail being cut off. The way hole is cut in is a lesson on how not to prepare to patch a laminated composite structure.
Flap hinge-as the airplane rolled over the fence post it caught on the flap hinge and bent it. The wing came to rest on the post about a foot out board on the flap. That gouge has been patched.
Inside the slosh tank-Ken took a different tack on the fuel tanks, they do not have to standard flapper system to close the tank, it has some kind of metal ball in a track that seals off the tank. He also did not coat the tank with the prescribed two coats of resin he used a slosh compound. A cool idea but after 20 years it is peeling of in areas like the tank filler and bottom fuel tester drain where the resin is real smooth from gluing in these parts.
Read this topic online here:
http://forums.matronics.com/viewtopic.php?p=406238#406238
Attachments:
http://forums.matronics.com//files/bog_river_to_lows_lake_173.jpg
http://forums.matronics.com//files/km3_slosh_tank_599.jpg
http://forums.matronics.com//files/km3_flap_hinge_123.jpg
http://forums.matronics.com//files/km3_wing_392.jpg
http://www.matronics.com/contri===============
|
<ESMSPITF-89F-47.jpg>
http://www.matronics.c==================
|
<IMG_0447small.jpg>
<IMG_0202_Small.jpg>
[b]
| | - The Matronics KIS-List Email Forum - | | | Use the List Feature Navigator to browse the many List utilities available such as the Email Subscriptions page, Archive Search & Download, 7-Day Browse, Chat, FAQ, Photoshare, and much more:
http://www.matronics.com/Navigator?KIS-List |
|
|
|
| Back to top |
|
|
Robert Reed
Joined: 22 Oct 2009
Posts: 331
Location: Dallas/Ft.Worth
|
| Posted: Fri Aug 09, 2013 6:22 am Post subject: How long does it take to build an throttle body airbox? |
|
|
Scott,
I put the oil cooler on the firewall with a feed from the pressure cowling behind #3 cylinder. If that doesn't prove adequate I will put an NACA inlet on side of cowling to pickup the air and block off the current outlet. I am really thinking it will be enough but if there are issues they will probably be in providing enough exits for the air. I am not planning on putting the cowling extensions below the fuselage as was done on some planes for appearance since I believe they will restrict the air going out. I think it will look just fine with the way the exhaust system will flow under the fuselage. If necessary I could put a lip on the bottom to help produce a low pressure area.
I also remember seeing some adjustable louvered cowl vents but darned if I can remember who had them. I got my louvers from Aircraft Specialty LLC, a small specialty shop producing parts for various aircraft. They only cost $16 each and they offer a service to custom fabricate the louvers to your specifications. They could probably produce the cockpit adjustable louvers without too much trouble. They also do hoses and power cables to order. http://www.aircraftspecialty.com/index.html
Bob Reed
From: Scott Stearns <sstearns2(at)yahoo.com>
To: "kis-list(at)matronics.com" <kis-list(at)matronics.com>
Sent: Friday, August 9, 2013 1:08 AM
Subject: Re: KIS-List: Re: How long does it take to build an throttle body airbox?
Hi Bob,
I forgot you had the FADEC engine. I had major cooling problems with my 360 in the TR-1. I have the 4 into 1 tuned exhaust and it does take up a big chunk of the exit area. I opened up the inlets and exit by 50% and went from a 6 row to a 10 row oil cooler. Cooling is good now but it was a long road. If your engine is set up to spray oil on the back of the pistons like mine is then I would recommend the 10 row oil cooler. It just fits on the vans baffles if you make the hole bigger.
Somewhere I saw a louvered cowl vent that was cockpit adjustable for airflow, but now I cant find it. Have you seen anything like that?
Scott
On Aug 8, 2013, at 11:06 PM, Robert Reed <robertr237(at)att.net (robertr237(at)att.net)> wrote:
[quote]Scott,
The throttle body is just an air control unit which in my mind should be shorter but the dual sensors for manifold pressure and temperature required for the FADEC system take up a large portion of the height. The blue tape is covering the mounts for the censors in the photo. They also protrude out several inches from the throttle body not including the wiring. I looked at the filtered air box from Vans. Another builder on the field has one and I looked at the measurements and they would have required me to also cut the bottom out of the cowling. I might have been able to use the Vans scoop but it would have required almost as much surgery on the cowling. The main difference though is going to come down to cost. When I am done the total cost for the air box, scoop, and modifications will be about $75 vs several hundred for any other option. Cost in time should be about the same overall.
I did get the baffle kit from Vans and you are right, it was a great starting point and saved considerable time. I used it to create a pressure cowling shown in the photo. Used piano hinges to provide quick easy access. My concern living in Texas is getting maximum cooling to the engine which is why I am using a pressure cowling along with vents on the side of the cowling. I am still concerned about getting enough air through the engine with the use of 4 into 1 exhaust. I am a bit concerned the exhaust system will block the air from the rear of the cowling. I am hoping I will have enough air flow.
Bob
From: Scott Stearns <sstearns2(at)yahoo.com (sstearns2(at)yahoo.com)>
To: "kis-list(at)matronics.com (kis-list(at)matronics.com)" <kis-list(at)matronics.com (kis-list(at)matronics.com)>
Sent: Thursday, August 8, 2013 10:02 PM
Subject: Re: Re: How long does it take to build an throttle body airbox?
I used the airbox, air scoop, and baffle kit from vans on my airplane. I had to modify them in places and graft the scoop onto the existing cowl, but it was a great starting point. The baffle kit saves tons of time.
http://www.vansaircraft.com/cgi-bin/store.cgi?ident=1376017121-472-6&browse=engines
Why is the throttle body so long? mine is half that long...
Scott
On Aug 8, 2013, at 3:20 PM, Robert Reed <robertr237(at)att.net (robertr237(at)att.net)> wrote:
| Quote: | Al,
The air box ended up an inch below the bottom of the cowling before I started with the connection to the scoop. I was able to bring that up a little and keep the bottom aligned with the bottom of the cowling. The air inlet extended the connection forward even further below the original cowling shape. The current layup gives me some wiggle room to shape it and cut it back some but my main goal was to keep the smooth flow. What you see right now is a lot of extra foam that will be cut away as the shape is developed. The attached photo shows the basic shape that I am going for and that will transition into the existing cowling shape as much as possible.
Please let me finish it before you start labeling it a steam locomotive.
BOB
From: Alfred Rosa <fredorosa(at)gmail.com (fredorosa(at)gmail.com)>
To: kisbuilders <kis-list(at)matronics.com (kis-list(at)matronics.com)>
Sent: Thursday, August 8, 2013 1:40 PM
Subject: Re: KIS-List: Re: How long does it take to build an throttle body airbox?
Bob,I'm sure that will be an efficient air scoop but the front of your plane is beginning to resemble a locomotive rather than a streamlined airplane. Couldn't the scoop be curved upward and follow the the cowling shape somewhat? Just a thought from a retired industrial designer.
Al
On Thu, Aug 8, 2013 at 12:15 PM, Robert Reed <robertr237(at)att.net (robertr237(at)att.net)> wrote:
| Quote: | Mark,
Looks like you had a great trip, wish I had been there, looks great.
Regarding the fuel tank....Good luck with that. I have NO idea how to fix except sand and try to recoat with Jeffcoat or something. The flaking looks really bad and I wonder if the second bay is as bad. Makes me want to scope out mine before I go any further.
The flap hinge doesn't look too bad from the photo but may need replacement if binding.
The hole in the wing looks like a reverse construction process. Layup two or three ply flat sheet of fiberglass with peel ply on one side to make good bonding surface. Fit the sheet to the inside of the wing hole and bond all the way around. Fill in the middle with foam and bond to the inside skin. Finally, glass over the outside and flair into existing skin. The result should be just as strong as the original skin if not a bit more so.
Sounds so easy doesn't it? The devil is always in the details though.
I am having to do much the same operation on the cowling trying to fabricate an air scoop. It sure looks funny in the intermediate stages but I am hopeful the final result won't look quite so odd. It would have looked a lot better if I has used the same color foam. I will try to get back to it this weekend and start the shaping with a rasp and sandpaper. I figure it will take a couple of weekends to shape it, fill it, shape it some more, fill it some more, and then start the glass work. Followed by more sanding, filling, and repeat until sick of it. The foam I am using can easily be shaped, filled with epoxy micro mix for a bondable surface and then be dissolved with Acetone when finished. It won't look pretty on the inside but I can live with that. I am doing it all in place to make sure the air inlet is properly positioned for the air box attachment.
It is hard to see from the photos but the underside is a flat sheet of 4-ply fiberglass that I fabricated for some other parts that I cut to form the bottom of the scoop and cowling. I used pop rivets and bonded (belt and suspenders) it to the existing cowling bottom. When it took the rounded shape it carried it forward to help flair into the existing contours. I will post additional photos of the process and the completed cowling. (BUT ONLY IF IT COMES OUT LOOKING RIGHT)
Bob Reed
Making slow but steady progress.
From: mark_trickel <marktrickel(at)gmail.com (marktrickel(at)gmail.com)>S
To: kis-list(at)matronics.com (kis-list(at)matronics.com)
Sent: Thursday, August 8, 2013 10:26 AM
Subject: Re: How long does it take to build an throttle body airbox?
--> KIS-List message posted by: "mark_trickel" <marktrickel(at)gmail.com (marktrickel(at)gmail.com)>
Hello Robert,
I just return from a wilderness canoe camping trip in New York's Adirondack Park to find you have overcome yet another problem. I like your idea of ducting cabin heat off the airbox intake. I also know how hard it is to work in extreme heat and humidity conditions. My dad and I rebuilt an Ercoupe and when we brought it back to the hanger to finish it off over a couple of summers the heat inside the back tar coated roof was unbearable no matter how early we arrived to work on the airplane. I hope I have as good as results as you when it comes to solving some of my dilemmas. I have attached a few pics of a couple of things I need to address:
Underside of wing-the scrap on the right is from the time Ken ran over the runway light at Oshkosh. The scrap on the left from the hole in the tank is from Kens last flight when he hit a fence post, maybe a result of the tail being cut off. The way hole is cut in is a lesson on how not to prepare to patch a laminated composite structure.
Flap hinge-as the airplane rolled over the fence post it caught on the flap hinge and bent it. The wing came to rest on the post about a foot out board on the flap. That gouge has been patched.
Inside the slosh tank-Ken took a different tack on the fuel tanks, they do not have to standard flapper system to close the tank, it has some kind of metal ball in a track that seals off the tank. He also did not coat the tank with the prescribed two coats of resin he used a slosh compound. A cool idea but after 20 years it is peeling of in areas like the tank filler and bottom fuel tester drain where the resin is real smooth from gluing in these parts.
Read this topic online here:
http://forums.matronics.com/viewtopic.php?p=406238#406238
Attachments:
http://forums.matronics.com//files/bog_river_to_lows_lake_173.jpg
http://forums.matronics.com//files/km3_slosh_tank_599.jpg
http://forums.matronics.com//files/km3_flap_hinge_123.jpg
http://forums.matronics.com//files/km3_wing_392.jpg
http://www.matronics.com/contri===============
|
<ESMSPITF-89F-47.jpg>
http://www.matronics.c==================/
|
<IMG_0447small.jpg>
<IMG_0202_Small.jpg>
http://www.matronics.com/Navigator?KISom/" target="_blank" rel="nofollow">http://forums.matronics.com/
ef="http://www.matronics.com/contribution" target="_blank" rel="nofol==
[b]
| | - The Matronics KIS-List Email Forum - | | | Use the List Feature Navigator to browse the many List utilities available such as the Email Subscriptions page, Archive Search & Download, 7-Day Browse, Chat, FAQ, Photoshare, and much more:
http://www.matronics.com/Navigator?KIS-List |
|
|
|
| Back to top |
|
|
mark_trickel
Joined: 13 Dec 2011
Posts: 101
Location: Philadelphia, PA, USA
|
| Posted: Fri Aug 09, 2013 6:59 am Post subject: Re: How long does it take to build an throttle body airbox? |
|
|
Hey Robert,
Attached is a pic of the âlocomotionâ end of Scottâs - King of all KISes. It shows the RV scoop and how he blended it onto the stock cowling. The part is about 80 bucks, but would remove the individuality that you have expressed in your build so far. I must say Robert when I look through the pics of your build your level of quality and innovation is first class. When Ken McCormick built the airplane I have he spent 500 hours to complete the airframe. When I look at yours I see more than 500 hours in the cockpit alone. Keep on Cruisinâ.
Thanks everybody for you input on my fuel tank situation. One thing I should have mentioned is it was fueled with auto gas. But it only flew about one year and there appears to be no damage or any signs of leaking, plus all the fuel leaked out of that big hole anyway. I plan to check the tanks out thoroughly with some kind of bore scope. I hate the idea of cutting holes in the wing but I will do what I must. Mark K â how about this idea, if I canât use the existing tanks-use the wing tips from the last rib outward and maybe make longer wing tips?
Mark T.
| | - The Matronics KIS-List Email Forum - | | | Use the List Feature Navigator to browse the many List utilities available such as the Email Subscriptions page, Archive Search & Download, 7-Day Browse, Chat, FAQ, Photoshare, and much more:
http://www.matronics.com/Navigator?KIS-List |
|
| Description: |
|
| Filesize: |
242.9 KB |
| Viewed: |
11485 Time(s) |
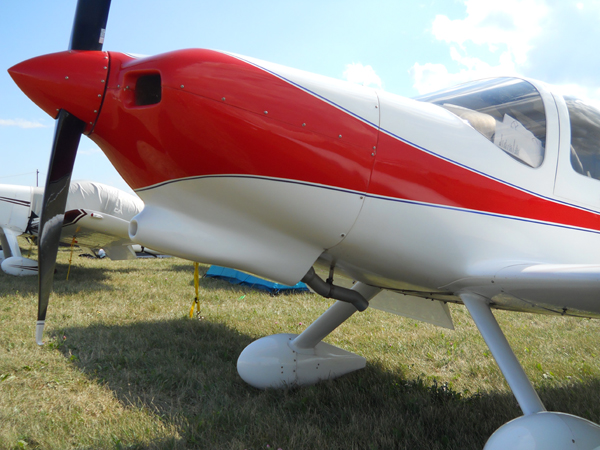
|
|
|
| Back to top |
|
|
sstearns2(at)yahoo.com
Guest
|
| Posted: Fri Aug 09, 2013 8:21 am Post subject: How long does it take to build an throttle body airbox? |
|
|
Hey Mark,
Harbor freight has a cheapish camera on a flexible arm thing. Works pretty well. Be sure to find a 20% off coupon. They call it a digital inspection camera.
Scott
On Aug 9, 2013, at 9:59 AM, "mark_trickel" <marktrickel(at)gmail.com> wrote:
| Quote: |
Hey Robert,
Attached is a pic of the ââ¬Ålocomotionââ¬Â end of Scottââ¬â¢s - King of all KISes. It shows the RV scoop and how he blended it onto the stock cowling. The part is about 80 bucks, but would remove the individuality that you have expressed in your build so far. I must say Robert when I look through the pics of your build your level of quality and innovation is first class. When Ken McCormick built the airplane I have he spent 500 hours to complete the airframe. When I look at yours I see more than 500 hours in the cockpit alone. Keep on Cruisinââ¬â¢.
Thanks everybody for you input on my fuel tank situation. One thing I should have mentioned is it was fueled with auto gas. But it only flew about one year and there appears to be no damage or any signs of leaking, plus all the fuel leaked out of that big hole anyway. I plan to check the tanks out thoroughly with some kind of bore scope. I hate the idea of cutting holes in the wing but I will do what I must. Mark K ââ¬â how about this idea, if I canââ¬â¢t use the existing tanks-use the wing tips from the last rib outward and maybe make longer wing tips?
Mark T.
Read this topic online here:
http://forums.matronics.com/viewtopic.php?p=406317#406317
Attachments:
http://forums.matronics.com//files/scotts_tr_1c_cowling_138.jpg
|
| | - The Matronics KIS-List Email Forum - | | | Use the List Feature Navigator to browse the many List utilities available such as the Email Subscriptions page, Archive Search & Download, 7-Day Browse, Chat, FAQ, Photoshare, and much more:
http://www.matronics.com/Navigator?KIS-List |
|
|
|
| Back to top |
|
|
Robert Reed
Joined: 22 Oct 2009
Posts: 331
Location: Dallas/Ft.Worth
|
| Posted: Fri Aug 09, 2013 9:28 am Post subject: How long does it take to build an throttle body airbox? |
|
|
Mark,
Thanks so much for your encouraging comments. I will say though that the individuality, innovation, and sometimes quality are all great but I am past the point where I just want it finished and flying. As you mentioned, all those innovations took a lot of time both from planning and construction. Were I to go back and be able to do it all again, there would not be as many innovations or individuality in this plane AND it would be flying by now.
As to the fuel tanks, I always felt that our wings were built upside down when they should have been built top side up but I do understand some of the reasoning behind it. The peeling shown on your photos really looks serious from both contamination and lamination standpoint. Have you detected any fuel penetration into the foam core of the wing? Other than cleaning and adding more lamination followed by Jeffcoat, I have no suggestions.
Bob
From: mark_trickel <marktrickel(at)gmail.com>
To: kis-list(at)matronics.com
Sent: Friday, August 9, 2013 9:59 AM
Subject: KIS-List: Re: How long does it take to build an throttle body airbox?
--> KIS-List message posted by: "mark_trickel" <marktrickel(at)gmail.com (marktrickel(at)gmail.com)>
Hey Robert,
Attached is a pic of the âlocomotionâ end of Scottâs - King of all KISes. It shows the RV scoop and how he blended it onto the stock cowling. The part is about 80 bucks, but would remove the individuality that you have expressed in your build so far. I must say Robert when I look through the pics of your build your level of quality and innovation is first class. When Ken McCormick built the airplane I have he spent 500 hours to complete the airframe. When I look at yours I see more than 500 hours in the cockpit alone. Keep on Cruisinâ.
Thanks everybody for you input on my fuel tank situation. One thing I should have mentioned is it was fueled with auto gas. But it only flew about one year and there appears to be no damage or any signs of leaking, plus all the fuel leaked out of that big hole anyway. I plan to check the tanks out thoroughly with some kind of bore scope. I hate the idea of cutting holes in the wing but I will do what I must. Mark K â how about this idea, if I canât use the existing tanks-use the wing tips from the last rib outward and maybe make longer wing tips?
Mark T.
Read this topic online here:
http://forums.matronics.com/viewtopic.php?p=406317#406317
Attachments:
http://forums.matronics.com//files/scotts_tr_1c_cowling_138.jpg
_-========================; -Matt Dral=============
[quote][b]
| | - The Matronics KIS-List Email Forum - | | | Use the List Feature Navigator to browse the many List utilities available such as the Email Subscriptions page, Archive Search & Download, 7-Day Browse, Chat, FAQ, Photoshare, and much more:
http://www.matronics.com/Navigator?KIS-List |
|
|
|
| Back to top |
|
|
fredorosa(at)gmail.com
Guest
|
| Posted: Fri Aug 09, 2013 9:37 am Post subject: How long does it take to build an throttle body airbox? |
|
|
Bob,
With me it has become the journey rather than the destination.
Al
Sent from my iPhone
On Aug 9, 2013, at 1:28 PM, Robert Reed <robertr237(at)att.net (robertr237(at)att.net)> wrote:
[quote]Mark,
Thanks so much for your encouraging comments. I will say though that the individuality, innovation, and sometimes quality are all great but I am past the point where I just want it finished and flying. As you mentioned, all those innovations took a lot of time both from planning and construction. Were I to go back and be able to do it all again, there would not be as many innovations or individuality in this plane AND it would be flying by now.
As to the fuel tanks, I always felt that our wings were built upside down when they should have been built top side up but I do understand some of the reasoning behind it. The peeling shown on your photos really looks serious from both contamination and lamination standpoint. Have you detected any fuel penetration into the foam core of the wing? Other than cleaning and adding more lamination followed by Jeffcoat, I have no suggestions.
Bob
From: mark_trickel <marktrickel(at)gmail.com (marktrickel(at)gmail.com)>
To: kis-list(at)matronics.com (kis-list(at)matronics.com)
Sent: Friday, August 9, 2013 9:59 AM
Subject: KIS-List: Re: How long does it take to build an throttle body airbox?
--> KIS-List message posted by: "mark_trickel" <marktrickel(at)gmail.com (marktrickel(at)gmail.com)>
Hey Robert,
Attached is a pic of the âlocomotionâ end of Scottâs - King of all KISes. It shows the RV scoop and how he blended it onto the stock cowling. The part is about 80 bucks, but would remove the individuality that you have expressed in your build so far. I must say Robert when I look through the pics of your build your level of quality and innovation is first class. When Ken McCormick built the airplane I have he spent 500 hours to complete the airframe. When I look at yours I see more than 500 hours in the cockpit alone. Keep on Cruisinâ.
Thanks everybody for you input on my fuel tank situation. One thing I should have mentioned is it was fueled with auto gas. But it only flew about one year and there appears to be no damage or any signs of leaking, plus all the fuel leaked out of that big hole anyway. I plan to check the tanks out thoroughly with some kind of bore scope. I hate the idea of cutting holes in the wing but I will do what I must. Mark K â how about this idea, if I canât use the existing tanks-use the wing tips from the last rib outward and maybe make longer wing tips?
Mark T.
Read this topic online here:
http://forums.matronics.com/viewtopic.php?p=406317#406317
Attachments:
http://forums.matro======================; -Matt Dral=============
| Quote: |
===================================
//www.matronics.com/Navigator?KIS-List
===================================
cs.com
===================================
matronics.com/contribution
===================================
|
[b]
| | - The Matronics KIS-List Email Forum - | | | Use the List Feature Navigator to browse the many List utilities available such as the Email Subscriptions page, Archive Search & Download, 7-Day Browse, Chat, FAQ, Photoshare, and much more:
http://www.matronics.com/Navigator?KIS-List |
|
|
|
| Back to top |
|
|
Robert Reed
Joined: 22 Oct 2009
Posts: 331
Location: Dallas/Ft.Worth
|
| Posted: Fri Aug 09, 2013 10:53 am Post subject: How long does it take to build an throttle body airbox? |
|
|
Al,
Understood, but I would eventually like to get there and then start on another while still flying this one.
I have been thinking about building some of the pedal planes as my keep busy work after retiring (like that is ever going to happen...4 1/2 years I HOPE!) but would consider a wood and fabric plane project too or maybe a LSA of some type.
BOB
From: Alfred Rosa <fredorosa(at)gmail.com>
To: "kis-list(at)matronics.com" <kis-list(at)matronics.com>
Sent: Friday, August 9, 2013 12:37 PM
Subject: Re: Re: How long does it take to build an throttle body airbox?
Bob,
With me it has become the journey rather than the destination.
Al
Sent from my iPhone
On Aug 9, 2013, at 1:28 PM, Robert Reed <robertr237(at)att.net (robertr237(at)att.net)> wrote:
[quote]Mark,
Thanks so much for your encouraging comments. I will say though that the individuality, innovation, and sometimes quality are all great but I am past the point where I just want it finished and flying. As you mentioned, all those innovations took a lot of time both from planning and construction. Were I to go back and be able to do it all again, there would not be as many innovations or individuality in this plane AND it would be flying by now.
As to the fuel tanks, I always felt that our wings were built upside down when they should have been built top side up but I do understand some of the reasoning behind it. The peeling shown on your photos really looks serious from both contamination and lamination standpoint. Have you detected any fuel penetration into the foam core of the wing? Other than cleaning and adding more lamination followed by Jeffcoat, I have no suggestions.
Bob
From: mark_trickel <marktrickel(at)gmail.com (marktrickel(at)gmail.com)>
To: kis-list(at)matronics.com (kis-list(at)matronics.com)
Sent: Friday, August 9, 2013 9:59 AM
Subject: Re: How long does it take to build an throttle body airbox?
--> KIS-List message posted by: "mark_trickel" <marktrickel(at)gmail.com (marktrickel(at)gmail.com)>
Hey Robert,
Attached is a pic of the âlocomotionâ end of Scottâs - King of all KISes. It shows the RV scoop and how he blended it onto the stock cowling. The part is about 80 bucks, but would remove the individuality that you have expressed in your build so far. I must say Robert when I look through the pics of your build your level of quality and innovation is first class. When Ken McCormick built the airplane I have he spent 500 hours to complete the airframe. When I look at yours I see more than 500 hours in the cockpit alone. Keep on Cruisinâ.
Thanks everybody for you input on my fuel tank situation. One thing I should have mentioned is it was fueled with auto gas. But it only flew about one year and there appears to be no damage or any signs of leaking, plus all the fuel leaked out of that big hole anyway. I plan to check the tanks out thoroughly with some kind of bore scope. I hate the idea of cutting holes in the wing but I will do what I must. Mark K â how about this idea, if I canât use the existing tanks-use the wing tips from the last rib outward and maybe make longer wing tips?
Mark T.
Read this topic online here:
http://forums.matronics.com/viewtopic.php?p=406317#406317
Attachments:
http://forums.matro======================; -Matt Dral=============
| Quote: |
===================================
//www.matronics.com/Navigator?KIS-List
===================================
cs.com
==========
matronics.com/contribution
==========
|
[b]
| | - The Matronics KIS-List Email Forum - | | | Use the List Feature Navigator to browse the many List utilities available such as the Email Subscriptions page, Archive Search & Download, 7-Day Browse, Chat, FAQ, Photoshare, and much more:
http://www.matronics.com/Navigator?KIS-List |
|
|
|
| Back to top |
|
|
bakerocb
Joined: 15 Jan 2006
Posts: 727
Location: FAIRFAX VA
|
| Posted: Fri Aug 09, 2013 12:38 pm Post subject: How long does it take to build an throttle body airbox? |
|
|
8/9/2013
Hello Robert Reed, You wrote: â..... the dual sensors for manifold pressure and temperature required for the FADEC system take up a large portion of the height.â
1) Lycoming has actually fielded engines with a FADEC (Full Authority Digital Engine Control) system? What engine models?
2) Why would not a FADEC system take advantage of / require fuel injection?
Thanks,
OC
===============================
From: Robert Reed (robertr237(at)att.net)
Sent: Friday, August 09, 2013 12:06 AM
To: kis-list(at)matronics.com (kis-list(at)matronics.com)
Subject: Re: Re: How long does it take to build an throttle body airbox?
Scott,
The throttle body is just an air control unit which in my mind should be shorter but the dual sensors for manifold pressure and temperature required for the FADEC system take up a large portion of the height. The blue tape is covering the mounts for the censors in the photo. They also protrude out several inches from the throttle body not including the wiring. I looked at the filtered air box from Vans. Another builder on the field has one and I looked at the measurements and they would have required me to also cut the bottom out of the cowling. I might have been able to use the Vans scoop but it would have required almost as much surgery on the cowling. The main difference though is going to come down to cost. When I am done the total cost for the air box, scoop, and modifications will be about $75 vs several hundred for any other option. Cost in time should be about the same overall.
I did get the baffle kit from Vans and you are right, it was a great starting point and saved considerable time. I used it to create a pressure cowling shown in the photo. Used piano hinges to provide quick easy access. My concern living in Texas is getting maximum cooling to the engine which is why I am using a pressure cowling along with vents on the side of the cowling. I am still concerned about getting enough air through the engine with the use of 4 into 1 exhaust. I am a bit concerned the exhaust system will block the air from the rear of the cowling. I am hoping I will have enough air flow.
Bob
[quote][b]
| | - The Matronics KIS-List Email Forum - | | | Use the List Feature Navigator to browse the many List utilities available such as the Email Subscriptions page, Archive Search & Download, 7-Day Browse, Chat, FAQ, Photoshare, and much more:
http://www.matronics.com/Navigator?KIS-List |
|
|
|
| Back to top |
|
|
|
|
You cannot post new topics in this forum
You cannot reply to topics in this forum
You cannot edit your posts in this forum
You cannot delete your posts in this forum
You cannot vote in polls in this forum
You cannot attach files in this forum
You can download files in this forum
|
Powered by phpBB © 2001, 2005 phpBB Group
|

