 |
Matronics Email Lists
Web Forum Interface to the Matronics Email Lists
|
| View previous topic :: View next topic |
| Author |
Message |
Robert Reed
Joined: 22 Oct 2009
Posts: 331
Location: Dallas/Ft.Worth
|
 Posted: Sun Aug 11, 2013 6:12 pm Post subject: Cowling Air Scoop and my wife... Posted: Sun Aug 11, 2013 6:12 pm Post subject: Cowling Air Scoop and my wife... |
 |
|
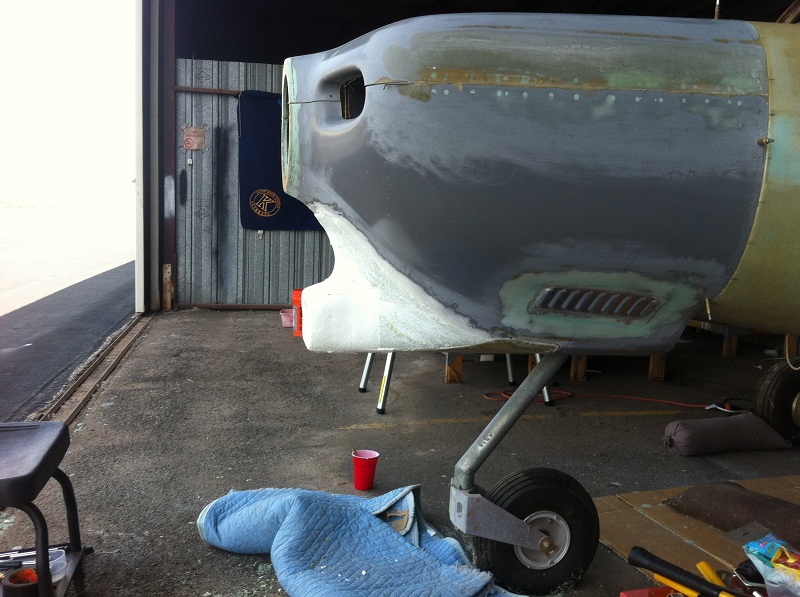
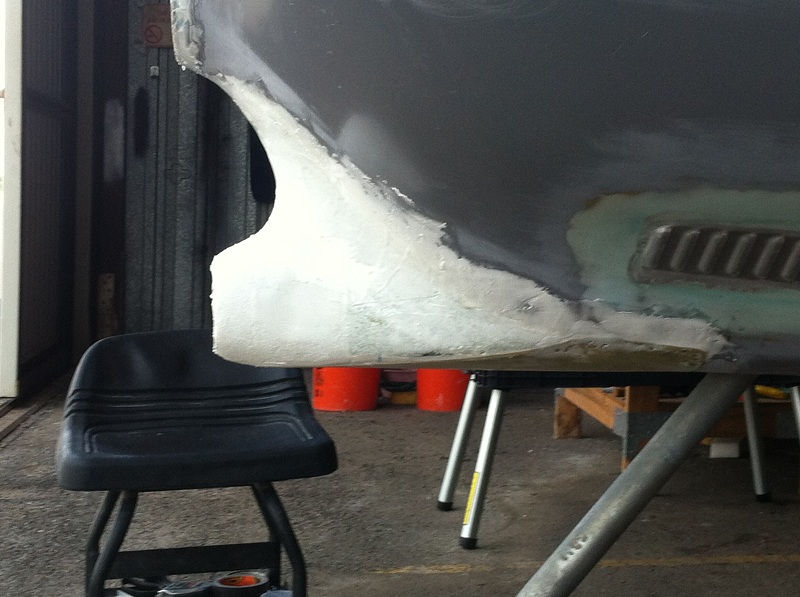
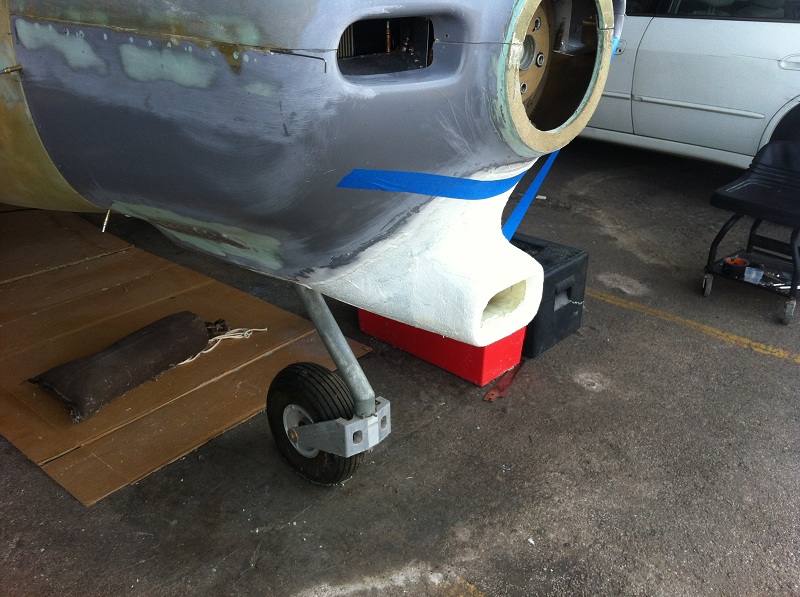
Saturday was another hotter than hell day of work on the plane. I spent the morning shaping the foam down to exactly what I had planned and I thought it looked pretty good. I then mixed up the micro-epoxy and started the fill in of the foam and the smoothing out of the form to the cowling. The fill in worked well for the first 15 or 20 minutes and then the heat (101 degrees) got to the epoxy and it started setting up in the cup. I managed to just barely finish what had to be done but had about 1/4 of the mix harden in the cup.<?xml:namespace prefix = o ns = "urn:schemas-microsoft-com:office:office" />
The first photo in each of the groupings was taken following the Saturday session.
I showed the photos to my wife that evening and she looked at all of the photos for several minutes, made a non-approving sound, and handed the iPhone back to me. Now after over 38 years of marriage I have learned to read her fairly well and when she doesn't like something I have done she never comes right out and says it "SUCKS" but I get the message just the same. Her response was one of those "well if you insist" it is ok but I would do it over. Truth was that while the results were exactly what I had planned, they were a disappointment to me as well. My wife just reflected back to me what she knew I was feeling.
Sunday morning, early Sunday morning, 4:30 am on Sunday morning, I am awake working on the plane in my mind as I usually do when I am trying to work out problems. I can see every part and mentally I try everything from tear it all out and start over to leave it as is and hope that when finished it will look ok. I have read several articles regarding the efficiency of the air inlets. One of the things I remembered was regarding the shape of the inside of the inlet and that the efficiency was improved by a rolled and expanding inlet. The major issue I saw with my initial try was the opening just looked too oversized and needed to be toned down. The whole thing just looked too bulky and out of proportion.
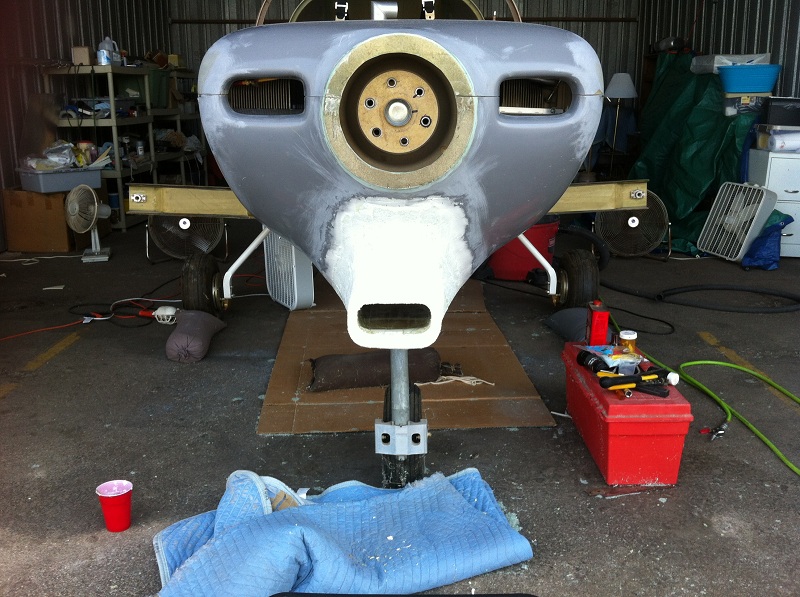
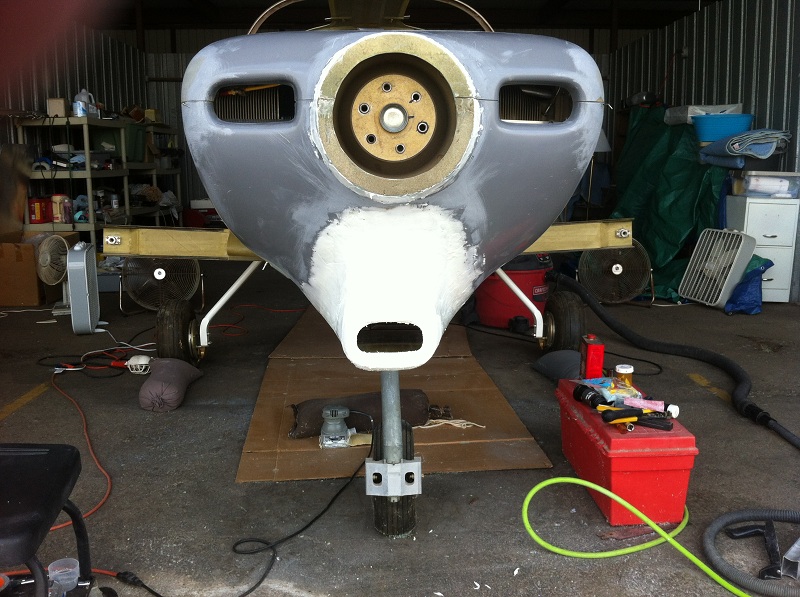
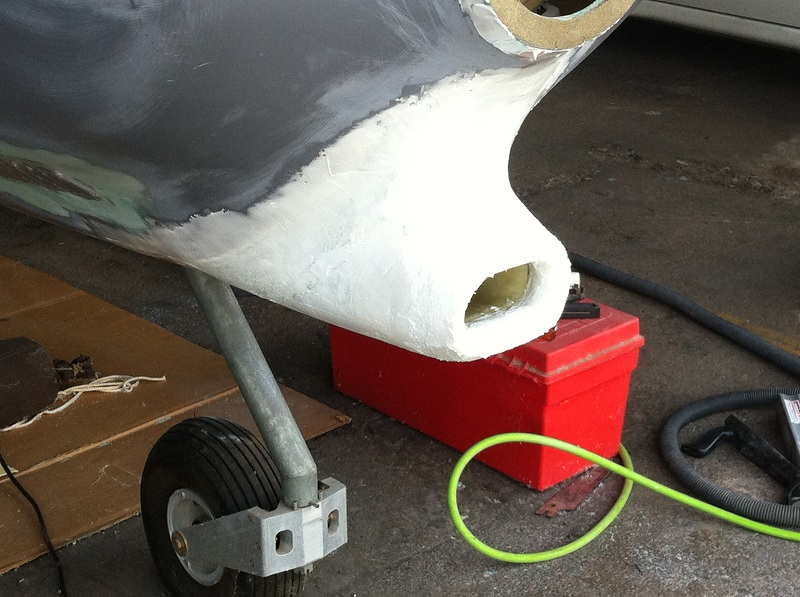
I didnât want to start over. I am at the point now where unless it is an issue of flight worthiness I am going to move on and NOT tear anything else down to start over. I want to get it flying! So the outcome of my 5am design session was to try and add some foam to the inside of the opening and trim down the outside to minimize the opening by a couple of inches. I bonded in a couple of foam inserts to the inside of the original opening and then shaped them to form a very rounded transition to the inside of the scoop. I then cut down the outside of the scoop around the opening and rolled it back into the original shape. Mixed another batch of epoxy-micro and filled everything in with the same problem as Saturday, almost 1/2 the batch setup before I could apply it. Can't understand, I was only 99 today.
The second photo in each pair is the resulting design. They are still somewhat rough with only the epoxy-micro applied and not smoothed out yet. I am much happier with the result and after showing the resulting photos to my wife I think I might be on fairly good ground. She liked it. The opening is almost 2 inches smaller in width and ½ inch in height. The outside shape is more rounded and aerodynamic. The changes arenât dramatic but when viewed from all angles I think it looks better.
I am thinking about shaping a small bit of a fish mouth into it when viewed from the side but not sure how it will look. Any comments?
Bob Reed
| | - The Matronics KIS-List Email Forum - | | | Use the List Feature Navigator to browse the many List utilities available such as the Email Subscriptions page, Archive Search & Download, 7-Day Browse, Chat, FAQ, Photoshare, and much more:
http://www.matronics.com/Navigator?KIS-List |
|
| Description: |
|
| Filesize: |
173.12 KB |
| Viewed: |
6362 Time(s) |
|
| Description: |
|
| Filesize: |
152.72 KB |
| Viewed: |
6362 Time(s) |
|
| Description: |
|
| Filesize: |
205.09 KB |
| Viewed: |
6362 Time(s) |
|
| Description: |
|
| Filesize: |
194.56 KB |
| Viewed: |
6362 Time(s) |
|
| Description: |
|
| Filesize: |
188.84 KB |
| Viewed: |
6362 Time(s) |
|
| Description: |
|
| Filesize: |
176.99 KB |
| Viewed: |
6362 Time(s) |
|
|
|
| Back to top |
|
 |
Flyinisfun(at)aol.com
Guest
|
| Posted: Sun Aug 11, 2013 7:53 pm Post subject: Cowling Air Scoop and my wife... |
|
|
Bob, I had the same problem with epoxy and heat until I got a small pan large enough and deep enough to handle about three large glasses of ice. Put the cans of resin and hardener in the ice, probably pour in a little water to get things going. Cool down the epoxy before mixing, then mix. Have another container the size of the mixed batch and put the cup or whatever into it. Keep the batch in the ice and mix it up there and use out of it as you need it. It will not flash off on you. You can get ice at McDonalds or your favorite fast foods place. You won't need all that much ice to do the trick.
Jesse Wright
In a message dated 8/11/2013 8:13:11 P.M. Mountain Daylight Time, robertr237(at)att.net writes:
| Quote: | Saturday was another hotter than hell day of work on the plane. I spent the morning shaping the foam down to exactly what I had planned and I thought it looked pretty good. I then mixed up the micro-epoxy and started the fill in of the foam and the smoothing out of the form to the cowling. The fill in worked well for the first 15 or 20 minutes and then the heat (101 degrees) got to the epoxy and it started setting up in the cup. I managed to just barely finish what had to be done but had about 1/4 of the mix harden in the cup.
The first photo in each of the groupings was taken following the Saturday session.
I showed the photos to my wife that evening and she looked at all of the photos for several minutes, made a non-approving sound, and handed the iPhone back to me. Now after over 38 years of marriage I have learned to read her fairly well and when she doesn't like something I have done she never comes right out and says it "SUCKS" but I get the message just the same. Her response was one of those "well if you insist" it is ok but I would do it over. Truth was that while the results were exactly what I had planned, they were a disappointment to me as well. My wife just reflected back to me what she knew I was feeling.
Sunday morning, early Sunday morning, 4:30 am on Sunday morning, I am awake working on the plane in my mind as I usually do when I am trying to work out problems. I can see every part and mentally I try everything from tear it all out and start over to leave it as is and hope that when finished it will look ok. I have read several articles regarding the efficiency of the air inlets. One of the things I remembered was regarding the shape of the inside of the inlet and that the efficiency was improved by a rolled and expanding inlet. The major issue I saw with my initial try was the opening just looked too oversized and needed to be toned down. The whole thing just looked too bulky and out of proportion.
I didnât want to start over. I am at the point now where unless it is an issue of flight worthiness I am going to move on and NOT tear anything else down to start over. I want to get it flying! So the outcome of my 5am design session was to try and add some foam to the inside of the opening and trim down the outside to minimize the opening by a couple of inches. I bonded in a couple of foam inserts to the inside of the original opening and then shaped them to form a very rounded transition to the inside of the scoop. I then cut down the outside of the scoop around the opening and rolled it back into the original shape. Mixed another batch of epoxy-micro and filled everything in with the same problem as Saturday, almost 1/2 the batch setup before I could apply it. Can't understand, I was only 99 today.
The second photo in each pair is the resulting design. They are still somewhat rough with only the epoxy-micro applied and not smoothed out yet. I am much happier with the result and after showing the resulting photos to my wife I think I might be on fairly good ground. She liked it. The opening is almost 2 inches smaller in width and ½ inch in height. The outside shape is more rounded and aerodynamic. The changes arenât dramatic but when viewed from all angles I think it looks better.
I am thinking about shaping a small bit of a fish mouth into it when viewed from the side but not sure how it will look. Any comments?
Bob Reed
|
[quote][b]
| | - The Matronics KIS-List Email Forum - | | | Use the List Feature Navigator to browse the many List utilities available such as the Email Subscriptions page, Archive Search & Download, 7-Day Browse, Chat, FAQ, Photoshare, and much more:
http://www.matronics.com/Navigator?KIS-List |
|
|
|
| Back to top |
|
|
fredorosa(at)gmail.com
Guest
|
| Posted: Mon Aug 12, 2013 4:58 am Post subject: Cowling Air Scoop and my wife... |
|
|
Bob,
I must be brutal- your wife was right- start over.
I dont see why the air box that came with the engine can't be adjusted to
work instead of resorting to this monstrous adaption. No offense intended.
I'm just too old to not tell it the way it is.
Al
On Sun, Aug 11, 2013 at 10:12 PM, Robert Reed <robertr237(at)att.net> wrote:
[quote] Saturday was another hotter than hell day of work on the plane. I spent
the morning shaping the foam down to exactly what I had planned and I
thought it looked pretty good. I then mixed up the micro-epoxy and started
the fill in of the foam and the smoothing out of the form to the cowling.
The fill in worked well for the first 15 or 20 minutes and then the heat
(101 degrees) got to the epoxy and it started setting up in the cup. I
managed to just barely finish what had to be done but had about 1/4 of the
mix harden in the cup.******
** **
The first photo in each of the groupings was taken following the Saturday
session.****
** **
I showed the photos to my wife that evening and she looked at all of the
photos for several minutes, made a non-approving sound, and handed the
iPhone back to me. Now after over 38 years of marriage I have learned to
read her fairly well and when she doesn't like something I have done she
never comes right out and says it "SUCKS" but I get the message just the
same. Her response was one of those "well if you insist" it is ok but I
would do it over. Truth was that while the results were exactly what I had
planned, they were a disappointment to me as well. My wife just reflected
back to me what she knew I was feeling. ****
** **
Sunday morning, early Sunday morning, 4:30 am on Sunday morning, I am
awake working on the plane in my mind as I usually do when I am trying to
work out problems. I can see every part and mentally I try everything from
tear it all out and start over to leave it as is and hope that when
finished it will look ok. I have read several articles regarding the
efficiency of the air inlets. One of the things I remembered was
regarding the shape of the inside of the inlet and that the efficiency was
improved by a rolled and expanding inlet. The major issue I saw with my
initial try was the opening just looked too oversized and needed to be
toned down. The whole thing just looked too bulky and out of proportion.*
***
** **
I didnt want to start over. I am at the point now where unless it is an
issue of flight worthiness I am going to move on and NOT tear anything else
down to start over. I want to get it flying! So the outcome of my 5am
design session was to try and add some foam to the inside of the opening
and trim down the outside to minimize the opening by a couple of inches. I
bonded in a couple of foam inserts to the inside of the original opening
and then shaped them to form a very rounded transition to the inside of the
scoop. I then cut down the outside of the scoop around the opening and
rolled it back into the original shape. Mixed another batch of epoxy-micro
and filled everything in with the same problem as Saturday, almost 1/2 the
batch setup before I could apply it. Can't understand, I was only 99 today.
****
The second photo in each pair is the resulting design. They are still
somewhat rough with only the epoxy-micro applied and not smoothed out yet
| | - The Matronics KIS-List Email Forum - | | | Use the List Feature Navigator to browse the many List utilities available such as the Email Subscriptions page, Archive Search & Download, 7-Day Browse, Chat, FAQ, Photoshare, and much more:
http://www.matronics.com/Navigator?KIS-List |
|
|
|
| Back to top |
|
|
Robert Reed
Joined: 22 Oct 2009
Posts: 331
Location: Dallas/Ft.Worth
|
| Posted: Mon Aug 12, 2013 6:06 am Post subject: Cowling Air Scoop and my wife... |
|
|
Jesse,
Thanks, I will give it a try this coming weekend. I have real concerns about doing the layups with the setup time being so short and that might just give the added time I need. Part of the problem is that even the parts are HOT and it becomes difficult to get the epoxy to stick and stay.
BOB
From: "Flyinisfun(at)aol.com" <Flyinisfun(at)aol.com>
To: kis-list(at)matronics.com
Sent: Sunday, August 11, 2013 10:53 PM
Subject: Re: Cowling Air Scoop and my wife...
Bob, I had the same problem with epoxy and heat until I got a small pan large enough and deep enough to handle about three large glasses of ice. Put the cans of resin and hardener in the ice, probably pour in a little water to get things going. Cool down the epoxy before mixing, then mix. Have another container the size of the mixed batch and put the cup or whatever into it. Keep the batch in the ice and mix it up there and use out of it as you need it. It will not flash off on you. You can get ice at McDonalds or your favorite fast foods place. You won't need all that much ice to do the trick.
Jesse Wright
In a message dated 8/11/2013 8:13:11 P.M. Mountain Daylight Time, robertr237(at)att.net writes:
| Quote: | Saturday was another hotter than hell day of work on the plane. I spent the morning shaping the foam down to exactly what I had planned and I thought it looked pretty good. I then mixed up the micro-epoxy and started the fill in of the foam and the smoothing out of the form to the cowling. The fill in worked well for the first 15 or 20 minutes and then the heat (101 degrees) got to the epoxy and it started setting up in the cup. I managed to just barely finish what had to be done but had about 1/4 of the mix harden in the cup.
The first photo in each of the groupings was taken following the Saturday session.
I showed the photos to my wife that evening and she looked at all of the photos for several minutes, made a non-approving sound, and handed the iPhone back to me. Now after over 38 years of marriage I have learned to read her fairly well and when she doesn't like something I have done she never comes right out and says it "SUCKS" but I get the message just the same. Her response was one of those "well if you insist" it is ok but I would do it over. Truth was that while the results were exactly what I had planned, they were a disappointment to me as well. My wife just reflected back to me what she knew I was feeling.
Sunday morning, early Sunday morning, 4:30 am on Sunday morning, I am awake working on the plane in my mind as I usually do when I am trying to work out problems. I can see every part and mentally I try everything from tear it all out and start over to leave it as is and hope that when finished it will look ok. I have read several articles regarding the efficiency of the air inlets. One of the things I remembered was regarding the shape of the inside of the inlet and that the efficiency was improved by a rolled and expanding inlet. The major issue I saw with my initial try was the opening just looked too oversized and needed to be toned down. The whole thing just looked too bulky and out of proportion.
I didnât want to start over. I am at the point now where unless it is an issue of flight worthiness I am going to move on and NOT tear anything else down to start over. I want to get it flying! So the outcome of my 5am design session was to try and add some foam to the inside of the opening and trim down the outside to minimize the opening by a couple of inches. I bonded in a couple of foam inserts to the inside of the original opening and then shaped them to form a very rounded transition to the inside of the scoop. I then cut down the outside of the scoop around the opening and rolled it back into the original shape. Mixed another batch of epoxy-micro and filled everything in with the same problem as Saturday, almost 1/2 the batch setup before I could apply it. Can't understand, I was only 99 today.
The second photo in each pair is the resulting design. They are still somewhat rough with only the epoxy-micro applied and not smoothed out yet. I am much happier with the result and after showing the resulting photos to my wife I think I might be on fairly good ground. She liked it. The opening is almost 2 inches smaller in width and ½ inch in height. The outside shape is more rounded and aerodynamic. The changes arenât dramatic but when viewed from all angles I think it looks better.
I am thinking about shaping a small bit of a fish mouth into it when viewed from the side but not sure how it will look. Any comments?
Bob Reed
|
[quote]http://www.matron://forums.matronics.com/" target="_blank" rel="nofollow">http://forums.==========
[b]
| | - The Matronics KIS-List Email Forum - | | | Use the List Feature Navigator to browse the many List utilities available such as the Email Subscriptions page, Archive Search & Download, 7-Day Browse, Chat, FAQ, Photoshare, and much more:
http://www.matronics.com/Navigator?KIS-List |
|
|
|
| Back to top |
|
|
Robert Reed
Joined: 22 Oct 2009
Posts: 331
Location: Dallas/Ft.Worth
|
| Posted: Mon Aug 12, 2013 6:13 am Post subject: Cowling Air Scoop and my wife... |
|
|
Al,
NO air box came with the engine and the throttle body that came with it was almost three inches longer than the standard so there was no choice. I found the smallest adaptable filtered air box I could but it still required cutting out the bottom of the cowling and stuck out to the front. I had the NACA vent installed but by the time I trimmed it out of the way and cut the bottom of the cowling for the air box there was no way to even try and adapt it. The alternatives were to custom fabricate and little else.
I am sorry YOU don't like it but to be equally brutal, unless you are willing to come and do it yourself it will have to do. I am tired of trying to make this a perfect plane and I just want to get it flying.
BOB
From: Alfred Rosa <fredorosa(at)gmail.com>
To: kisbuilders <kis-list(at)matronics.com>
Sent: Monday, August 12, 2013 7:57 AM
Subject: Re: Cowling Air Scoop and my wife...
Bob,
I must be brutal- your wife was right- start over.
I dont see why the air box that came with the engine can't be adjusted to work instead of resorting to this monstrous adaption. No offense intended. I'm just too old to not tell it the way it is.
Al
On Sun, Aug 11, 2013 at 10:12 PM, Robert Reed <robertr237(at)att.net (robertr237(at)att.net)> wrote:
[quote]
Saturday was another hotter than hell day of work on the plane. I spent the morning shaping the foam down to exactly what I had planned and I thought it looked pretty good. I then mixed up the micro-epoxy and started the fill in of the foam and the smoothing out of the form to the cowling. The fill in worked well for the first 15 or 20 minutes and then the heat (101 degrees) got to the epoxy and it started setting up in the cup. I managed to just barely finish what had to be done but had about 1/4 of the mix harden in the cup.
The first photo in each of the groupings was taken following the Saturday session.
I showed the photos to my wife that evening and she looked at all of the photos for several minutes, made a non-approving sound, and handed the iPhone back to me. Now after over 38 years of marriage I have learned to read her fairly well and when she doesn't like something I have done she never comes right out and says it "SUCKS" but I get the message just the same. Her response was one of those "well if you insist" it is ok but I would do it over. Truth was that while the results were exactly what I had planned, they were a disappointment to me as well. My wife just reflected back to me what she knew I was feeling.
Sunday morning, early Sunday morning, 4:30 am on Sunday morning, I am awake working on the plane in my mind as I usually do when I am trying to work out problems. I can see every part and mentally I try everything from tear it all out and start over to leave it as is and hope that when finished it will look ok. I have read several articles regarding the efficiency of the air inlets. One of the things I remembered was regarding the shape of the inside of the inlet and that the efficiency was improved by a rolled and expanding inlet. The major issue I saw with my initial try was the opening just looked too oversized and needed to be toned down. The whole thing just looked too bulky and out of proportion.
I didnât want to start over. I am at the point now where unless it is an issue of flight worthiness I am going to move on and NOT tear anything else down to start over. I want to get it flying! So the outcome of my 5am design session was to try and add some foam to the inside of the opening and trim down the outside to minimize the opening by a couple of inches. I bonded in a couple of foam inserts to the inside of the original opening and then shaped them to form a very rounded transition to the inside of the scoop. I then cut down the outside of the scoop around the opening and rolled it back into the original shape. Mixed another batch of epoxy-micro and filled everything in with the same problem as Saturday, almost 1/2 the batch setup before I could apply it. Can't understand, I was only 99 today.
The second photo in each pair is the resulting design. They are still somewhat rough with only the epoxy-micro applied and not smoothed out yet. I am much happier with the result and after showing the resulting photos to my wife I think I might be on fairly good ground. She liked it. The opening is almost 2 inches smaller in width and ½ inch in height. The outside shape is more rounded and aerodynamic. The changes arenât dramatic but when viewed from all angles I think it looks better.
I am thinking about shaping a small bit of a fish mouth into it when viewed from the side but not sure how it will look. Any comments?
Bob Reed
http://www.ma=====================
[b]
| | - The Matronics KIS-List Email Forum - | | | Use the List Feature Navigator to browse the many List utilities available such as the Email Subscriptions page, Archive Search & Download, 7-Day Browse, Chat, FAQ, Photoshare, and much more:
http://www.matronics.com/Navigator?KIS-List |
|
|
|
| Back to top |
|
|
mantafs(at)earthlink.net
Guest
|
| Posted: Mon Aug 12, 2013 6:20 am Post subject: Cowling Air Scoop and my wife... |
|
|
Hi Bob,


It is large and maybe not in line with the local airflow but it looks good and should work well.  Kind of like a turbine inlet!


Mark K

--
| | - The Matronics KIS-List Email Forum - | | | Use the List Feature Navigator to browse the many List utilities available such as the Email Subscriptions page, Archive Search & Download, 7-Day Browse, Chat, FAQ, Photoshare, and much more:
http://www.matronics.com/Navigator?KIS-List |
|
|
|
| Back to top |
|
|
Robert Reed
Joined: 22 Oct 2009
Posts: 331
Location: Dallas/Ft.Worth
|
| Posted: Mon Aug 12, 2013 6:51 am Post subject: Cowling Air Scoop and my wife... |
|
|
Mark,


What I tried to do was blend the scoop into the existing cowling as smoothly as possible using the existing profiles while providing the needed openings.  That involves a lot of different compound curves in each part.  I cut back the profile repeatedly to meet the objectives while keeping the airflow as smooth as possible.  Yes it is bigger than I had wanted but that is dictated more by the required opening size and the knowledge that layups don't turn tight radius curves very well.  I think it will look better when smoothed out and painted but even if it doesn't, it will perform effectively.


I enjoy building projects but more important, I enjoy completing and using those projects.   Over the years I have built a large deck, gazebo, swimming pool, greenhouse, and room additions onto my home.  I have gutted and remodeled master baths and kitchens and built all the cabinets myself.  Many of those projects were done while I was working on this plane.  All of them have been FINISHED except the airplane.  All of them also shared a couple of common elements... I have never finished a project that I didn't have something that I knew I could have done better but, and this is the important part, they were all finished and I got the pleasure of using them.  That is where I am at with this airplane, I can continue and finish it while I can still enjoy flying it or work on it forever and get noting out of it.  When Ted had to essentially give his airplane away because of health issues that prevented him from finishing and enjoying it that was the wakeup call for me.  Al has also tried to sell his project  because of age and commitment issues but found no takers without substantial loss of investment.


GET IT FINISHED!!!


Bob


   From: Mark Kettering <mantafs(at)earthlink.net>

 To: kis-list(at)matronics.com

 Sent: Monday, August 12, 2013 9:20 AM

 Subject: Re: Cowling Air Scoop and my wife...


 --> KIS-List message posted by: Mark Kettering <mantafs(at)earthlink.net (mantafs(at)earthlink.net)>


Hi Bob,


It is large and maybe not in line with the local airflow but it looks good and should work well.  Kind of like a turbine inlet!


Mark K

--
| | - The Matronics KIS-List Email Forum - | | | Use the List Feature Navigator to browse the many List utilities available such as the Email Subscriptions page, Archive Search & Download, 7-Day Browse, Chat, FAQ, Photoshare, and much more:
http://www.matronics.com/Navigator?KIS-List |
|
|
|
| Back to top |
|
|
Flyinisfun(at)aol.com
Guest
|
| Posted: Mon Aug 12, 2013 11:38 am Post subject: Cowling Air Scoop and my wife... |
|
|
Bob,
Are you scuffing up the part you are working with. Go over it with about 100 grit. Cool down the epoxy more than to room tempt so it will cool down the part some as well. Be sure not to reuse any vessel you put ice and epoxy cans in, for cooking or eating. Their contaminated. (Just a reminder) Good luck
Jesse
| Quote: | Jesse,
Thanks, I will give it a try this coming weekend. I have real concerns about doing the layups with the setup time being so short and that might just give the added time I need. Part of the problem is that even the parts are HOT and it becomes difficult to get the epoxy to stick and stay.
BOB
From: "Flyinisfun(at)aol.com" <Flyinisfun(at)aol.com>
To: kis-list(at)matronics.com
Sent: Sunday, August 11, 2013 10:53 PM
Subject: Re: KIS-List: Cowling Air Scoop and my wife...
Bob, I had the same problem with epoxy and heat until I got a small pan large enough and deep enough to handle about three large glasses of ice. Put the cans of resin and hardener in the ice, probably pour in a little water to get things going. Cool down the epoxy before mixing, then mix. Have another container the size of the mixed batch and put the cup or whatever into it. Keep the batch in the ice and mix it up there and use out of it as you need it. It will not flash off on you. You can get ice at McDonalds or your favorite fast foods place. You won't need all that much ice to do the trick.
Jesse Wright
In a message dated 8/11/2013 8:13:11 P.M. Mountain Daylight Time, robertr237(at)att.net writes:
| Quote: | Saturday was another hotter than hell day of work on the plane. I spent the morning shaping the foam down to exactly what I had planned and I thought it looked pretty good. I then mixed up the micro-epoxy and started the fill in of the foam and the smoothing out of the form to the cowling. The fill in worked well for the first 15 or 20 minutes and then the heat (101 degrees) got to the epoxy and it started setting up in the cup. I managed to just barely finish what had to be done but had about 1/4 of the mix harden in the cup.
The first photo in each of the groupings was taken following the Saturday session.
I showed the photos to my wife that evening and she looked at all of the photos for several minutes, made a non-approving sound, and handed the iPhone back to me. Now after over 38 years of marriage I have learned to read her fairly well and when she doesn't like something I have done she never comes right out and says it "SUCKS" but I get the message just the same. Her response was one of those "well if you insist" it is ok but I would do it over. Truth was that while the results were exactly what I had planned, they were a disappointment to me as well. My wife just reflected back to me what she knew I was feeling.
Sunday morning, early Sunday morning, 4:30 am on Sunday morning, I am awake working on the plane in my mind as I usually do when I am trying to work out problems. I can see every part and mentally I try everything from tear it all out and start over to leave it as is and hope that when finished it will look ok. I have read several articles regarding the efficiency of the air inlets. One of the things I remembered was regarding the shape of the inside of the inlet and that the efficiency was improved by a rolled and expanding inlet. The major issue I saw with my initial try was the opening just looked too oversized and needed to be toned down. The whole thing just looked too bulky and out of proportion.
I didnât want to start over. I am at the point now where unless it is an issue of flight worthiness I am going to move on and NOT tear anything else down to start over. I want to get it flying! So the outcome of my 5am design session was to try and add some foam to the inside of the opening and trim down the outside to minimize the opening by a couple of inches. I bonded in a couple of foam inserts to the inside of the original opening and then shaped them to form a very rounded transition to the inside of the scoop. I then cut down the outside of the scoop around the opening and rolled it back into the original shape. Mixed another batch of epoxy-micro and filled everything in with the same problem as Saturday, almost 1/2 the batch setup before I could apply it. Can't understand, I was only 99 today.
The second photo in each pair is the resulting design. They are still somewhat rough with only the epoxy-micro applied and not smoothed out yet. I am much happier with the result and after showing the resulting photos to my wife I think I might be on fairly good ground. She liked it. The opening is almost 2 inches smaller in width and ½ inch in height. The outside shape is more rounded and aerodynamic. The changes arenât dramatic but when viewed from all angles I think it looks better.
I am thinking about shaping a small bit of a fish mouth into it when viewed from the side but not sure how it will look. Any comments?
Bob Reed
|
|
[quote][b]
| | - The Matronics KIS-List Email Forum - | | | Use the List Feature Navigator to browse the many List utilities available such as the Email Subscriptions page, Archive Search & Download, 7-Day Browse, Chat, FAQ, Photoshare, and much more:
http://www.matronics.com/Navigator?KIS-List |
|
|
|
| Back to top |
|
|
Robert Reed
Joined: 22 Oct 2009
Posts: 331
Location: Dallas/Ft.Worth
|
| Posted: Mon Aug 12, 2013 12:06 pm Post subject: Cowling Air Scoop and my wife... |
|
|
Jesse,
For the mold formation I am using 80 grit to scuff the micro mix after cure before applying more or applying the layups. I am shaping using several different Perma-Grit tools. It works great for free form molding if you don't mind getting covered in foam and dust in 100 degree heat. The problem with the last coating of micro-epoxy was probably a result of too dry a mixture combined with the heat. I had some problems with the first application sagging so I probably over compensated a little.
Thanks,
BOB
From: "Flyinisfun(at)aol.com" <Flyinisfun(at)aol.com>
To: kis-list(at)matronics.com
Sent: Monday, August 12, 2013 2:37 PM
Subject: Re: KIS-List: Cowling Air Scoop and my wife...
Bob,
Are you scuffing up the part you are working with. Go over it with about 100 grit. Cool down the epoxy more than to room tempt so it will cool down the part some as well. Be sure not to reuse any vessel you put ice and epoxy cans in, for cooking or eating. Their contaminated. (Just a reminder) Good luck
Jesse
| Quote: | Jesse,
Thanks, I will give it a try this coming weekend. I have real concerns about doing the layups with the setup time being so short and that might just give the added time I need. Part of the problem is that even the parts are HOT and it becomes difficult to get the epoxy to stick and stay.
BOB
From: "Flyinisfun(at)aol.com" <Flyinisfun(at)aol.com>
To: kis-list(at)matronics.com
Sent: Sunday, August 11, 2013 10:53 PM
Subject: Re: Cowling Air Scoop and my wife...
Bob, I had the same problem with epoxy and heat until I got a small pan large enough and deep enough to handle about three large glasses of ice. Put the cans of resin and hardener in the ice, probably pour in a little water to get things going. Cool down the epoxy before mixing, then mix. Have another container the size of the mixed batch and put the cup or whatever into it. Keep the batch in the ice and mix it up there and use out of it as you need it. It will not flash off on you. You can get ice at McDonalds or your favorite fast foods place. You won't need all that much ice to do the trick.
Jesse Wright
In a message dated 8/11/2013 8:13:11 P.M. Mountain Daylight Time, robertr237(at)att.net writes:
| Quote: | Saturday was another hotter than hell day of work on the plane. I spent the morning shaping the foam down to exactly what I had planned and I thought it looked pretty good. I then mixed up the micro-epoxy and started the fill in of the foam and the smoothing out of the form to the cowling. The fill in worked well for the first 15 or 20 minutes and then the heat (101 degrees) got to the epoxy and it started setting up in the cup. I managed to just barely finish what had to be done but had about 1/4 of the mix harden in the cup.
The first photo in each of the groupings was taken following the Saturday session.
I showed the photos to my wife that evening and she looked at all of the photos for several minutes, made a non-approving sound, and handed the iPhone back to me. Now after over 38 years of marriage I have learned to read her fairly well and when she doesn't like something I have done she never comes right out and says it "SUCKS" but I get the message just the same. Her response was one of those "well if you insist" it is ok but I would do it over. Truth was that while the results were exactly what I had planned, they were a disappointment to me as well. My wife just reflected back to me what she knew I was feeling.
Sunday morning, early Sunday morning, 4:30 am on Sunday morning, I am awake working on the plane in my mind as I usually do when I am trying to work out problems. I can see every part and mentally I try everything from tear it all out and start over to leave it as is and hope that when finished it will look ok. I have read several articles regarding the efficiency of the air inlets. One of the things I remembered was regarding the shape of the inside of the inlet and that the efficiency was improved by a rolled and expanding inlet. The major issue I saw with my initial try was the opening just looked too oversized and needed to be toned down. The whole thing just looked too bulky and out of proportion.
I didnât want to start over. I am at the point now where unless it is an issue of flight worthiness I am going to move on and NOT tear anything else down to start over. I want to get it flying! So the outcome of my 5am design session was to try and add some foam to the inside of the opening and trim down the outside to minimize the opening by a couple of inches. I bonded in a couple of foam inserts to the inside of the original opening and then shaped them to form a very rounded transition to the inside of the scoop. I then cut down the outside of the scoop around the opening and rolled it back into the original shape. Mixed another batch of epoxy-micro and filled everything in with the same problem as Saturday, almost 1/2 the batch setup before I could apply it. Can't understand, I was only 99 today.
The second photo in each pair is the resulting design. They are still somewhat rough with only the epoxy-micro applied and not smoothed out yet. I am much happier with the result and after showing the resulting photos to my wife I think I might be on fairly good ground. She liked it. The opening is almost 2 inches smaller in width and ½ inch in height. The outside shape is more rounded and aerodynamic. The changes arenât dramatic but when viewed from all angles I think it looks better.
I am thinking about shaping a small bit of a fish mouth into it when viewed from the side but not sure how it will look. Any comments?
Bob Reed
|
|
[quote]http://www.matronics.com/Navigatnics.com/" target="_blank" rel="nofollow">http://forums.matronics.com/< [b]
| | - The Matronics KIS-List Email Forum - | | | Use the List Feature Navigator to browse the many List utilities available such as the Email Subscriptions page, Archive Search & Download, 7-Day Browse, Chat, FAQ, Photoshare, and much more:
http://www.matronics.com/Navigator?KIS-List |
|
|
|
| Back to top |
|
|
sstearns2(at)yahoo.com
Guest
|
| Posted: Mon Aug 12, 2013 12:55 pm Post subject: Cowling Air Scoop and my wife... |
|
|
It will look so much better when painted and just tell people you want it ready for the turbine conersion!
Covering the foam with aluminum tape instead of micro/sanding might be easier. And work at night!
Scott
On Aug 12, 2013, at 12:37 PM, Flyinisfun(at)aol.com (Flyinisfun(at)aol.com) wrote:
[quote]
Bob,
Are you scuffing up the part you are working with. Go over it with about 100 grit. Cool down the epoxy more than to room tempt so it will cool down the part some as well. Be sure not to reuse any vessel you put ice and epoxy cans in, for cooking or eating. Their contaminated. (Just a reminder) Good luck
Jesse
| Quote: | Jesse,
Thanks, I will give it a try this coming weekend. I have real concerns about doing the layups with the setup time being so short and that might just give the added time I need. Part of the problem is that even the parts are HOT and it becomes difficult to get the epoxy to stick and stay.
BOB
From: "Flyinisfun(at)aol.com (Flyinisfun(at)aol.com)" <Flyinisfun(at)aol.com (Flyinisfun(at)aol.com)>
To: kis-list(at)matronics.com (kis-list(at)matronics.com)
Sent: Sunday, August 11, 2013 10:53 PM
Subject: Re: KIS-List: Cowling Air Scoop and my wife...
Bob, I had the same problem with epoxy and heat until I got a small pan large enough and deep enough to handle about three large glasses of ice. Put the cans of resin and hardener in the ice, probably pour in a little water to get things going. Cool down the epoxy before mixing, then mix. Have another container the size of the mixed batch and put the cup or whatever into it. Keep the batch in the ice and mix it up there and use out of it as you need it. It will not flash off on you. You can get ice at McDonalds or your favorite fast foods place. You won't need all that much ice to do the trick.
Jesse Wright
In a message dated 8/11/2013 8:13:11 P.M. Mountain Daylight Time, robertr237(at)att.net (robertr237(at)att.net) writes:
| Quote: | Saturday was another hotter than hell day of work on the plane. I spent the morning shaping the foam down to exactly what I had planned and I thought it looked pretty good. I then mixed up the micro-epoxy and started the fill in of the foam and the smoothing out of the form to the cowling. The fill in worked well for the first 15 or 20 minutes and then the heat (101 degrees) got to the epoxy and it started setting up in the cup. I managed to just barely finish what had to be done but had about 1/4 of the mix harden in the cup.
The first photo in each of the groupings was taken following the Saturday session.
I showed the photos to my wife that evening and she looked at all of the photos for several minutes, made a non-approving sound, and handed the iPhone back to me. Now after over 38 years of marriage I have learned to read her fairly well and when she doesn't like something I have done she never comes right out and says it "SUCKS" but I get the message just the same. Her response was one of those "well if you insist" it is ok but I would do it over. Truth was that while the results were exactly what I had planned, they were a disappointment to me as well. My wife just reflected back to me what she knew I was feeling.
Sunday morning, early Sunday morning, 4:30 am on Sunday morning, I am awake working on the plane in my mind as I usually do when I am trying to work out problems. I can see every part and mentally I try everything from tear it all out and start over to leave it as is and hope that when finished it will look ok. I have read several articles regarding the efficiency of the air inlets. One of the things I remembered was regarding the shape of the inside of the inlet and that the efficiency was improved by a rolled and expanding inlet. The major issue I saw with my initial try was the opening just looked too oversized and needed to be toned down. The whole thing just looked too bulky and out of proportion.
I didnât want to start over. I am at the point now where unless it is an issue of flight worthiness I am going to move on and NOT tear anything else down to start over. I want to get it flying! So the outcome of my 5am design session was to try and add some foam to the inside of the opening and trim down the outside to minimize the opening by a couple of inches. I bonded in a couple of foam inserts to the inside of the original opening and then shaped them to form a very rounded transition to the inside of the scoop. I then cut down the outside of the scoop around the opening and rolled it back into the original shape. Mixed another batch of epoxy-micro and filled everything in with the same problem as Saturday, almost 1/2 the batch setup before I could apply it. Can't understand, I was only 99 today.
The second photo in each pair is the resulting design. They are still somewhat rough with only the epoxy-micro applied and not smoothed out yet. I am much happier with the result and after showing the resulting photos to my wife I think I might be on fairly good ground. She liked it. The opening is almost 2 inches smaller in width and ½ inch in height. The outside shape is more rounded and aerodynamic. The changes arenât dramatic but when viewed from all angles I think it looks better.
I am thinking about shaping a small bit of a fish mouth into it when viewed from the side but not sure how it will look. Any comments?
Bob Reed
|
|
| Quote: |
===================================
//www.matronics.com/Navigator?KIS-List
===================================
cs.com
===================================
matronics.com/contribution
===================================
|
[b]
| | - The Matronics KIS-List Email Forum - | | | Use the List Feature Navigator to browse the many List utilities available such as the Email Subscriptions page, Archive Search & Download, 7-Day Browse, Chat, FAQ, Photoshare, and much more:
http://www.matronics.com/Navigator?KIS-List |
|
|
|
| Back to top |
|
|
Keith.Miller(at)esa.int
Guest
|
| Posted: Tue Aug 13, 2013 4:06 am Post subject: Cowling Air Scoop and my wife... |
|
|
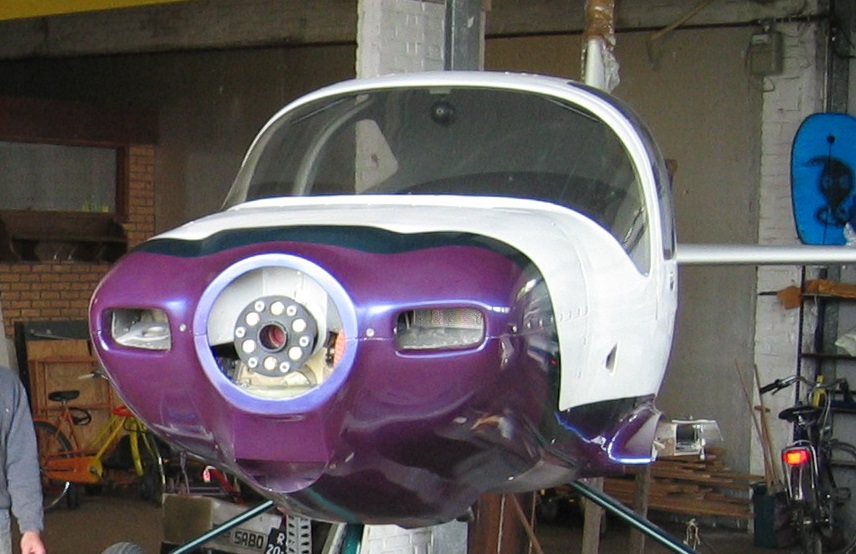
when i was building my Tr1 , when I showed my wife the new intake scope she
also gave a similar non- approval look, but said nothing . But I knew that
it was best to have a second go. Since she bases her buying of new cars on
if they look happy from the front so I had to redesign the scoop
accordingly and got the thumbs up - no idea which would have been more
efficient
apologies for the quality of the the old scoop photo but it was pre
digital .
(See attached file: old scoop.pdf)(See attached file: New intake.jpg)
Keith
From: Scott Stearns <sstearns2(at)yahoo.com>
To: "kis-list(at)matronics.com" <kis-list(at)matronics.com>,
Date: 08/12/2013 10:59 PM
Subject: Re: KIS-List: Cowling Air Scoop and my wife...
Sent by: owner-kis-list-server(at)matronics.com
It will look so much better when painted and just tell people you want it
ready for the turbine conersion!
Covering the foam with aluminum tape instead of micro/sanding might be
easier. And work at night!
Scott
On Aug 12, 2013, at 12:37 PM, Flyinisfun(at)aol.com wrote:
Bob,
Are you scuffing up the part you are working with. Go over it with
about 100 grit. Cool down the epoxy more than to room tempt so it will
cool down the part some as well. Be sure not to reuse any vessel you
put ice and epoxy cans in, for cooking or eating. Their contaminated.
(Just a reminder) Good luck
Jesse
Jesse,
Thanks, I will give it a try this coming weekend. I have real
concerns about doing the layups with the setup time being so short and
that might just give the added time I need. Part of the problem is
that even the parts are HOT and it becomes difficult to get the epoxy
to stick and stay.
BOB
From: "Flyinisfun(at)aol.com" <Flyinisfun(at)aol.com>
To: kis-list(at)matronics.com
Sent: Sunday, August 11, 2013 10:53 PM
Subject: Re: KIS-List: Cowling Air Scoop and my wife...
Bob, I had the same problem with epoxy and heat until I got a small
pan large enough and deep enough to handle about three large glasses
of ice. Put the cans of resin and hardener in the ice, probably pour
in a little water to get things going. Cool down the epoxy before
mixing, then mix. Have another container the size of the mixed batch
and put the cup or whatever into it. Keep the batch in the ice and
mix it up there and use out of it as you need it. It will not flash
off on you. You can get ice at McDonalds or your favorite fast foods
place. You won't need all that much ice to do the trick.
Jesse Wright
In a message dated 8/11/2013 8:13:11 P.M. Mountain Daylight Time,
robertr237(at)att.net writes:
Saturday was another hotter than hell day of work on the plane. I
spent the morning shaping the foam down to exactly what I had planned
and I thought it looked pretty good. I then mixed up the micro-epoxy
and started the fill in of the foam and the smoothing out of the form
to the cowling. The fill in worked well for the first 15 or 20 minutes
and then the heat (101 degrees) got to the epoxy and it started
setting up in the cup. I managed to just barely finish what had to be
done but had about 1/4 of the mix harden in the cup.
The first photo in each of the groupings was taken following the
Saturday session.
I showed the photos to my wife that evening and she looked at all of
the photos for several minutes, made a non-approving sound, and handed
the iPhone back to me. Now after over 38 years of marriage I have
learned to read her fairly well and when she doesn't like something I
have done she never comes right out and says it "SUCKS" but I get the
message just the same. Her response was one of those "well if you
insist" it is ok but I would do it over. Truth was that while the
results were exactly what I had planned, they were a disappointment to
me as well. My wife just reflected back to me what she knew I was
feeling.
Sunday morning, early Sunday morning, 4:30 am on Sunday morning, I am
awake working on the plane in my mind as I usually do when I am trying
to work out problems. I can see every part and mentally I try
everything from tear it all out and start over to leave it as is and
hope that when finished it will look ok. I have read several articles
regarding the efficiency of the air inlets. One of the things I
remembered was regarding the shape of the inside of the inlet and that
the efficiency was improved by a rolled and expanding inlet. The
major issue I saw with my initial try was the opening just looked too
oversized and needed to be toned down. The whole thing just looked
too bulky and out of proportion.
I didnât want to start over. I am at the point now where unless it is
an issue of flight worthiness I am going to move on and NOT tear
anything else down to start over. I want to get it flying! So the
outcome of my 5am design session was to try and add some foam to the
inside of the opening and trim down the outside to minimize the
opening by a couple of inches. I bonded in a couple of foam inserts
to the inside of the original opening and then shaped them to form a
very rounded transition to the inside of the scoop. I then cut down
the outside of the scoop around the opening and rolled it back into
the original shape. Mixed another batch of epoxy-micro and filled
everything in with the same problem as Saturday, almost 1/2 the batch
setup before I could apply it. Can't understand, I was only 99 today.
The second photo in each pair is the resulting design. They are still
somewhat rough with only the epoxy-micro applied and not smoothed out
yet. I am much happier with the result and after showing the
resulting photos to my wife I think I might be on fairly good ground.
She liked it. The opening is almost 2 inches smaller in width and ½
inch in height. The outside shape is more rounded and aerodynamic.
The changes arenât dramatic but when viewed from all angles I think it
looks better.
I am thinking about shaping a small bit of a fish mouth into it when
viewed from the side but not sure how it will look. Any comments?
Bob Reed
http://www.matron://forums.matronics.com/" target="_blank"
rel="nofollow">http://forums.==========
="http://www.matronics.com/Navigator?KIS-List">
http://www.matronics.com/Navigator?KIS-List
s.matronics.com/">http://forums.matronics.com
p://www.matronics.com/contribution">
http://www.matronics.com/contribution
===================================
//www.matronics.com/Navigator?KIS-List
===================================
cs.com
===================================
matronics.com/contribution
===================================
| | - The Matronics KIS-List Email Forum - | | | Use the List Feature Navigator to browse the many List utilities available such as the Email Subscriptions page, Archive Search & Download, 7-Day Browse, Chat, FAQ, Photoshare, and much more:
http://www.matronics.com/Navigator?KIS-List |
|
| Description: |
|
| Filesize: |
154.71 KB |
| Viewed: |
6342 Time(s) |
|
| Description: |
|

Download |
| Filename: |
old_scoop.pdf |
| Filesize: |
155.28 KB |
| Downloaded: |
291 Time(s) |
|
|
| Back to top |
|
|
mjpienaar(at)shaw.ca
Guest
|
| Posted: Tue Aug 13, 2013 6:23 am Post subject: Cowling Air Scoop and my wife... |
|
|
Bob,


 I know how you feel, also got the wake-up call that  there are not too many years left. I wasted too much time trying to do do it  perfectly and have now decided not to correct any issues that can wait. You have  plenty of winters ahead of you to correct whatever you are not happy  with.


 Mike

 [quote]   ---
| | - The Matronics KIS-List Email Forum - | | | Use the List Feature Navigator to browse the many List utilities available such as the Email Subscriptions page, Archive Search & Download, 7-Day Browse, Chat, FAQ, Photoshare, and much more:
http://www.matronics.com/Navigator?KIS-List |
|
|
|
| Back to top |
|
|
|
|
You cannot post new topics in this forum
You cannot reply to topics in this forum
You cannot edit your posts in this forum
You cannot delete your posts in this forum
You cannot vote in polls in this forum
You cannot attach files in this forum
You can download files in this forum
|
Powered by phpBB © 2001, 2005 phpBB Group
|

