 |
Matronics Email Lists
Web Forum Interface to the Matronics Email Lists
|
| View previous topic :: View next topic |
| Author |
Message |
trigo(at)mail.telepac.pt
Guest
|
 Posted: Thu Feb 09, 2017 7:45 am Post subject: Cabin cover bottom Posted: Thu Feb 09, 2017 7:45 am Post subject: Cabin cover bottom |
 |
|
Guys


The bottom surface of the pink fiberglass cabin cover, which will act as the cockpit ceiling, has 2 different surfaces.

The one in the aft part, which will cover the back seats and the baggage compartment, is very smooth, and seems to be almost finished.

The one over the front seats, around the doors hinges holes, is very very rough.


How did you finish these 2 different surfaces?


Regards

Carlos

Enviado do meu iPhone
| | - The Matronics RV10-List Email Forum - | | | Use the List Feature Navigator to browse the many List utilities available such as the Email Subscriptions page, Archive Search & Download, 7-Day Browse, Chat, FAQ, Photoshare, and much more:
http://www.matronics.com/Navigator?RV10-List |
|
|
|
| Back to top |
|
 |
jrlark
Joined: 03 Jul 2009
Posts: 72
|
| Posted: Thu Feb 09, 2017 8:12 am Post subject: Cabin cover bottom |
|
|
Carlos, lots of filler and sanding of both...

#40956

C-GDMH


--
| | - The Matronics RV10-List Email Forum - | | | Use the List Feature Navigator to browse the many List utilities available such as the Email Subscriptions page, Archive Search & Download, 7-Day Browse, Chat, FAQ, Photoshare, and much more:
http://www.matronics.com/Navigator?RV10-List |
|
|
|
| Back to top |
|
|
philperry9
Joined: 23 Nov 2011
Posts: 381
|
| Posted: Thu Feb 09, 2017 8:13 am Post subject: Cabin cover bottom |
|
|
Sand and fill.
Sand and fill.
Sand and fill.
Sand and fill again.
Sand and fill one more time.
Now you're getting close.
Sand and fill.
Sand and fill.
Oh wait, you're not as close as we thought.
Sand and fill some more.
And again.
And again.
Now you get to work on pin holes!
Sent from my iPhone
| Quote: | On Feb 9, 2017, at 9:41 AM, Carlos Trigo <trigo(at)mail.telepac.pt> wrote:
Guys
The bottom surface of the pink fiberglass cabin cover, which will act as the cockpit ceiling, has 2 different surfaces.
The one in the aft part, which will cover the back seats and the baggage compartment, is very smooth, and seems to be almost finished.
The one over the front seats, around the doors hinges holes, is very very rough.
How did you finish these 2 different surfaces?
Regards
Carlos
Enviado do meu iPhone
====================================
|
====================================
====================================
====================================
====================================
| | - The Matronics RV10-List Email Forum - | | | Use the List Feature Navigator to browse the many List utilities available such as the Email Subscriptions page, Archive Search & Download, 7-Day Browse, Chat, FAQ, Photoshare, and much more:
http://www.matronics.com/Navigator?RV10-List |
|
| Description: |
|
| Filesize: |
69.13 KB |
| Viewed: |
14223 Time(s) |
|
|
|
| Back to top |
|
|
rjones560xl@gmail.com
Joined: 29 Jul 2015
Posts: 64
Location: Las Vegas, NV
|
| Posted: Thu Feb 09, 2017 8:33 am Post subject: Cabin cover bottom |
|
|
I put the carbon fiber overhead duct in but finishing would be the same. I shaded down the really high spots with a 3 inch disk sander and took the shine off everywhere. Them I mixed up some Westsystem 105 epoxy and some micro faring filler and spread it everywhere. The aft part I used a long board sander on and around the curves I just tried to get nice smooth curves with whatever soft material (like a sponge) worked. It took quite a few coats to get it smooth. I bonded the aluminum backup strips for the rivets on before I finished it so the edge of the aluminum would not show and painted it before I riveted it on the aircraft. The bag side of the cabin cover is pretty bad. I may leave it painted or cover it with some thin foam backed material like they use in modern cars. At least I have I nice smooth surface now. It was a lot easier to finish it laying upside down.
Robert Jones
702-521-1840
| Quote: | On Feb 9, 2017, at 09:41, Carlos Trigo <trigo(at)mail.telepac.pt> wrote:
Guys
The bottom surface of the pink fiberglass cabin cover, which will act as the cockpit ceiling, has 2 different surfaces.
The one in the aft part, which will cover the back seats and the baggage compartment, is very smooth, and seems to be almost finished.
The one over the front seats, around the doors hinges holes, is very very rough.
How did you finish these 2 different surfaces?
Regards
Carlos
Enviado do meu iPhone
|
| | - The Matronics RV10-List Email Forum - | | | Use the List Feature Navigator to browse the many List utilities available such as the Email Subscriptions page, Archive Search & Download, 7-Day Browse, Chat, FAQ, Photoshare, and much more:
http://www.matronics.com/Navigator?RV10-List |
|
_________________
Robert J Jones
702-521-1840 |
|
| Back to top |
|
|
Mauledriver(at)nc.rr.com
Guest
|
| Posted: Thu Feb 09, 2017 8:37 am Post subject: Cabin cover bottom |
|
|
You can glue headliner fabric over the whole thing and not otherwise
touch it.
Using the right adhesive results in an easy and nice job (automotive
headline adhesive recommended by Flightline). However, the edges are a
challenge that I never solved. Still unhappy.
Bill "never wanting to touch the top again if I can help it" Watson
On 2/9/2017 10:41 AM, Carlos Trigo wrote:
| Quote: |
Guys
The bottom surface of the pink fiberglass cabin cover, which will act as the cockpit ceiling, has 2 different surfaces.
The one in the aft part, which will cover the back seats and the baggage compartment, is very smooth, and seems to be almost finished.
The one over the front seats, around the doors hinges holes, is very very rough.
How did you finish these 2 different surfaces?
Regards
Carlos
|
---
This email has been checked for viruses by Avast antivirus software.
https://www.avast.com/antivirus
| | - The Matronics RV10-List Email Forum - | | | Use the List Feature Navigator to browse the many List utilities available such as the Email Subscriptions page, Archive Search & Download, 7-Day Browse, Chat, FAQ, Photoshare, and much more:
http://www.matronics.com/Navigator?RV10-List |
|
|
|
| Back to top |
|
|
carl.froehlich(at)verizon
Guest
|
| Posted: Thu Feb 09, 2017 8:49 am Post subject: Cabin cover bottom |
|
|
Carlos,


I used micro to fill in the rough areas on the forward side, along with a

lot of sanding.  The forward side got painted the same color as the rest of

the interior.  On the aft side I put up a 3/8" thick marine grade vinyl

backed foam, and covered that with a matching interior cloth (from

Cleaveland Tool).  If I had to do it today, I would prep and paint the front

as before, but use this high textured product on the aft side:

http://www.zolatone.com/


A Lancair IV neighbor did this with his plane and it looks great.  It is a

fraction of the work, very light, and will last forever.


Carl


--
| | - The Matronics RV10-List Email Forum - | | | Use the List Feature Navigator to browse the many List utilities available such as the Email Subscriptions page, Archive Search & Download, 7-Day Browse, Chat, FAQ, Photoshare, and much more:
http://www.matronics.com/Navigator?RV10-List |
|
|
|
| Back to top |
|
|
trigo(at)mail.telepac.pt
Guest
|
| Posted: Thu Feb 09, 2017 10:13 am Post subject: Cabin cover bottom |
|
|
Dammit!


Why did I ask this question?

I should have known that I didn't want to know the answer!...


Thanks Philip

I guess I have to hire some patient "Sand & Fill" dude ....


Carlos


-----Mensagem original-----

De: owner-rv10-list-server(at)matronics.com

[mailto:owner-rv10-list-server(at)matronics.com] Em nome de Phillip Perry

Enviada: Thursday, February 9, 2017 4:13 PM

Para: rv10-list(at)matronics.com

Assunto: Re: Cabin cover bottom


Sand and fill.

Sand and fill.

Sand and fill.

Sand and fill again.

Sand and fill one more time.


Now you're getting close.


Sand and fill.

Sand and fill.


Oh wait, you're not as close as we thought.


Sand and fill some more.

And again.

And again.


Now you get to work on pin holes!
| | - The Matronics RV10-List Email Forum - | | | Use the List Feature Navigator to browse the many List utilities available such as the Email Subscriptions page, Archive Search & Download, 7-Day Browse, Chat, FAQ, Photoshare, and much more:
http://www.matronics.com/Navigator?RV10-List |
|
|
|
| Back to top |
|
|
trigo(at)mail.telepac.pt
Guest
|
| Posted: Thu Feb 09, 2017 10:16 am Post subject: Cabin cover bottom |
|
|
And when should that be done?

Before permanently installing the cabin cover in the fuselage?


And how about the door hinges installation?, can that be done after all that

sand & fill work?


Carlos


-----Mensagem original-----

De: owner-rv10-list-server(at)matronics.com

[mailto:owner-rv10-list-server(at)matronics.com] Em nome de Rick Lark

Enviada: Thursday, February 9, 2017 4:09 PM

Para: rv10-list(at)matronics.com

Assunto: RE: Cabin cover bottom


Carlos, lots of filler and sanding of both...

#40956

C-GDMH


--
| | - The Matronics RV10-List Email Forum - | | | Use the List Feature Navigator to browse the many List utilities available such as the Email Subscriptions page, Archive Search & Download, 7-Day Browse, Chat, FAQ, Photoshare, and much more:
http://www.matronics.com/Navigator?RV10-List |
|
|
|
| Back to top |
|
|
rene(at)felker.com
Guest
|
| Posted: Thu Feb 09, 2017 10:25 am Post subject: Cabin cover bottom |
|
|
I used headliner....2 people about 1 hour.  Doing the trim a little longer.

I did a little prep before hand, but mostly dealing with the retractable

shoulder harness pads, etc.


Rene'

801-721-6080


--
| | - The Matronics RV10-List Email Forum - | | | Use the List Feature Navigator to browse the many List utilities available such as the Email Subscriptions page, Archive Search & Download, 7-Day Browse, Chat, FAQ, Photoshare, and much more:
http://www.matronics.com/Navigator?RV10-List |
|
|
|
| Back to top |
|
|
philperry9
Joined: 23 Nov 2011
Posts: 381
|
| Posted: Thu Feb 09, 2017 10:27 am Post subject: Cabin cover bottom |
|
|
If I had it to do again, I'd sand off the high spots. Fill the lows to match. Then glue in a foam backed headliner to cover the imperfections.
Then I'd be fine with it and move on.
The cabin top has been the worst part of the project for me. Even over the doors.
I had planned on putting a headliner in mine, but after all the work I put into mine to make it look awesome, I decided to not cover it up.
So mine is exposed now, but I'd cover it if I ever did another.
Sent from my iPhone
| Quote: | On Feb 9, 2017, at 12:10 PM, Carlos Trigo <trigo(at)mail.telepac.pt> wrote:
Dammit!
Why did I ask this question?
I should have known that I didn't want to know the answer!...
Thanks Philip
I guess I have to hire some patient "Sand & Fill" dude ....
Carlos
-----Mensagem original-----
De: owner-rv10-list-server(at)matronics.com
[mailto:owner-rv10-list-server(at)matronics.com] Em nome de Phillip Perry
Enviada: Thursday, February 9, 2017 4:13 PM
Para: rv10-list(at)matronics.com
Assunto: Re: Cabin cover bottom
Sand and fill.
Sand and fill.
Sand and fill.
Sand and fill again.
Sand and fill one more time.
Now you're getting close.
Sand and fill.
Sand and fill.
Oh wait, you're not as close as we thought.
Sand and fill some more.
And again.
And again.
Now you get to work on pin holes!
|
| | - The Matronics RV10-List Email Forum - | | | Use the List Feature Navigator to browse the many List utilities available such as the Email Subscriptions page, Archive Search & Download, 7-Day Browse, Chat, FAQ, Photoshare, and much more:
http://www.matronics.com/Navigator?RV10-List |
|
|
|
| Back to top |
|
|
Dave Saylor
Joined: 11 Jan 2015
Posts: 210
Location: GILROY, CA
|
| Posted: Thu Feb 09, 2017 10:37 am Post subject: Cabin cover bottom |
|
|
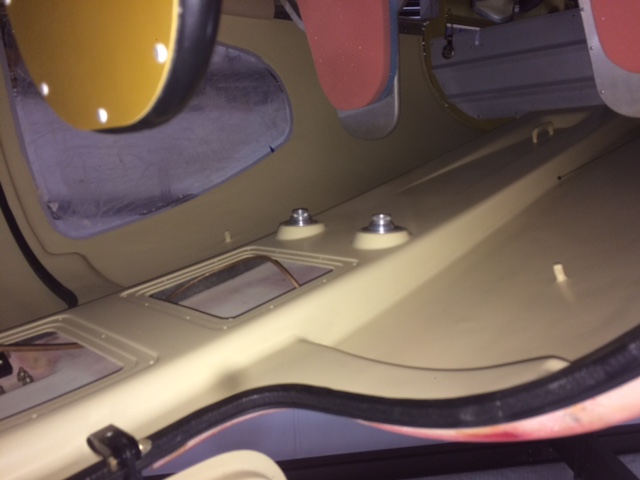
I was lucky in that I was based next to an aircraft interior shop. We used a combination of textured truck bed liner paint and automotive type headliner. I let the paint show in areas that are hard to cover with cloth, like around the windows. The upper door areas are painted to conserve headroom. This kit comes with the spray gun. I had it tinted at my local paint supplier. Worked great and easy to apply:
http://tinyurl.com/j7bclgy
Here's an example of the finished paint surface and the headliner.
[img]cid:ii_15a2426ac22ef90d[/img]
Also, the areas that tend to be touched a lot are painted so they're easy to clean.
--Dave
On Thu, Feb 9, 2017 at 7:41 AM, Carlos Trigo <trigo(at)mail.telepac.pt (trigo(at)mail.telepac.pt)> wrote:
| Quote: | --> RV10-List message posted by: Carlos Trigo <trigo(at)mail.telepac.pt (trigo(at)mail.telepac.pt)>
Guys
The bottom surface of the pink fiberglass cabin cover, which will act as the cockpit ceiling, has 2 different surfaces.
The one in the aft part, which will cover the back seats and the baggage compartment, is very smooth, and seems to be almost finished.
The one over the front seats, around the doors hinges holes, is very very rough.
How did you finish these 2 different surfaces?
Regards
Carlos
Enviado do meu iPhone
====================================
-List" rel="noreferrer" target="_blank">http://www.matronics.com/Navigator?RV10-List
====================================
FORUMS -
eferrer" target="_blank">http://forums.matronics.com
====================================
WIKI -
errer" target="_blank">http://wiki.matronics.com
====================================
b Site -
-Matt Dralle, List Admin.
rel="noreferrer" target="_blank">http://www.matronics.com/contribution
====================================
|
| | - The Matronics RV10-List Email Forum - | | | Use the List Feature Navigator to browse the many List utilities available such as the Email Subscriptions page, Archive Search & Download, 7-Day Browse, Chat, FAQ, Photoshare, and much more:
http://www.matronics.com/Navigator?RV10-List |
|
| Description: |
|
| Filesize: |
2.84 MB |
| Viewed: |
14222 Time(s) |

|
_________________
--Dave
KWVI |
|
| Back to top |
|
|
rv10flyer(at)live.com
Guest
|
| Posted: Thu Feb 09, 2017 10:51 am Post subject: Cabin cover bottom |
|
|
I sprayed sound insulation and ceramic "truckliner" on my cabin top, has a orangepeel look to it and I love it! No idea if its any quieter and temperature difference than without it, but it sure was easy to complete- never really sanded anything

I BTW sprayed the same mixture on my firewall- and it does block noise and heat, but I put more on both sides on FW than I did on cabin area. In all cases the area remains solid with no peeling whatsoever.

I used Lizardskin sound and ceramic gallons, but I think there are less expensive options that would accomplish the same goal of covering over an area quickly. As a note the ceramic can be sanded smooth, the sound insulator is more a rubbery non sandable area. Additionally throwing micro balloons into the ceramic makes it even easier to smooth out.

Pascal


--
| | - The Matronics RV10-List Email Forum - | | | Use the List Feature Navigator to browse the many List utilities available such as the Email Subscriptions page, Archive Search & Download, 7-Day Browse, Chat, FAQ, Photoshare, and much more:
http://www.matronics.com/Navigator?RV10-List |
|
|
|
| Back to top |
|
|
flying-nut(at)cfl.rr.com
Guest
|
| Posted: Thu Feb 09, 2017 11:25 am Post subject: Cabin cover bottom |
|
|
I used Zolatone on the inside of the cabin on mine. Darker on the lower

half ..... height of door sill, and a lighter color from there up.  I

sprayed it with my HF gun.

Linn

On 2/9/2017 11:49 AM, Carl Froehlich wrote:

[quote]


 Carlos,


 I used micro to fill in the rough areas on the forward side, along with a

 lot of sanding.  The forward side got painted the same color as the rest of

 the interior.  On the aft side I put up a 3/8" thick marine grade vinyl

 backed foam, and covered that with a matching interior cloth (from

 Cleaveland Tool).  If I had to do it today, I would prep and paint the front

 as before, but use this high textured product on the aft side:

 http://www.zolatone.com/


 A Lancair IV neighbor did this with his plane and it looks great.  It is a

 fraction of the work, very light, and will last forever.


 Carl


 --
| | - The Matronics RV10-List Email Forum - | | | Use the List Feature Navigator to browse the many List utilities available such as the Email Subscriptions page, Archive Search & Download, 7-Day Browse, Chat, FAQ, Photoshare, and much more:
http://www.matronics.com/Navigator?RV10-List |
|
|
|
| Back to top |
|
|
jrlark
Joined: 03 Jul 2009
Posts: 72
|
| Posted: Thu Feb 09, 2017 1:00 pm Post subject: Cabin cover bottom |
|
|
Carlos as others have indicated, it all depends on how you finish the

interior.  Like Phil, I also painted my cabin top, with high gloss urethane

no less, so it took a lot of work (I also made my own overhead console so it

all worked out together).  I would do almost all of the work before

installing the top.  Same thing with the door hinges.

I figured out what position the cabin top would be in when installed, and

did about 80% of my door fitting on a work bench, then finished it up on the

fuse.

Take your time and think it all through.  If you can get this far in the

build, the remainder will come as well, just takes time.

Rick


--
| | - The Matronics RV10-List Email Forum - | | | Use the List Feature Navigator to browse the many List utilities available such as the Email Subscriptions page, Archive Search & Download, 7-Day Browse, Chat, FAQ, Photoshare, and much more:
http://www.matronics.com/Navigator?RV10-List |
|
|
|
| Back to top |
|
|
|
|
You cannot post new topics in this forum
You cannot reply to topics in this forum
You cannot edit your posts in this forum
You cannot delete your posts in this forum
You cannot vote in polls in this forum
You cannot attach files in this forum
You can download files in this forum
|
Powered by phpBB © 2001, 2005 phpBB Group
|

